Tiworker.exe high CPU problem is reported by tons of Windows users including the latest Windows 11. The Tiworker.exe process keeps running in the background for checking and downloading the system updates.
This is the reason while performing its action the high CPU usage problem occurs and many times the Windows system starts crashing.
So, if you are also wondering how to prevent the high disk usage problem, then in this tutorial you will find the different potential ways to fix TiWorker.exe high CPU problem on Windows system.
To repair corrupted Windows system files, we recommend Advanced System Repair:
This software is your one stop solution to fix Windows errors, protect you from malware, clean junks and optimize your PC for maximum performance in 3 easy steps:
- Download Advanaced System Repair rated Excellent on Trustpilot.
- Click Install & Scan Now to install & scan issues causing the PC problems.
- Next, click on Click Here to Fix All Issues Now to fix, clean, protect and optimize your PC effectively.
What is TiWorker.exe?
TiWorker.exe is a sub-process of TrustedInstaller.exe and a part of the Windows Module Installer Service. It is present on your PC in the location “C:\Windows\servicing“. This Module as a whole is responsible for Windows updates on your PC.
And therefore, it runs in the Windows system background to check for the latest Windows updates. Generally, this module won’t use the system resources (RAM, CPU or hard disk) till it starts working.
Once the update process is finished, TiWorker.exe releases the computer resources. But in some cases, just after the startup of a computer, it is seen that the TiWorker.exe process uses up a lot of CPU resources making it very slow. This is the reason you need to stop the tiworker.exe service from running.
Note: You should not disable or uninstall the process as it may result in your PC not being able to get important Windows security updates.
Why is TiWorker.exe Causing a High CPU?
The TiWorker.exe is causing the high CPU problem due to a number of reasons:
- Your Windows system is outdated.
- The 3rd party applications installed sometime use the high disk and lead to the problem.
- The Servicing Stack update service compresses some Windows update files and causes the TiWorker.exe issue.
- Sometimes while playing games or running high-demanding apps the problem occurs.
Moreover, it is found that some malware pretends to be TiWorker.exe. Thus before starting with the solutions here, it is suggested to scan your PC with a good antivirus program to check for viruses or malware infection
Get SpyHunter to Remove Viruses or Malware Completely
Now, follow the instructions mentioned below to fix TiWorker.exe Windows 10 high CPU problem.
How To Fix TiWorker.exe High CPU?
Solution 1: Run System Maintenance Troubleshooter Tool
The System Maintenance Troubleshooter is a tool inbuilt into Microsoft Windows to automatically do computer maintenance tasks on a regular basis to prevent errors in the system beforehand.
To run a System Maintenance Troubleshooter, follow these steps:
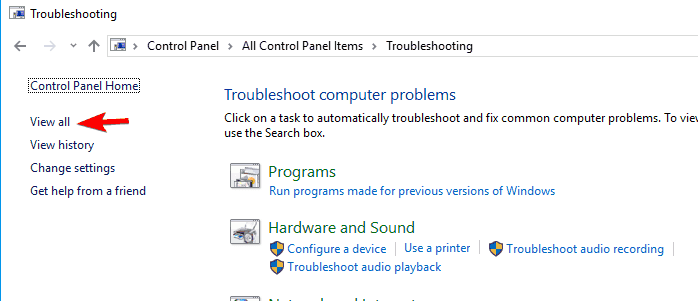
- Press the Win+S key simultaneously and write “troubleshooting” in the search bar
- Select the Troubleshooting
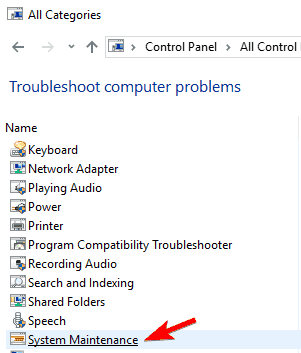
- Now press View all
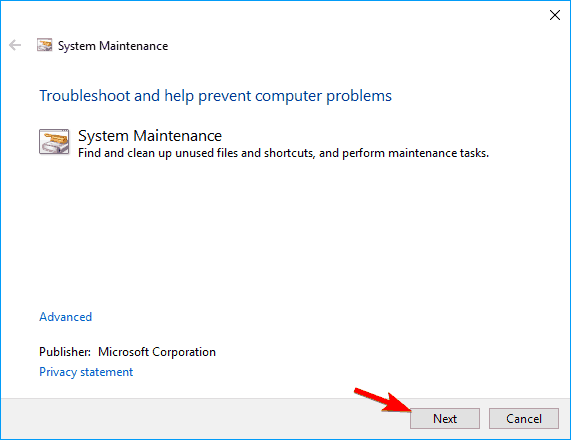
- Then select System Maintenance
- Click the next button and follow the prompts from there
Now check if the problem is solved or not. If not then follow the next solution.
Solution 2: Update your Windows
Updating the Windows version can work to stop TiWorker.exe high CPU on startup. As it stops the module from keep checking about the Windows update and prevents it from running in the background
To update your Windows follow the steps:
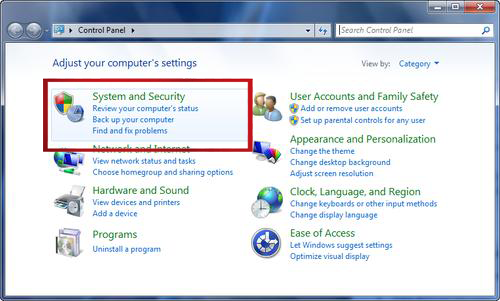
- In the taskbar search box type control panel and press
- Click on Windows updates from the left corner and then press check for updates.
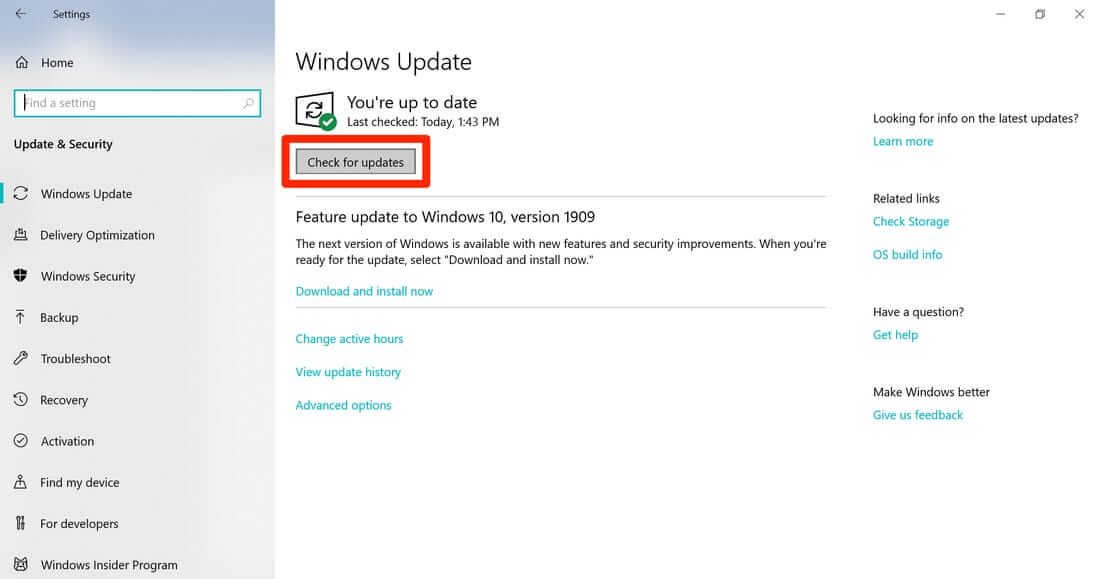
- After the updating process is finished restart the PC.
Now check if TiWorker.exe is slowing down the system or not.
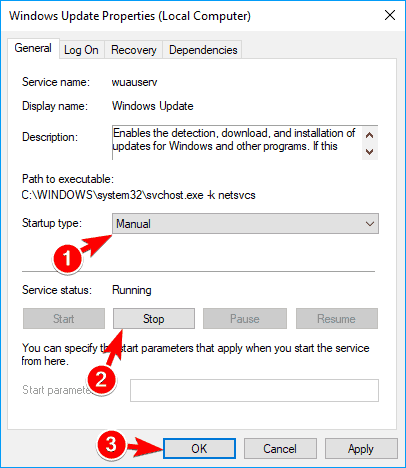
Solution 3: Restart Windows Update Service
Many users claimed that restarting the Windows Update Service will fix Tiworker.exe issue. So, it is suggested to follow the steps to do so.
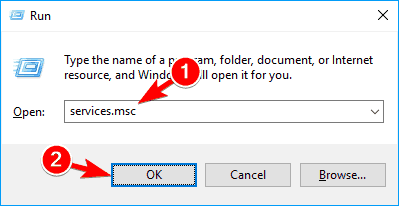
- Press Windows + R keys to launch the Run dialog box.
- Type services.msc in the box and click on the OK button.
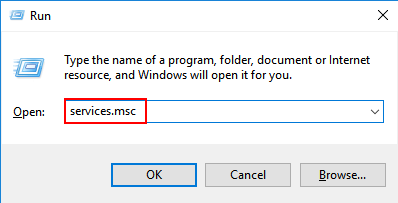
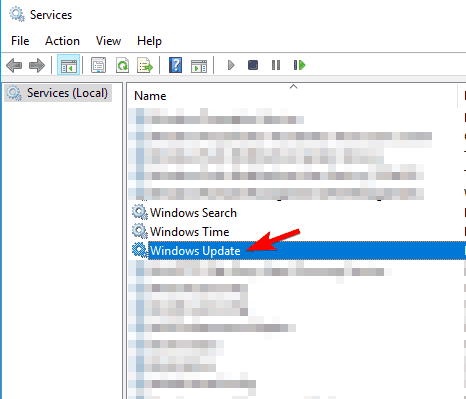
- On the Services window, search for Windows Update and click on it.
- Click on the Restart link given on the left side of the panel.
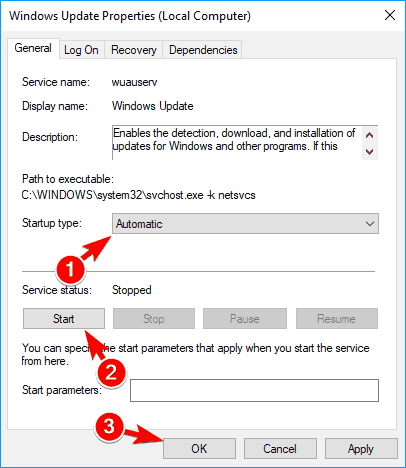
Solution 4: Delete Windows Update Files
If the Windows Update files present on your computer are damaged or corrupted, then it will lead to a high CPU usage issue. In this case, deleting the Windows Update files will fix the issue.
Windows Update service stores all the files in a specific folder called SoftwareDistribution. So, go to this folder and clear the files.
- Press Win + R keys and type services.msc in the Run box press the Enter key.
- On the Services window, click on Windows Update.
- Click on the Stop option.
- Now, open File Explorer and go to this folder:
C:\Windows
- Right-click on the SoftwareDistribution and select the Delete option.
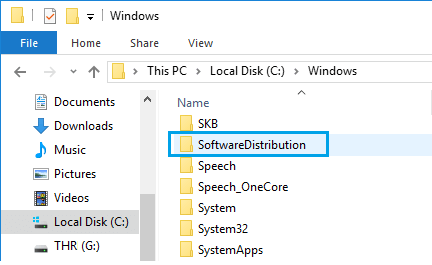
- Now, restart the Windows Update service and check if the Tiworker.exe high disk usage on Windows 10 problem has been fixed or not.
Solution 5: Clear all Updated history
Many users have reported that the temporary files of the PC can cause TiWorker.exe to slow it down. Thus it is suggested you clear all temp files from your system.
To delete the temp files simply go to C:Windows/Temp and find and delete the updates folder. Then restart your PC and check if the TiWorker.exe is still causing the PC to slow down.
Solution 6: Run Windows Update Troubleshooter
Here it is suggested to run the inbuilt Windows update troubleshooter, as this scans and fixes the possible problem related to Windows updates. And as the TiWorker.exe service is related to Windows updates so running the troubleshooter might work for you to solve the problem.
- Launch the Control Panel by pressing the Windows + R key and typing control in the run box and hitting Enter.
- Now in the Control Panel click on the View by option and click on Large icons and click on the Troubleshooting
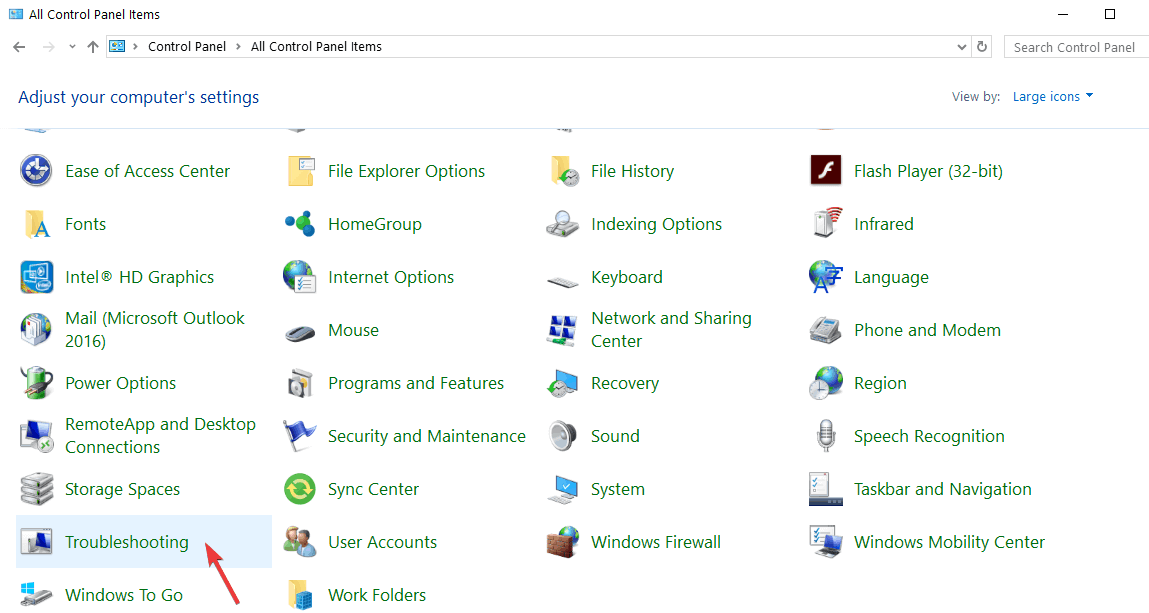
- Then click in the System and Security option and click on the option Fix problems with Windows Update.
- A new window appears click on next and follows the onscreen instructions for running the Windows update troubleshooter.
Wait for the scanning process to finish and check if the tiworker.exe high CPU problem is fixed or still seeing the problem.
Solution 7: Run SFC & DISM scan
It is likely that your TiWorker.exe has gone corrupt and is malfunctioning. That’s why here it is suggested to run an SFC scan. This is inbuilt that just by scanning once repair corrupted Windows files.
To perform a System File Checker scan follow the steps:
- Press Win+X and click on the command prompt (admin)
- Input the command sfc/scannow and press ENTER
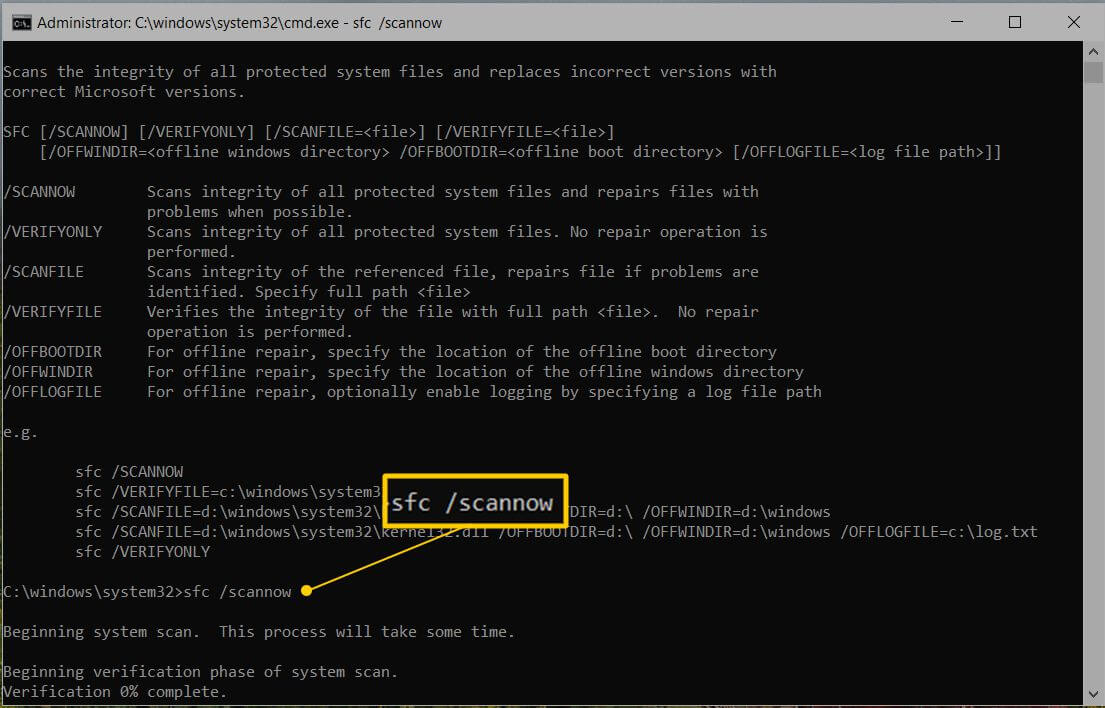
- Wait patiently for the process to complete
Now the problem should be fixed but if it isn’t then you have to run a DISM scan. To perform a DISM scan follow the steps:
- Press Win+X and click on the command prompt (admin)
- Type DISM.exe/Online /Cleanup-Image /RestoreHealth and hit Enter
- Be patient while the DISM scanning is going on, it can take upwards of 15 minutes to complete.
After the completion of both, the scans restart your system and check if the TiWorker.exe high disk usage problem is resolved or not.
Solution 7: Rename the SoftwareDistribution directory
If the SoftwareDistribution directory is corrupted it can cause the TiWorker.exe high CPU issue and make your PC slow. In that case, you have to rename the directory.
Follow the steps to rename the SoftwareDistribution directory:
- Press Win+R simultaneously to open the run dialogue box.
- Type services.msc and press OK
- Search and double click on Windows update
- Change the startup type to manual and click on stop
- Now click on Apply
- Go to the C:Windows, search for SoftwareDistribution and rename it to old
- Now again go to services and open Windows updates
- Then change the startup type to Automatic and click on Start
- Press Apply
Now restart your PC and check if the problem was solved.
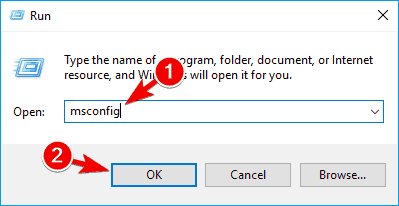
Solution 8: Perform a Clean Boot
A clean boot is required to be done to find if any application is interfering with TiWorker.exe and causing it to slow down your PC.
To clean boot your System, follow the steps:
- Press Win+R simultaneously to open the Run dialogue box
- Type “msconfig” and press ENTER
- In the services, window check the checkbox named “Hide all Microsoft services” and then click on disable all.
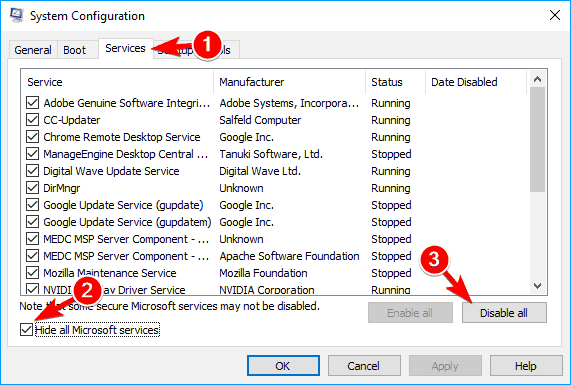
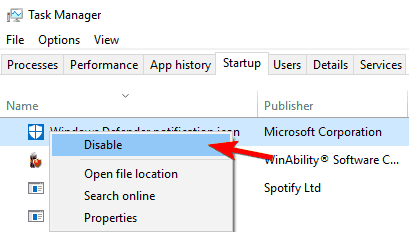
- Now move to the Startup tab and press open task manager
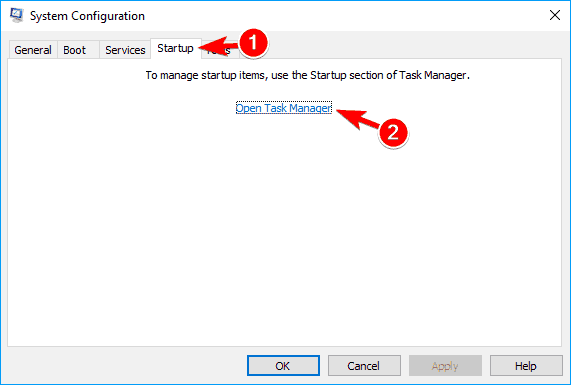
- Disable all the startup applications one by one
- Now move to system configuration and press Apply

Now restart your PC and check if the problem was solved. If not then enable all the disabled applications one by one and restart the PC every time until you find the process which was causing the problem.
Once the problematic application is found either update it or uninstall it.
Solution 1o: Exclude TiWorker.exe from Windows Defender
It is found that Windows Defender keeps on scanning the TiWorker.exe and in turn, increasing the CPU usage. In that case, you should exclude TiWorker.exe from Windows Defender and tiworker.exe Windows 10 high CPU problem should be solved.
Follow the steps to exclude TiWorker.exe from Windows Defender:
- Right-click on the taskbar and select task manager to open the task manager
- Right-click on TiWorker.exe and click on Open File Location
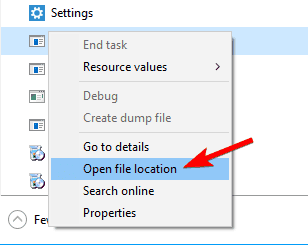
- Copy the path of this directory
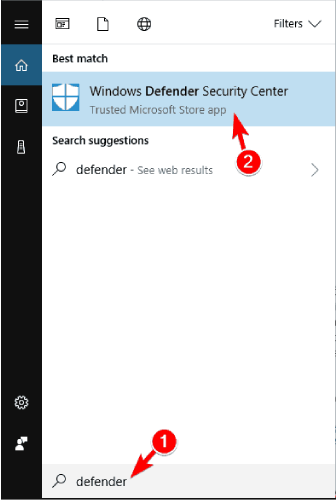
- Press Win+S and search for Windows Defender
- Now click on Windows Defender Security Center
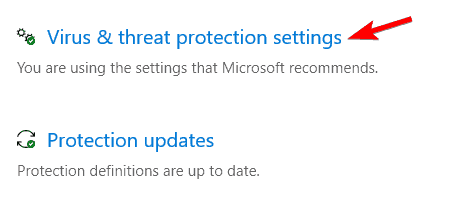
- Move to Virus and threat protection.

- Now click on the virus and threat protection settings.
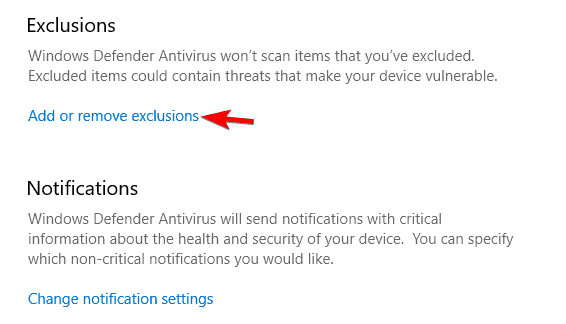
- Then press the add or remove exclusions option in the exclusion section
- Then click on Add an Exclusion and choose the folder
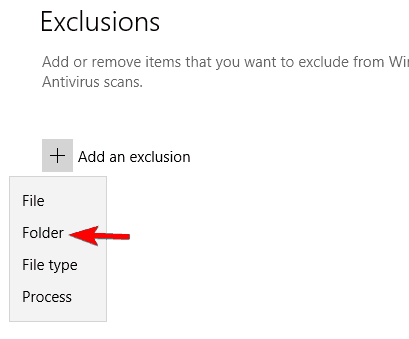
- And now paste the directory path that you copied
Now the Defender won’t scan your system. Restart the computer and check if the problem is resolved.
Recommended Solution to Fix Various Windows Errors
If your PC is running slow due to TiWorker.exe or due to any other problem then it is recommended to run the PC Repair Tool. This is a multifunction tool that just by scanning once detects and fixes various Windows 10 issues and errors.
This is also capable to fix other PC issues like BSOD errors, DLL errors, repair registry entries, runtime errors, application errors, and many others. So, feel free to download and install the tool.
Get PC Repair Tool, to Fix Windows Issues & Errors
FAQ: Learn More About TiWorker.exe
1. What is TiWorker EXE?
The TiWorker.exe is a part of the Windows Module Installer Service and is present in your PC at 'C:Windowsservicing'. This Module as a whole is responsible for Windows updates in your PC.
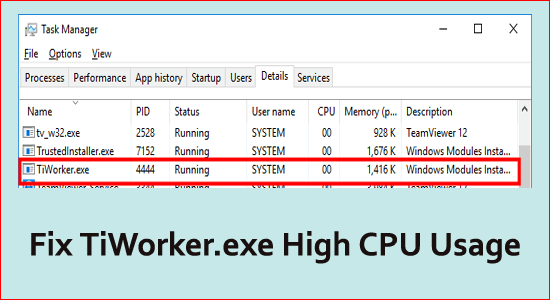
2. Where is tiworker exe on task manager?
You can find the application Windows Modules Installer Worker in the processes tab in task manager. And the TiWorker.exe file can be found in the details tab of the task manager.
3. Can I kill TiWorker EXE?
You should not disable or uninstall the process as it may result in your PC not being able to get important Windows security updates.
Conclusion:
So, this is all about the TiWorker.exe high CPU on Windows.
I hope now the TiWorker.exe is disabled and the high disk usage problem is fixed. However, if all the above-mentioned solutions fail to solve the issue then reinstalling your Windows 10 OS may work for you. Make sure to back up your data and reinstall Windows.
Also, we love to hear from our readers, do let us know which solution works for you. Also, do like and share the article on our Facebook page.
Good Luck..!
Hardeep has always been a Windows lover ever since she got her hands on her first Windows XP PC. She has always been enthusiastic about technological stuff, especially Artificial Intelligence (AI) computing. Before joining PC Error Fix, she worked as a freelancer and worked on numerous technical projects.