The automatic repair couldn’t repair your PC error is seen when you try to run the Startup Repair, which fails on the Windows 10 or 11 system.
If you also see the error, this article will help you to fix the error and start using this inbuilt repair tool. Automatic Repair is the Windows 10 & 11 inbuilt tool meant to fix booting failure errors and unexpected shutdowns due to internal corruption or malfunctions. When the Windows operating system fails to boot, Automatic Repair fixes the bugs preventing Windows from running properly.
Though it automatically repairs and fixes the errors, sometimes, due to some limitations, this tool may not work and interfere with the smooth booting of the system, thus making it a dreaded problem for the user.
The Startup Repair fails as there are files that are missing or corrupted from your OS installation file folder, and when it fails, you will not be able to boot through the Safe Mode.
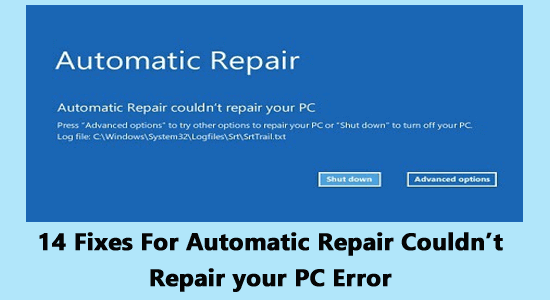
And most of the time, the Windows Automatic Repair failure option displays the error message such as:
Automatic Repair couldn’t repair your PC. Press “Advanced options” to try other options to repair your PC or “Shut down” to turn off your PC. Log file: C:\WINDOWS\System32\Logfiles\Srt\SrtTrail.txt or automatic repair couldn’t repair your pc log file srttrail.txt
Well, the startup repair couldn’t repair your PC is a strange error, but luckily there are solutions that work for you to resolve automatic repair couldn’t repair your PC.
There are other error messages also related to the Automatic Repair failure; here have a look at some of the common ones:
- Windows 10 automatic repair failed
- bootrec.exe /fixboot access denied
- log file c /windows/system32/logfiles/srt/srttrail.txt Windows 10
- bootrec.exe /fixboot access is denied Windows 10
- The Windows 10 automatic repair your pc did not start correctly
In such a situation when the Automatic Repair tool cannot repair your PC, then Recovery Drive/System Repair or Bootable installation media can be helpful.
However, there are some noteworthy methods explained step by step you can follow to fix automatic repair couldn’t repair your PC error on Windows 10/11. But first, look at the common culprit causing the error here.
To repair corrupted Windows system files, we recommend Advanced System Repair:
This software is your one stop solution to fix Windows errors, protect you from malware, clean junks and optimize your PC for maximum performance in 3 easy steps:
- Download Advanaced System Repair rated Excellent on Trustpilot.
- Click Install & Scan Now to install & scan issues causing the PC problems.
- Next, click on Click Here to Fix All Issues Now to fix, clean, protect and optimize your PC effectively.
What Causes “Automatic Repair Couldn’t Repair your PC”?
There are many reasons why Automatic repair couldn’t repair your PC error. Here has a look at some of the common ones:
- The corrupted or broken system files
- Corrupted or problematic Windows update
- Hard drive corruption
- Damaged or corrupted Windows Boot Manager files
How to Fix Automatic Repair Couldn’t Repair Your PC?
Fix 1: Using Command Prompt from Boot Options Menu
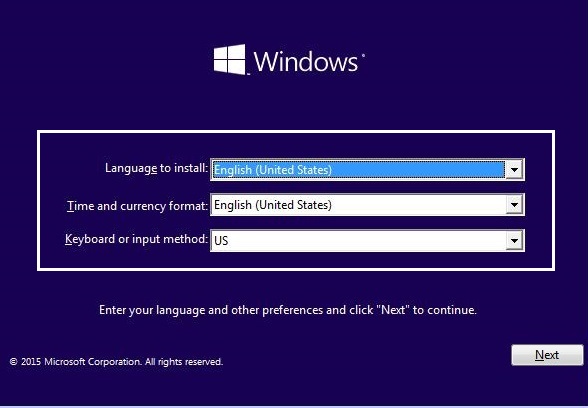
1. Insert the Windows installation media or recovery drive/System Repair Disc, select language preferences from the drop-down menu, and click Next.
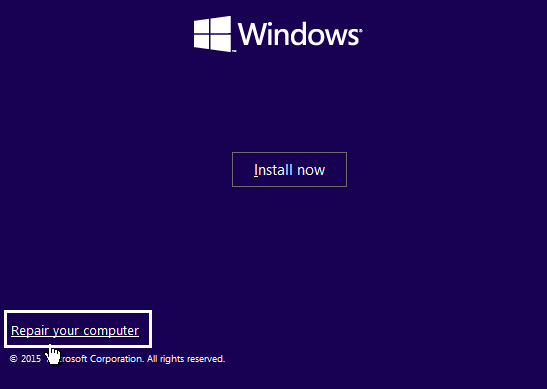
2. Click the Repair your computer button at the bottom left corner.
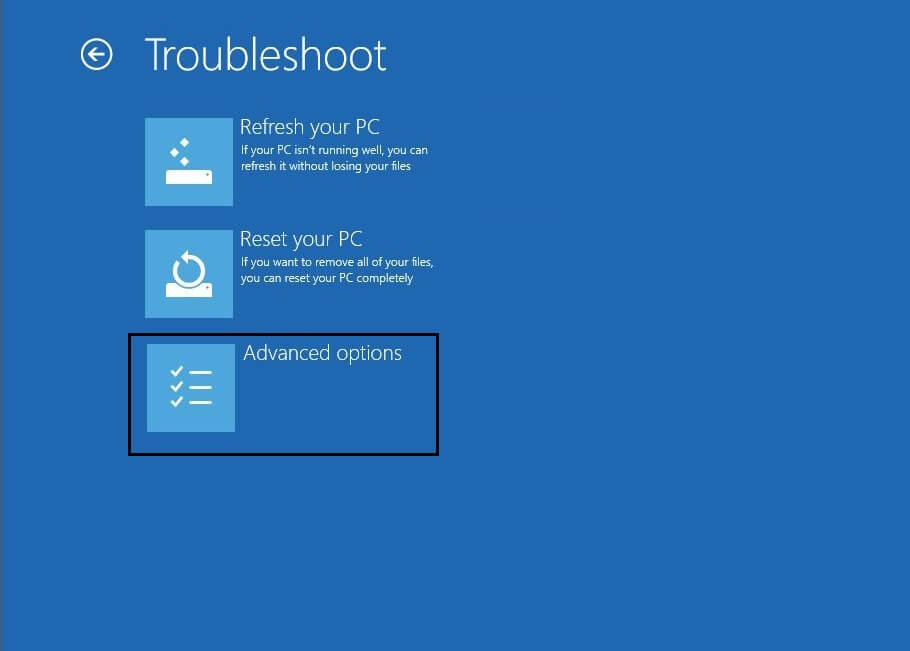
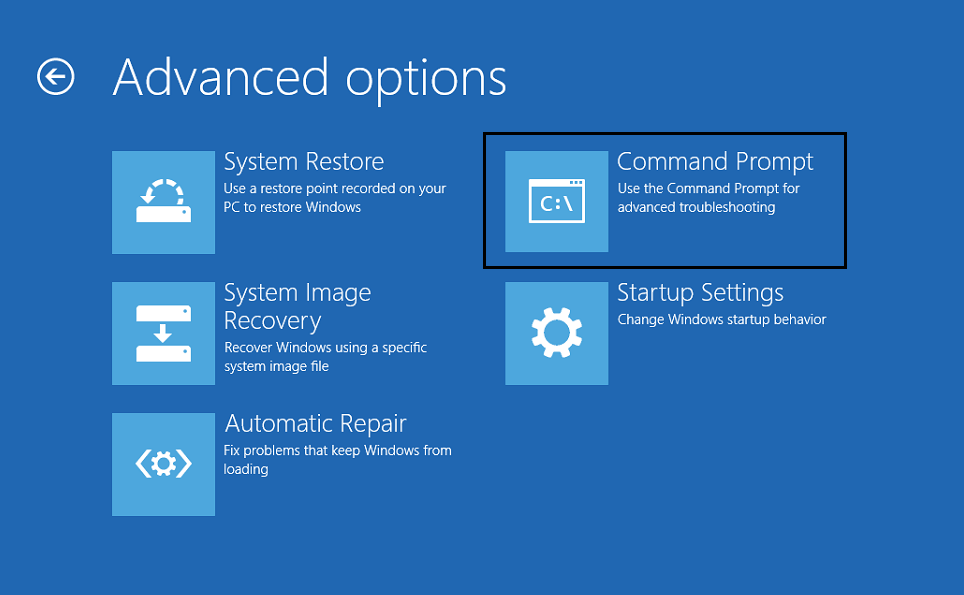
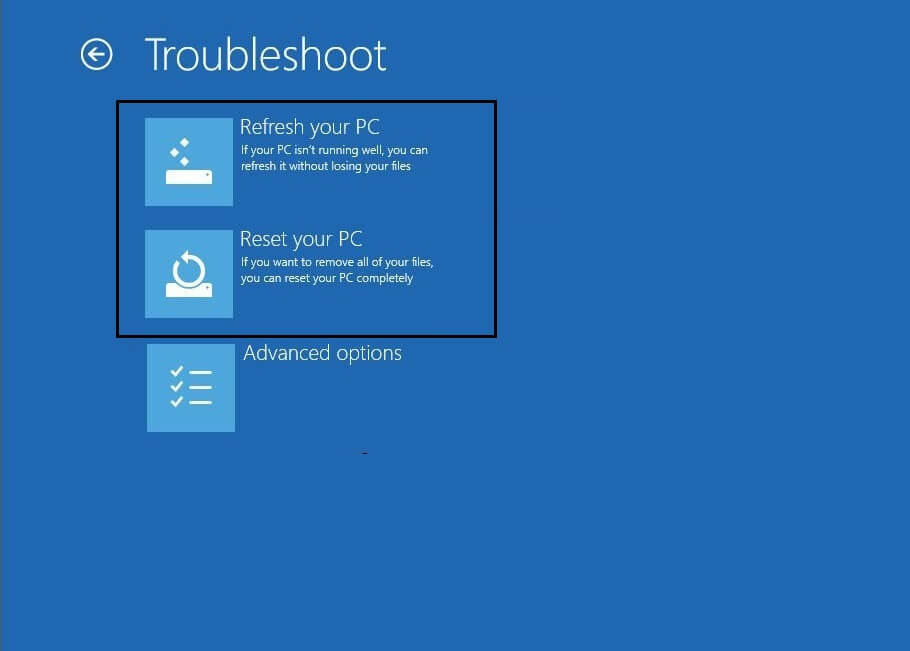
3. After this, choose to Troubleshoot and then click on Advanced options.
4. Select Command Prompt.
5. When you see the command prompt interface, enter these commands and hit enter.
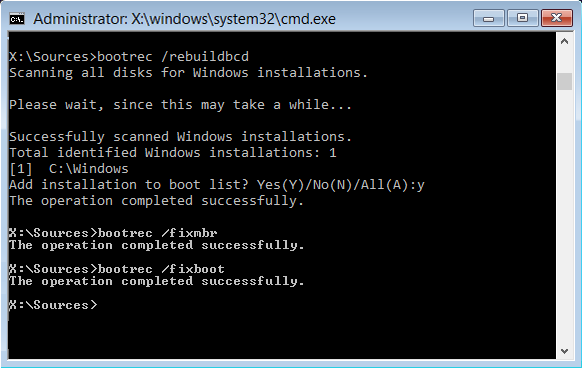
bootrec.exe /rebuildbcd
bootrec.exe /fixmbr
bootrec.exe /fixboot

6. After executing these commands successfully, type exit.
7. Restart your PC to check if your PC is now booting to windows
8. If any of the above methods fail and shows an error, then try this:
bootsect /ntfs60 C: (Here C: is your boot drive letter)
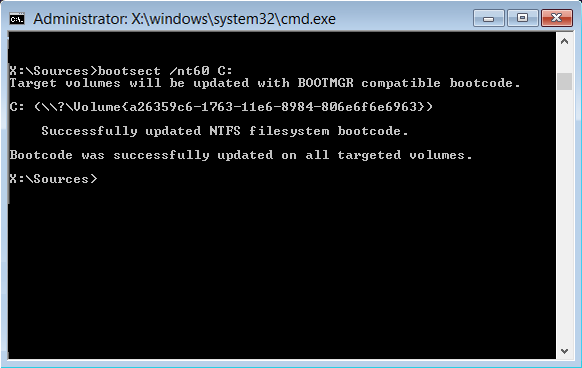 9. Now try again with the same commands which failed earlier.
Fix 2: Utilize Diskpart to Fix Corrupted File System
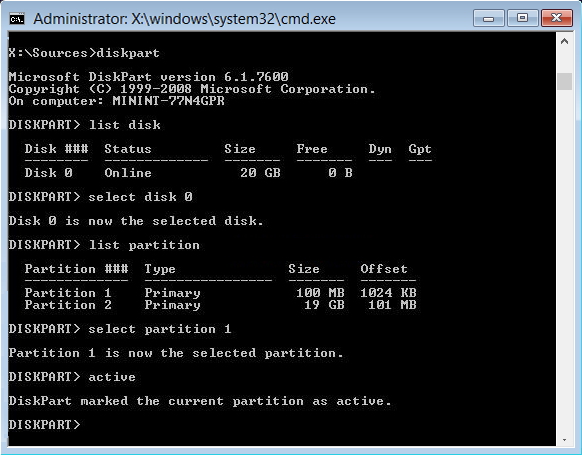
1. Again, go to Command Prompt and type: diskpart
2. Now type these commands in diskpart the same way as highlighted.
DISKPART> select disk 1
DISKPART> select partition 1
DISKPART> active
DISKPART> extend filesystem
DISKPART> exit
3. Then type the following commands:
bootrec.exe /rebuildbcd
bootrec.exe /fixmbr
bootrec.exe /fixboot
4. Restart your PC to apply the change, and this may fix “Automatic Repair couldn’t repair your PC” error.
Fix 3: Run CheckDisk Utility
1. Run the command prompt and type the following command chkdsk /f /r C: (where C denotes the drive in which Windows is installed)
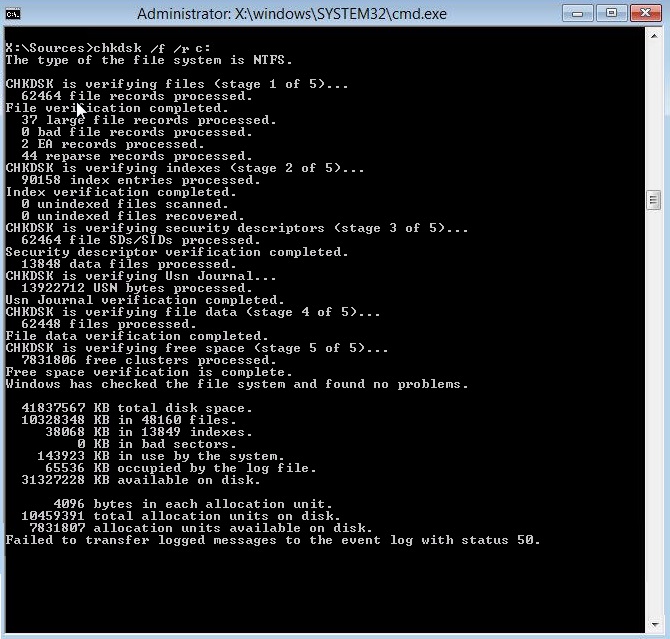
3. Check if the problem is fixed by restarting your PC.
I hope this works for you to fix the Windows 10 automatic repair couldn’t repair your PC error but if not, then follow the next solution.
Fix 4: Recover Windows Registry
1. Boot from any installation or recovery media that you have created before.
2. From the drop-down menu, select your language preferences and then click Next.
3. After step 2, press Shift +F10 to open the command prompt.
4. In the command prompt box hit enter after this command:
cd C:\windows\system32\logfiles\srt\ (Here C: denotes the OS installed drive)
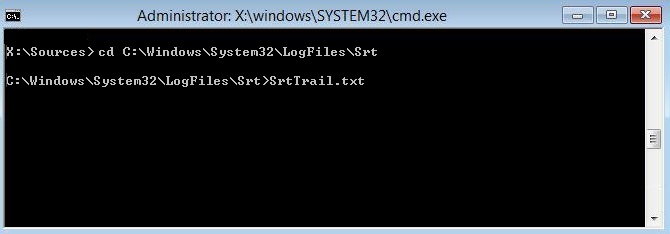
5. Next, type this command to open the file in Notepad:
SrtTrail.txt
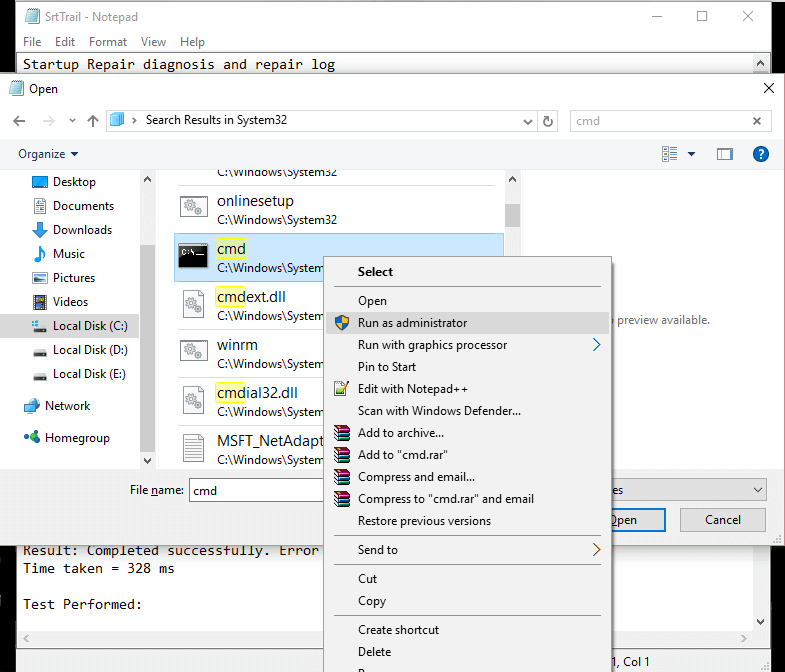
6. Now press CTRL + O and from file type, select “All files” and then search for C:\windows\system32, then right-click CMD and run as administrator.
7. Enter the following command in cmd:
cd C:\windows\system32\config
8. Then, Rename Default, Software, SAM, System, and Security files to .bak as below to create a backup for these files.
rename DEFAULT DEFAULT.bak
rename SAM SAM.bak
rename SECURITY SECURITY.bak
rename SOFTWARE SOFTWARE.bak
rename SYSTEM SYSTEM.bak
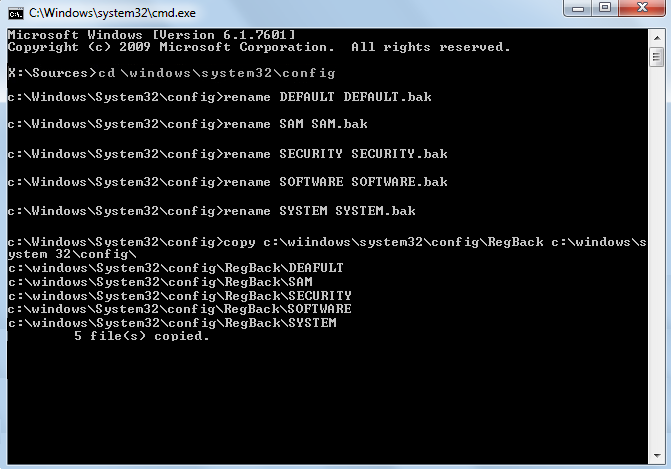
9. Now, using CMD, type the following command:
copy c:\windows\system32\config\RegBack c:\windows\system32\
10. Restart your PC to see if you can boot to windows.
Fix 5: Using Repair Windows Image
1. Run Command Prompt and enter this command:
DISM /Online /Cleanup-Image /RestoreHealth
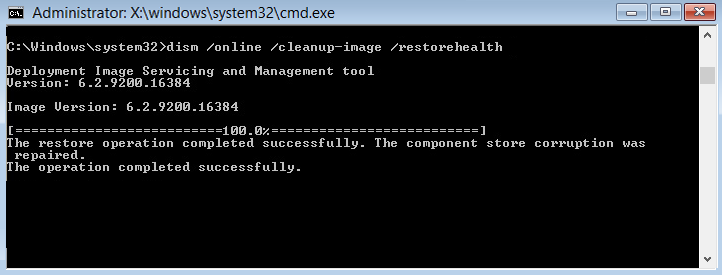 2. After entering this command, wait for execution; this might take 15-20 minutes.
NOTE: if step 1 doesn’t work, then try this:
Dism /Image:C:\offline /Cleanup-Image /RestoreHealth /Source:c:\test\mount\windows
or
Dism/Online/Cleanup-Image/RestoreHealth/Source:c:\test\mount\windows /LimitAccess
3. When the process is completed, restart your PC.
4. This would fix Automatic Repair couldn’t repair your PC error in Windows 10 system.
Fix 6: Delete the Corrupted File
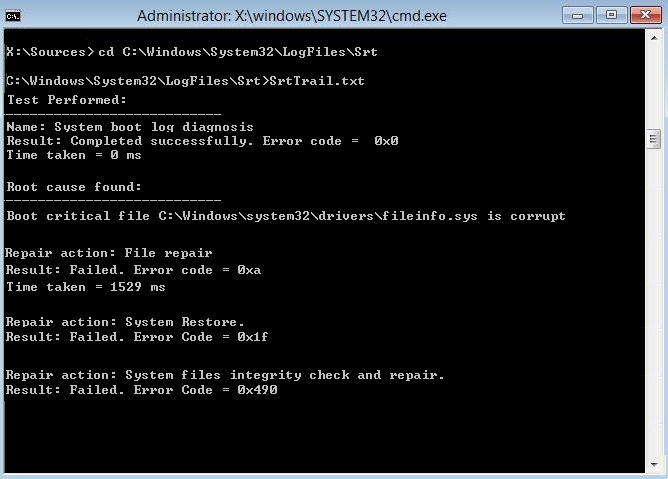
1. Run CMD again and enter this command:
cd C:\Windows\System32\LogFiles\Srt
2. Next, type this command:
SrtTrail.txt

3. When it opens, it will show something like this
Boot critical file c:\windows\system32\drivers\tmel.sys is corrupt.
4. Now delete the corrupted file by using the following command:
cd c:\windows\system32\drivers
5. And Enter this command
del vsock.sys
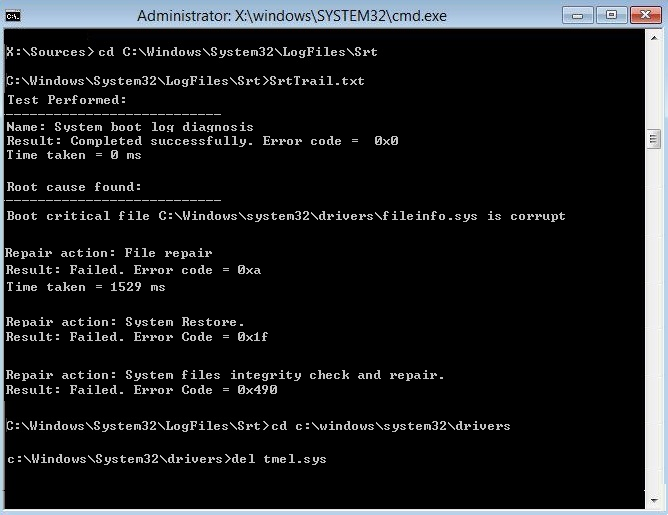
Note: Do not delete the important files which are required for booting.
- Restart your PC and ensure the error is fixed, or try the next method.
Fix 7: Disable Early Launch Anti-Malware Protection
At times your PC might get into a “Windows 10 Automatic Repair couldn’t repair your PC” loop, and the reason may sometimes be the early launch of the anti-malware protection option. So, following these steps, you can disable this option:
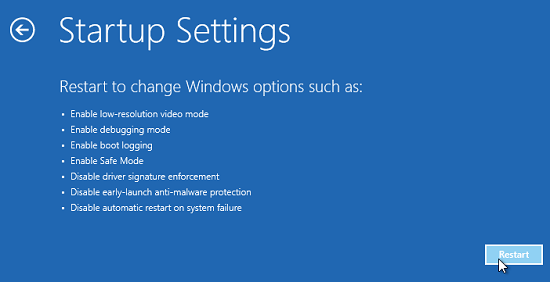
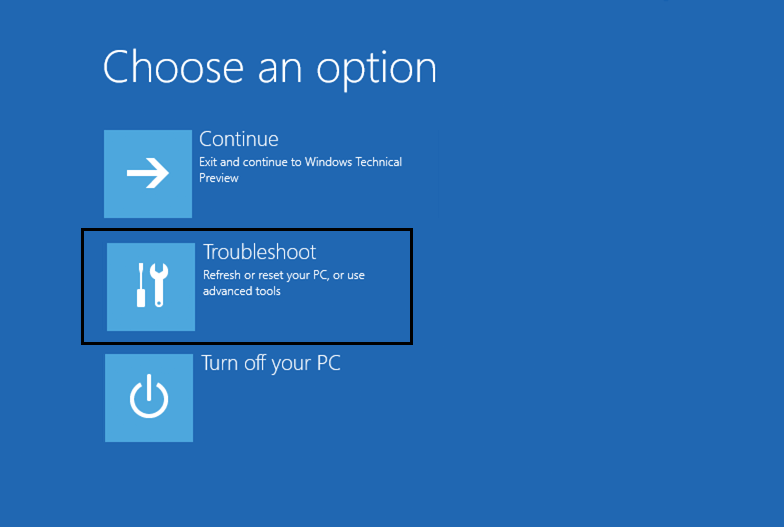
1. After getting into the boot menu, choose to Troubleshoot>then, Advanced Options> Startup Settings.
2. Now you can see a list of options; from this list, choose to Disable early launch anti-malware protection
3. Restart your PC and see if the problem is fixed.
Fix 8: DisableAutomatic Startup Repair Loop
1. Run CMD and enter the following command:
bcdedit /set {default} recoveryenabled No
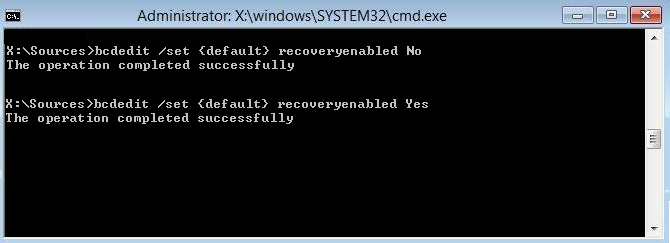
NOTE: Ensure that you are in the Automatic Startup Repair Loop
2. Restart your PC and check whether it has been disabled.
3. If in case you need to make this, then type this command:
bcdedit /set {default} recoveryenabled Yes
4. Restart your PC to make changes.
Fix 9: Set Correct Values of Device and OS-device Partition
- Open CMD and enter the following command “bcdedit”

- Now find the values of the device partition and osdevice partition and ensure they are correct or set to the correct partition.
- By default, the value is C: because windows always get pre-installed on this partition only, then enter these commands one by one:
-
- bcdedit /set {default} device partition=c:

-
- bcdedit /set {default} osdevice partition=c:

Note: If you have installed your windows on any other drive, make sure you use that one instead of C:
- Reboot your PC and check if the startup repair couldn’t repair your PC error is fixed or not.
Fix 10: Disable Driver Signature Enforcement
1. Insert your installation drive and after selecting the language preferences, click next
2. Click the Repair option present at the left end bottom screen.
3. Choose Troubleshoot and then click on Advanced Options.
4. Choose Startup Settings.
5. Restart your PC and press the number 7. (Use different number keys each time if it isn’t working)
Fix 11: Refresh or Reset your PC
1. Choose Troubleshooting similarly as mentioned above.
2. Then click on Refresh or Reset
Note: Refresh will set your Windows 10 operating system to factory setting, retaining your files, photos, music, and application but reset wipes all everything and makes a new installation of the operating system.
3. Then follow the screen instructions.
4. Next, you will be asked for the partition in which it will install (preferably C: )
Note: To complete the process, you may require the Windows 10 installation media, so ensure you have it.
The above-given methods could be used from the boot menu itself to fix the automatic repair couldn’t repair your PC Windows 10 error.
But there are also solutions that help you fix the Automatic repair doesn’t work error without an installation media. Below check out some of them:
Fix 12: Boot Priority in BIOS
It may sometimes happen that because of the boot priority in the bios, the automatic repair couldn’t repair your PC error. In this case, the following steps might be useful.
- When you start your PC, try to enter the BIOS settings by pressing the function keys (F1, F2, F3. It’s different for different systems). On notice, you will know that a prompt to press any key will be asked to enter into the BIOS settings.
- After entering the BIOS, You need to navigate to the Boot Section. (The location of this section is different for each type of BIOS)
- When you’re in the boot section, make sure that your Windows-installed disk or drive is the priority.
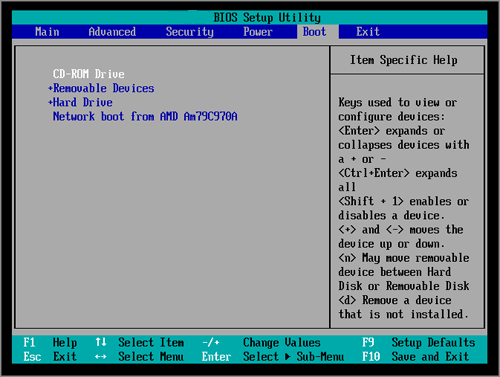
- Save the changes made and exit.
Fix 13: Disk controller mode in BIOS
Other than Boot Priority, there’s one more option that you can do to rescue your windows from the loop error. Get to your BIOS setting (by following the steps mentioned in 12 number points). After this, you must navigate to disk controller mode and set it’s Standard (IDE, SATA, or Legacy) instead of RAID or AHCI. Save the change and restart your PC. If your problem persists, then undo the changes made and set it to its original value, and try using other options on this page.
Fix 14: Enable NX, XN, or XD flag bit in BIOS
Get to your BIOS settings (follow the steps mentioned in #12 point) and then switch to the Security option. Find XD-bit and Enable it. If there is no such setting, search for XN or NX-bit and enable it. Save your changes and restart.
So, these are the fixes you can run one by one to troubleshoot Windows 10 Automatic Repair couldn’t repair your PC error.
Frequently Asked Questions
1: How Much Time Will Automatic Repair Takes?
The automatic repair usually takes time, depending on the tasks. It may take a couple of minutes to some hours.
For performing a fresh install, it may take 30-45 minutes, and in other cases, it may take 3-4 hours to repair and keep the files.
2: What to do When Windows stuck in Automatic Repair loop?
To fix the automatic repair loop on Windows 10 try the solutions like
- Run CHKDSK
- Try to Rebuild the BCD and Repair MBR
- Disable Automatic Startup Repair option
- Restore your Windows registry
3: What to do When Automatic Repair Failed Windows 11?
To fix the automatic repair failed error in Windows 11 try the fixes given below:
- Boot in safe mode
- Uninstall the recently installed Windows update
- Run the Windows startup repair
- Disable Automatic Repair Tool
- Perform a system restore
Recommended Solution- Fix Various PC Issues & Errors
If your Windows PC/laptop system is running slow or showing various issues and errors, then scan your system with the PC Repair Tool. This is a powerful repair tool that, just by scanning once, detects and fixes various Windows issues and errors.
The tool fixes common PC errors like system file corruption and protects from file loss, malware, hardware failure, BSOD error, and more.
Well, this not only fixes errors but also enhances Windows PC performance.
Get PC Repair Tool to Fix Various PC Issues and Errors
Conclusion:
The “Windows 10 Automatic Repair couldn’t repair your PC” is quite a tricky error and needs to be fixed ASAP. In this guide, we have discussed the troubleshooting solutions that work for you to fix the error completely on your Windows 10 and 11 system.
Following the commands and steps carefully is important to avoid further corruption.
Despite this, it is estimated by following the solutions, you managed to fix the error, and the Windows 10 automatic repair start working again.
If there is anything I missed out, or you have any suggestions or queries, then feel free to share with us on our social media handles – Facebook and Twitter page.
Good Luck!!!
Hardeep has always been a Windows lover ever since she got her hands on her first Windows XP PC. She has always been enthusiastic about technological stuff, especially Artificial Intelligence (AI) computing. Before joining PC Error Fix, she worked as a freelancer and worked on numerous technical projects.