
Are you suffering from an error “Couldn’t install Windows 10 0XC190010 – 0x20017”. Installation of Windows 10 failed in the SAFE_OS phase with this error throughout BOOT operation.
Generally, the error 0x1900101 – 0x20017 happens when the user tries to upgrade their Windows 7 PC to Windows 10 but this error is not limited to the Windows 7 because it seems that this error also occurs in Windows 8 or Windows 8.1 PC.
This error 0x1900101 – 0x20017 appears when the user starts the Windows 10 installation with the help of Media creation tool, the process arrives at 100% and when the Windows tries to reboot it will be jammed on Windows logo without any progress or the Computer will reboot with your previous Windows version.
In case, you restart the PC or force shutdown the PC then you will get the error message “we couldn’t install Windows 10 0XC190010 – 0x20017” with the message installation failed in the SAFE_OS phase with an error during Boot operation.
Below some fixes are given that can solve this error, go through this article to the conclusion and apply the given fixes one by one.
Methods to Fix “We couldn’t install Windows 10 0XC190010 – 0x20017”
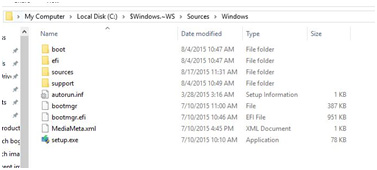
Note 1: – Don’t download the Windows 10 Setup files because Windows 10 setup files are already present in the C drive. You must have two folders in your C:/ drive, named as $Windows.~BT and $Windows.~WS. Windows 10 Setup files are available at $Windows.~WS. See the below-given image.
Note 2:- Also remove the External Hard drives, USB storage devices such as Network USB Dongle, external USB device and more.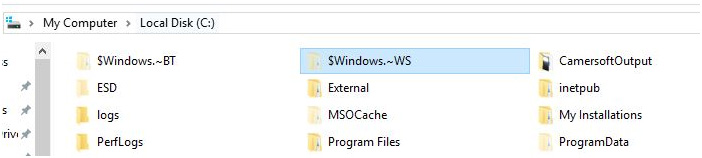
Fix 1: Create a Restore Point on your Windows PC
Click on the Start button -> Go to the search box and type Restore Point-> Click on the Create Restore point option from the list and wait until Windows creates a restore point.
And check if the 0xc19001-0x20017 Windows 10 error is resolved or not
Fix 2: Remove or Uninstall Broadcom Bluetooth and Wireless Network Drivers
Uninstalling Bluetooth and Wireless Network drivers are necessary because Broadcom drivers of Windows 7 or Windows 8.1 PC are not companionable with Windows 10. To do so follow the steps given below:
- Open the Device Manager.
- Search for your Bluetooth driver on the list.
- Right-click on the driver and click on Uninstall device
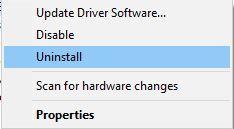
- Repeat the same steps for Wireless Network Drivers
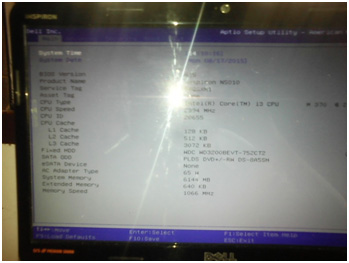
Fix 3: Disable Wireless option from BIOS
To do this first close all the program and shut down your PC.
After shutting down your PC restart it by pressing the power button and start pressing F2 to bring the BIOS Settings. After entering in the BIOS Settings apply the below-given changes.
- Go to Advanced Tab with the help of right Arrow key.
- Use the Advanced Tab and go to the Wireless option with Down Arrow Key.
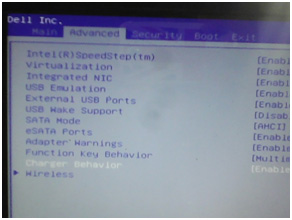
- After it press Enter to open Wireless option.
- Here you will get two options, Internal Bluetooth, and Internal WLAN. You need to disable both the options by pressing the enter key on them and then choosing Disabled.
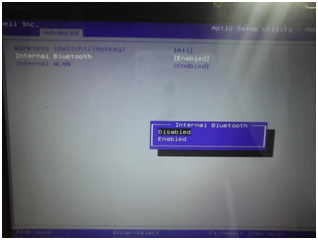 Exit from the BIOS Settings after saving all the modifications (Press F10 to save the changes).
Fix 4: Remove Additional RAM
If you have added any extra RAM to your PC then remove it. It is a little difficult for the normal user. You need to open the cabinet of your CPU and then remove the added RAM. If you have a laptop with an extra RAM then you must have to contact with any hardware professional.
Fix 5: Reboot your PC and Run the Setup
After executing all the above-given steps now you need to reboot your system. After the restarting PC, go to C:\$Windows.~WS\Sources\Windows folder and execute the Setup.exe file. This will start the Windows 10 installation process.
In case, you have the bootable USB Device or Disk of Windows 10 then you can do a clean install of Windows 10.
Note: – Devoid of upgrading your PC to Windows 10 first if you run a clean install then your Windows 10 will not be activated for free and you can require buying the product key.
Fix 6: Change the Registry Settings
If you are encountering errors 0xC1900101 or 0x20017 during Windows 10 installation, then this issue might be connected to your registry. Follow the steps to fix this error by modifying your registry:
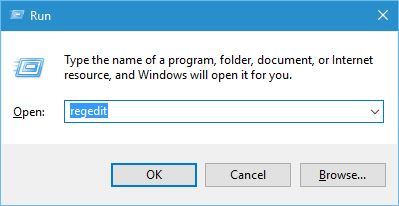
- Press Windows + R key
- Type regedit and click OK
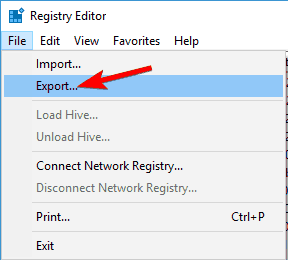
- Note: Modifying the registry can be quite dangerous, so it’s recommended that before making any changes export your registry. To do so, go to File > Export.
Select All as Export range and then enter the file name. Choose a location and click Save.
Now that you have a backup of your registry you can make changes.
- Navigate to HKEY_LOCAL_MACHINE\SOFTWARE\Microsoft\WindowsSelfHost\Applicability.
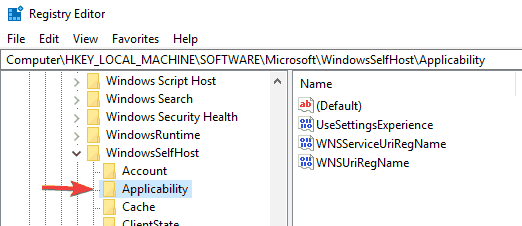
- Now change the values:
Ring = WIF
RingBackup = WIS or Enabled
EnablePreviewBuilds = 2
BranchName = TH1
UserPreferredBranchName = TH1
After making the required changes in the registry, close the Registry Editor and restart your PC. Now check whether the “we couldn’t install windows 10” issue is fixed or not.
Automatic Solution to Fix 0xc1900101 – 0x20017 Error:
If you are not technically advanced and find the manual methods tricky to perform then try running PC Repair Tool, this tool will scan, detect and fix the error 0x1900101 – 0x20017 automatically.
After upgrading your PC to Windows 10 or executing the clean installation of Windows 10 you may face slow PC performance. To avoid it you this tool is there which is packed with lots of advanced features to make your Windows system fast.
This tool not only fixes installation error in Windows 10 but also fixes all kind of PC related issues and errors such as DLL error, registry error, game error and it also repair corrupted & damaged files.
Get PC Repair Tool to Fix Various Installation Error
Conclusion
That’s it!!! I have provided ample information on how to solve 0xc1900101 – 0x20017 error. Now, it’s your turn to put some efforts and apply the solutions to get rid of ‘we couldn’t install windows 10 the installation failed in the safe_os phase‘ error.
After performing the manual solutions your installation error will be solved.
Hope this article helped you in solving your issue. Apart from this if you are having any suggestions or questions to ask then you can share it with us in the below comment section.
Hardeep has always been a Windows lover ever since she got her hands on her first Windows XP PC. She has always been enthusiastic about technological stuff, especially Artificial Intelligence (AI) computing. Before joining PC Error Fix, she worked as a freelancer and worked on numerous technical projects.