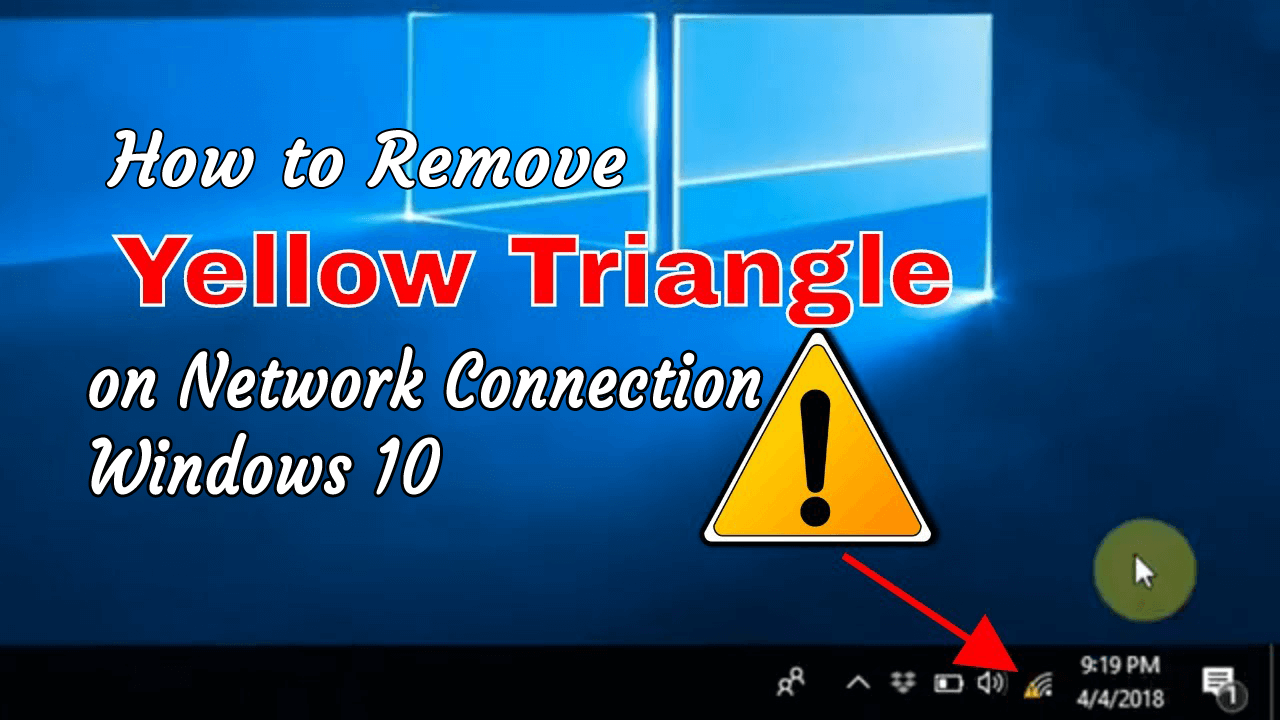
Unable to browse the internet due to the yellow triangle exclamation mark on Network icon? Looking at what went wrong and how to fix yellow triangle on the network icon?
Then unluckily this blog is for you.
In this post learn the complete information about what this yellow triangle means? Why you get a yellow triangle with an exclamation mark? And how to remove yellow triangle on network connection?
Let’s get started…!
What Does Yellow Triangle With Exclamation Mark Mean?
The yellow triangle with an exclamation mark means limited internet connectivity or no internet connectivity.
You exclamation marks on the network connection clearly indicate the device is connected to the WLAN but there is no internet connection and there many different reasons responsible for the issue.
Why does my Internet connection have an exclamation mark on Windows 10?
There are many different reasons due to which internet connection has an exclamation mark like outdated network driver, internal confliction of apps, system resource conflict and more.
Windows 10 and the previous Windows version contains a feature through which it detects the available internet connection. And, when this auto-connecting feature faces any issues then it starts showing a yellow exclamation mark over the network icon.
If you are using a proxy server or connection filtering then this is a quite frustrating issue but luckily there are fixes that work for you to remove yellow triangle on network connection.
Below follow the fixes given one by one carefully.
How do I Fix Yellow Triangle on my Network Icon Windows 10?
Solution 1: Fix Internet Limited Sign via Registry Editor
Well, manually modifying the registry is quite tricky so make sure to follow the fixes carefully as a small mistake can damage your entire system.
Follow the steps to do so:
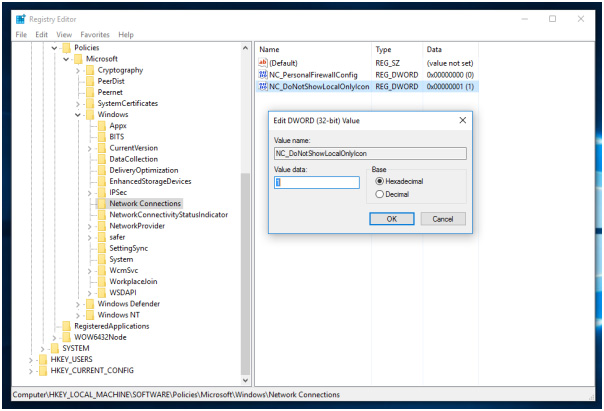
- Open Registry Editor.
- Find the below-given Registry key:
- HKEY_LOCAL_MACHINE\SOFTWARE\Policies\Microsoft\Windows\Network Connections
Note: In case the above registry key doesn’t available then just create it.
- Go to the right pane and create a new DWORD value with the name NC_DoNotShowLocalOnlyIcon. Set it to 1.
- After it close the Registry Editor and restart the Explorer shell or you can also restart Windows.
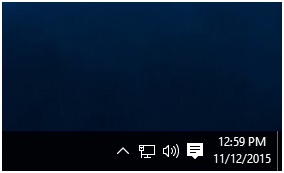
You will see the yellow overlay will disappear. You can also apply this trick in Windows 7, Windows 8 and Windows 8.1.
Solution 2: Run Network Troubleshooter to Fix Internet Connection Issues
Network troubleshooter is the built-in network troubleshooter suit designed to get rid of all types of Windows 10 network connection problems. Apply the below-given steps to run this troubleshooter:
1: Go to the search box of your system and search for the Network troubleshooter, then from the search result choose the Identify and repair network problems
2: Now, you have to follow the troubleshooter window to fix the Windows 10 network issues
After applying the troubleshot, if you become unable to fix the Internet connection issues then you should need to reset TCP/IP stack, release the IP address, renew the IP address, and at last flush and reset the DNS client resolver cache.
To execute all of these tricks you should go to the next method.
Solution 3: Run the Network Commands
After applying the network troubleshooter, try to execute the network commands given below. It is observed that the combination of running these two things i.e. network troubleshooter and network commands will get rid of this issue.
Commands are:
- Reset the TCP/IP stack.
- Release the IP address.
- Renew the IP address.
- Flush and reset the DNS client resolver cache.
How to run Network Commands like a pro?
First of all, you have to open the Command window with admin permission. To do this, go to the Start menu search for the cmd, right-click on the cmd from the list and choose Run as administrator. If any confirmation window appears then select Yes.
Now, on the command prompt, you have to run the below-given commands one by one. You should run these commands in the listed order:
On the Command prompt type netsh Winsock reset and hit the Enter key to run this command.
- Type netsh int ip reset and hit the Enter key.
- Type ipconfig /release and press Enter.
- Then type ipconfig /renew and press Enter.
- Type ipconfig /flushdns and press Enter.
After running all of the above-given commands, check for the issue.
Solution 4: Try to Reset the Network
With the help of the network reset feature you can get rid of this issue.
Note: This method will remove all the installed network adapters and the settings.
1: Click on the Start button and then choose Settings
2: Choose Network & Internet and then select Status -> Network reset and then click on the Reset now at last Yes
Solution 5: Disable the Firewall
Try after disabling the Firewall, to turn the Firewall off you should follow the below-given steps carefully:
1: Go to the Control Panel and then navigate to the Windows Firewall.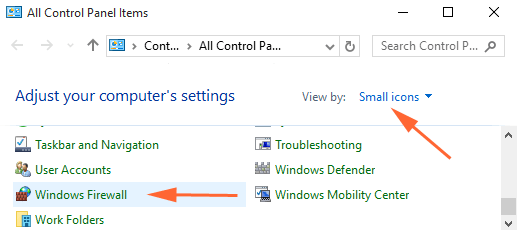
2: Now, click on the Turn Windows Firewall on or off link which is present at the left fringe.
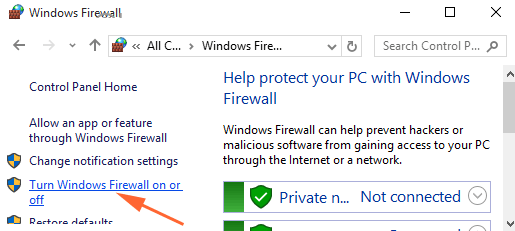 3: You will see Customize settings, from here you have to Select the round circle present along with the Turn off the firewall.
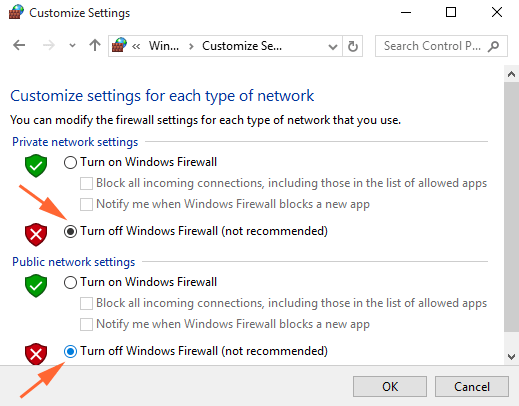
4: At last, Click on the Ok button and reboot your system to check for the issue.
Solution 6: Update Network Driver
Sometimes the outdated driver can also cause a limited or no Internet access issue. Also, the adapter driver might get corrupted and cause irregular connections and other issues.
So here it is suggested to update and download the latest network driver or else update the driver with the latest update.
Follow the steps to do so:
- Go to Device Manager > right click on network adapter > select “Update driver”
- Now select ‘Search automatically for updated driver software’ and wait for the process to complete.
If in case the driver is not found, then go to the official website of the network adapter manufacturer. And download the driver for the adapter model and update it manually.
However, you can also update the driver automatically and to do so run the Driver Updater this helps you to update the driver in just a few clicks.
Get Driver Updater to update the driver automatically
Check your Windows PC/Laptop Health
If in case Windows PC/laptop is running slow or getting stubborn computer errors then it is best to run the PC Repair Tool. This is an advanced repair tool that just by scanning once detect and fix various computer stubborn errors.
With this, you can also fix DLL errors, Registry errors, BSOD errors, prevent virus or malware infections, repair the corrupted Windows system files and many others.
This not only fixes computer errors but also optimizes the Windows PC performance like a new one.
Get PC Repair Tool, to optimize Windows PC performance
Conclusion:
So these are the fixes that work for you to remove yellow triangle on network connection in Windows 10.
Try the fixes given one by one carefully to fix yellow triangle on internet connection Windows 10 issue.
Also if your internet connection is running slow then read our complete guide to fix slow internet connection in Windows 10.
I hope after following the fixes the issue is resolved.
Hardeep has always been a Windows lover ever since she got her hands on her first Windows XP PC. She has always been enthusiastic about technological stuff, especially Artificial Intelligence (AI) computing. Before joining PC Error Fix, she worked as a freelancer and worked on numerous technical projects.