Chrome is one of the most powerful browsers that is used by people worldwide. Unfortunately, some features in Chrome has no option to remove the bookmarks bar and unable to remove favicons on the new tab page. Yet, Google has introduced a few additional options for disabling bookmarks bar and to remove favicons. But there is still one annoying feature that users are facing is an automatic update.
Google update feature is used by the chrome and uses it as an open-source and update the system automatically whenever connected to the internet. Sometimes update changes the feature whole new and some users find it difficult to handle it. Don’t Worry.
Want to disable the automatic updates in Google Chrome then read this blog completely and learn how to Disable as well as Enable Google Chrome automatic updates in Chrome.
Methods to Disable Automatic Update in Google Chrome
#Method 1: By System Configuration
Google Chrome uses two System Services namely Google Update (gupdate) and Google Update (gupdatem) to check for the update. So, in order to turn off automatic update in Google Chrome, you need to disable these Google services.
To do this task you can use the System Configuration window. Apply the below-given steps to turn off automatic updates in Google Chrome.
Note: After turning off auto-updates your chrome browser may not get the latest security updates automatically.
Step 1: First of all close the Google Chrome browser.
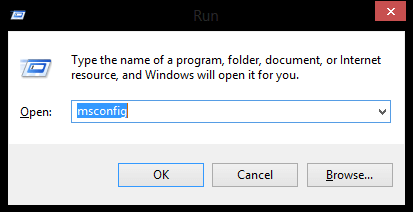
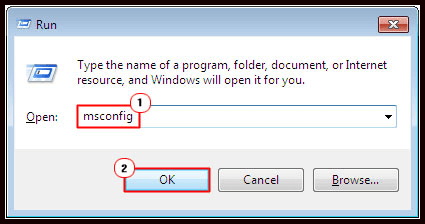
Step 2: Open run dialogue box by pressing Windows Key + R.
Step 3: In this window type msconfig and press enter.
Step 4: System Configuration window will appear, navigate to the Services tab.
Step 5: Check the box “Hide All Microsoft Services” present at the bottom. By doing this you can hide all the services associated with Microsoft so that you don’t disable essential services.
Step 6: Under the services, section search and find Google Update (gupdate) and Google Update (gupdatem).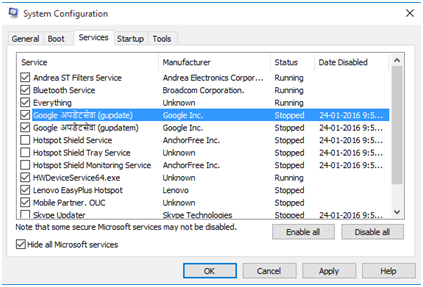
Step 7: Uncheck both the Google Services and click Apply and OK buttons to save changes.
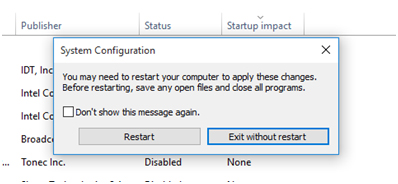
Step 8: Now, a message appears that asks whether you want to restart your PC or not then select anything according to your requirement.
After applying the above steps to disable automatic updates in Google Chrome, now make sure that this chrome update feature is disabled correctly.
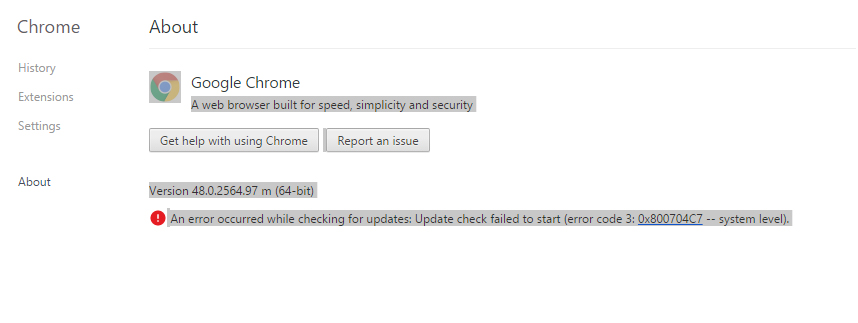
Open Google Chrome > click Chrome Menu > Help > About Google Chrome.
After it, you will see that Google Chrome will start checking for the available update. If you receive an error “An error occurred while checking for updates: Update check failed to start (error code 3: 0x800704C7 — system level).” then you have successfully disabled the automatic updates in Google Chrome.
#Methods 2: By Renaming Update Folder
This is the easiest methods to disable google chrome update that anyone can do it.
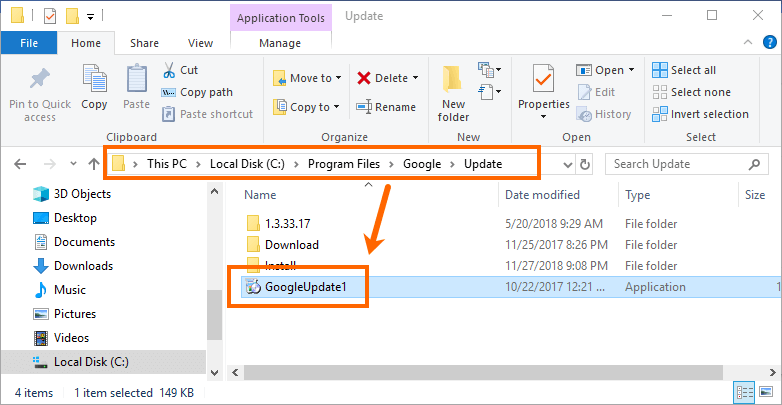
Step 1: Go to Chrome installation drive (C: drive).
Step 2: Navigate “C:\Program Files\Google\”.
Step 3: An “Update” folder will appear. Rename the folder
Step 4: Open the “Update” folder and rename this “GoogleUpdate” application file “GoogleUpdate2”.
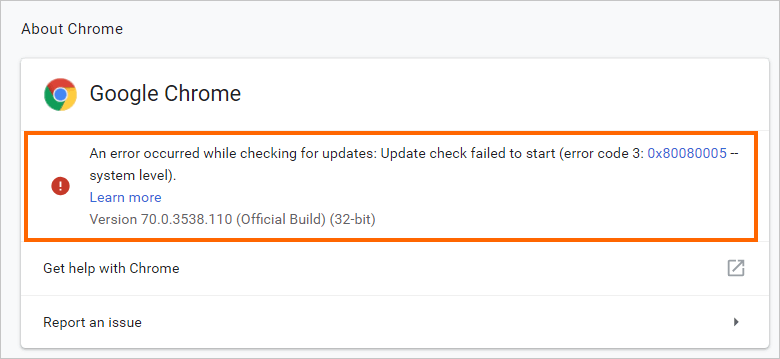
Step 5: Go to the Chrome and check URL “chrome://settings/help”. Here you will see an error.
#Method 3: By Windows Service Manager
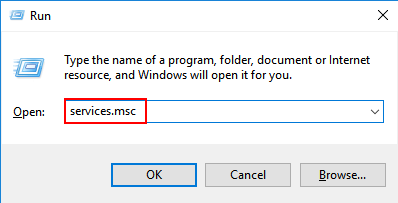
Press Windows + R key and type “services.msc” and click on OK. By doing this services manager window will open in that windows follow the steps given below:
Step 1: Type “control” on Windows search and select “Control Panel”> “System and Security” and then click on the “Administrative Tools”.
Step 2: Double click on the “Services” to open service manager screen.
Step 3: Search for “Google Update (gupdate)” and “Google Update (gupdatem)” on the list.
Step 4: Double click on both the update (each at a time) and on “General” >“Startup Type” choose “Disabled” option and click ok.
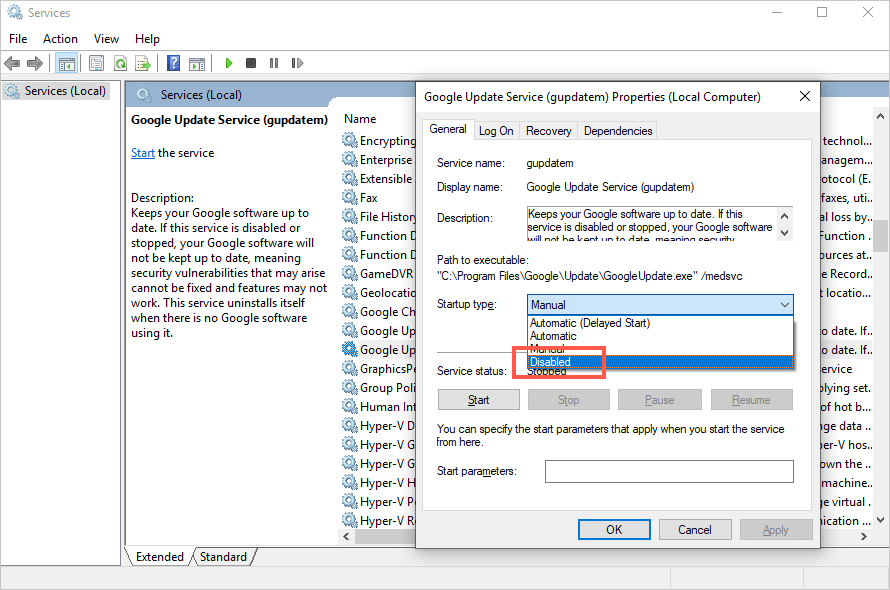
Step 5: Restart your PC.
#Method 4: By Registry Editor
You can disable Chrome from automatic updating by editing registry keys.
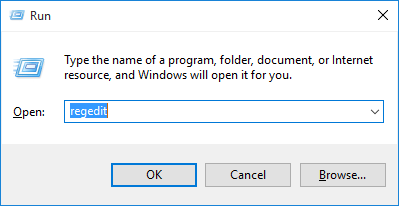
Step 1: Press Windows + R key and type “regedit” and then click on OK to open registry editor
Step 2: In registry editor open “HKEY_LOCAL_MACHINE” folder. Double click or click on the arrow to open the folder
Step 3: Open “SOFTWARE” folder and look for “Policies”.
Step 4: Right-click on the “Policies” folder and select the “New” and then click on “Key”.
Step 5: Rename the newly created key to “Google”.
Step 6: Right-click on the “Google” folder and select the “New” and then click on “Key”, rename the key “Update”.
Step 7: On the right side of the registry editor, right-click on white space below the “Default” option and select the “New” and then choose “DWORD”.
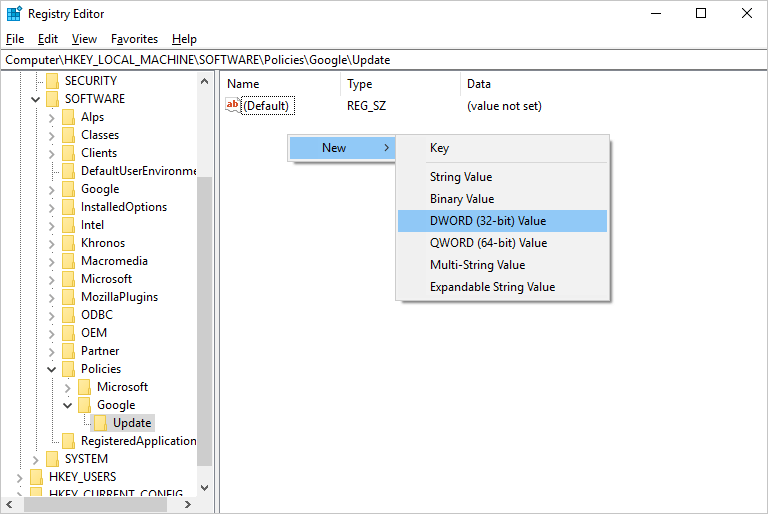
Step 8: Rename new key to “Updatedefault”.
Step 9: Double click on “Updatedefault” to edit DWORD value and set the “Value data” to 0.
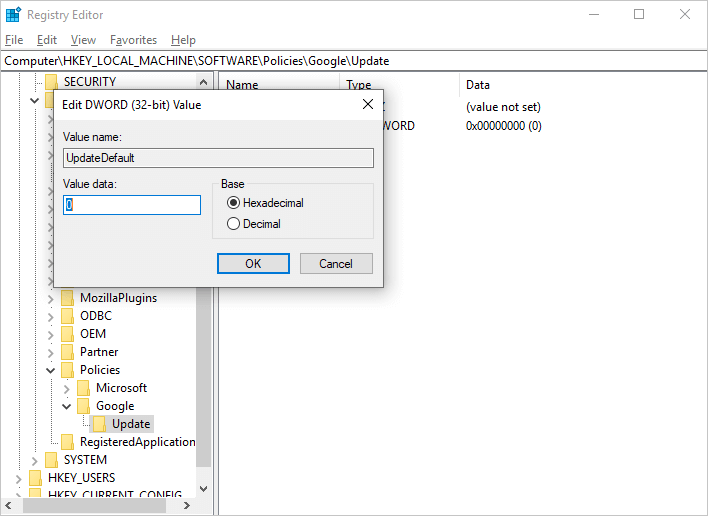
Step 10: Click on “Ok” to save the changes and exit “Registry Editor”.
How to Enable Automatic Update in Google Chrome?
After disabling automatic updates in Google Chrome, chrome browser gets unable to download the necessary updates unless you enable the Google update services. To Enable to Google Chrome Updates, apply the below-given steps.
Step 1: Close Google Chrome.
Step 2: Open run dialogue box by pressing Windows Key + R.
Step 3: In this window type msconfig and click OK.
Step 4: System Configuration window will appear, navigate to the Services tab.
Step 5: After it, find Google Update (gupdate) and Google Update (gupdatem) and check the services.
Step 6: Click on the Apply and then on OK button to save the changes.
Step 7: Reboot your PC and open Google Chrome.
How do I Uninstall Chrome Updates?
Step 1: First of all you have to close all of the Chrome windows and tabs and then go to the Start menu Settings -> then click on the Apps.
Step 2: Under the ‘Apps & features’, search for Google Chrome and then click on it.
Step 3: Then click on the Uninstall, confirm the process by clicking on the Uninstall.
Step 4: If you want to delete all of your profile data and other information such as bookmarks, history and more then tick ‘Also delete your browsing data’.
Step 5: At last, click on the Uninstall.
Get RevoUninstaller to Uninstall Programs Completely
Increase Your PC Performance
If you want to make your system fast and error-free then you should use a professionally designed PC Repair Tool.
This tool is one of the best and effective ways to maintain your Windows system, it contains an easy to use interface so that one can easily operate this tool without the need for professional skill. If your computer is displaying any types of error related to registry, DLL error, application, Games and more then this error repair tool will help you to fix them.
So, it is recommended to use this tool and enhance the performance of your old computer.
Get PC Repair Tool to Fix Various Errors and Issues.
Conclusion
The above-mentioned steps will help you to disable, enable and uninstall Google Chrome update. Perform the steps carefully to overcome this issue
Hope you liked this article and it turns out to be helpful for you regarding Google chrome update.
If you have any suggestions or questions regarding this article then you can ask in the comment section.
Hardeep has always been a Windows lover ever since she got her hands on her first Windows XP PC. She has always been enthusiastic about technological stuff, especially Artificial Intelligence (AI) computing. Before joining PC Error Fix, she worked as a freelancer and worked on numerous technical projects.