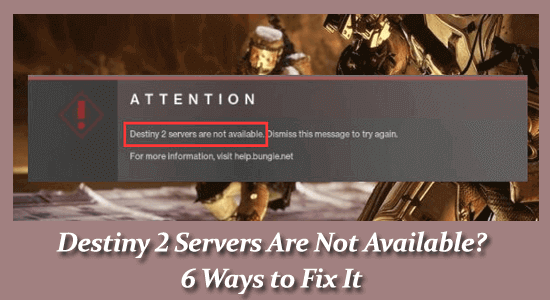
Seeing the error “Destiny 2 servers are not available” upon launching the game on your Windows PC? Well, the error is caused due to the server issue and to fix it checking the Destiny 2 server status is recommended.
So, if you are also struggling with the error and unable to play the game then this article is for you.
Here follow the step-by-step instructions to resolve the Destiny 2 servers not available error easily.
To repair corrupted Windows system files, we recommend Advanced System Repair:
This software is your one stop solution to fix Windows errors, protect you from malware, clean junks and optimize your PC for maximum performance in 3 easy steps:
- Download Advanaced System Repair rated Excellent on Trustpilot.
- Click Install & Scan Now to install & scan issues causing the PC problems.
- Next, click on Click Here to Fix All Issues Now to fix, clean, protect and optimize your PC effectively.
Why Does Destiny 2 Servers are Not Available?
Well, the error clearly states the problem is with the Destiny 2 server and when plenty of users connect at the same time to the same server leads to the server overloading problem, and the server status goes down or gets unavailable.
Despite this, if the servers are under repair or maintenance by the developers then also the Destiny 2 server not available problem with the error code tapir occurs and you are unable to connect to the server.
In some cases, the network issues like network adapter problems and outdated network drivers can cause issues while connecting with the server and may cause the error.
Luckily, for many users following the fixes listed below will work for you to resolve the error.
How to Fix ‘Destiny 2 Servers are Not Available’?
Solution 1: Try Connecting to the Server with a Different Time Frame
Try to connect to the Destiny servers in different time frames as there is a possibility that plenty of users are using the same Destiny server.
So, connecting to different Destiny 2 servers with different time frames may work for you. And if still after so many trials you are getting the Destiny 2 servers are not available error then head to the second solution.
Solution 2: Disable DHCP
If you are connected through a WIFI connection then the DHCP (Dynamic Host Control Protocol) connection might cause the problem.
Many users confirmed that disabling the functionality and assigning new IP addresses manually will solve the issue.
So, follow the steps to do so:
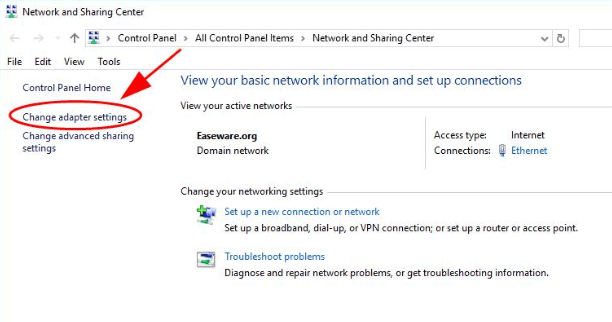
- At the bottom right corner right click on the network icon and choose Open Network & Internet settings.
- Then in Settings click Network and Sharing Centre.
- In the left pane click the Change adapter settings.
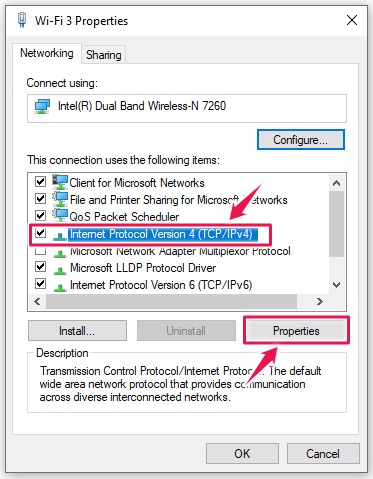
- Now right-click on the connection you are using and choose Properties.
- Then select Internet Protocol Version 4 (TCP/IPv4) then click Properties.
- Next, choose Use the following IP address and Use the following DNS server addresses. And type your computer’s IP address and DNS servers’ addresses.
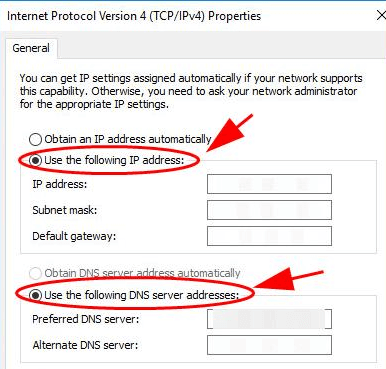
- To save changes click OK
Next, restart your PC and start Destiny 2 again.
Solution 3: Reset TCP/IP address
Here you need to check if you are facing any network corruption on your Windows PC. Try to reset your IP address and as the network connection error is fixed check for the Destiny 2 server issue.
Follow the steps to do so:
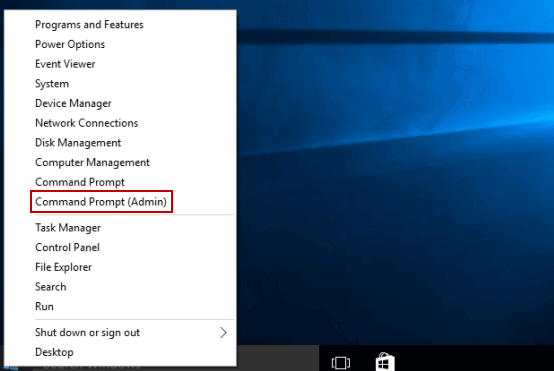
- In the Search box type cmd and from the search resul> right-click on Command Prompt and choose Run as administrator.
- Then in the Command Prompt window type command ‘netsh winsock reset’ hit Enter
- And restart your system to save the changes.
And now your TCP/IP address is reset.
Solution 4: Utilize the Ethernet Connection
It is suggested to use the Ethernet connection on your PC as this provides a stable and faster internet connection and the game will run smoothly. So, here it is suggested to use an ethernet connection to play the game.
But if in case there is no ethernet connection then follow the steps given to force your PC and game to connect through Wifi:
Follow the steps to do so:
- On your desktop at the bottom right corner right click the network icon and choose Open Network & Internet settings.

- Then in settings then click Network and Sharing Centre
- And click on Change adapter settings then right-click on the network connection that you are using and choose Disable.
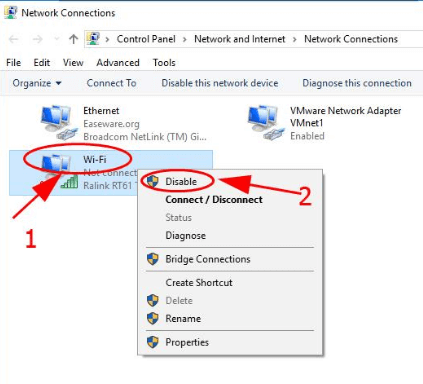
- Now repeat the step for other connections that you are not using
- Your PC will now only connect through WIFI.
Restart your game and check if Destiny 2 server status to confirm if the error is resolved.
Solution 5: Update Network Driver
If your network drivers are outdated or corrupted, then this can cause network connection issues, so make sure your network drivers are updated.
To update the network drivers you can simply visit the manufacturer’s website and search for the latest driver update and update your network drivers.
You can also update the network driver via the device manager, follow the steps given to do so:
- Hit the Windows + X key and open Device Manager from the menu.
- Now double-click on the Network Adapters category and right-click on the network driver then click on Update Driver.
- Then click on Search automatically for an updated driver.
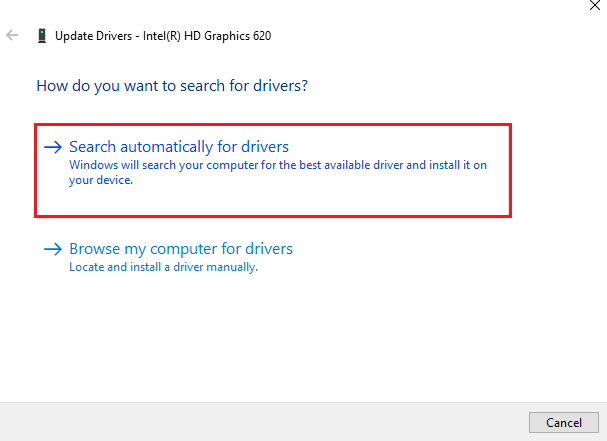
- Wait for the scanning process to finish and install the latest driver
Moreover, you can also update the drivers easily with the automatic Driver Updater tool. This scans your system drivers and updates entire drivers.
Get Driver Updater to Update Network Drivers Easily
Solution 6: Enable the UPnP
Well, this solution is for gamers who are playing Destiny 2 on one or more consoles. In this case, using the UPnP (Universal Plug and Play) enables the PCs with the same network to identify each other.
And, turning on the UPnP may do the trick to fix Destiny 2 server not available.
Follow the steps to do so:
- Go to the Control Panel click on Network and Internet and click Network and Sharing Center.
- Now in the settings and click Change Advanced Sharing settings
- Then under Network Discovery and choose Turn on Network Discovery and click Save Changes.
Hope this works for you to fix Destiny 2 Servers Not Available issues.
Best Way to Optimize Your Game Performance on Windows PC
Many players encounter issues like game crashing, lagging, or stuttering when playing the game, then optimize your gaming performance by running Game Booster.
This boosts the game by optimizing the system resources and offers better gameplay. Not only this, but it also fixes common game problems like lagging and low FPS issues.
Get Game Booster to Optimize your Game Performance
Conclusion:
So, these are the fixes to resolve Destiny 2 Servers are not available. Hope the fixes mentioned help you to fix Destiny 2 server issues and start playing the game.
Follow the solutions listed carefully and get past the problem.
Also, if there is anything that I missed out on or you are having any queries then write to us on our Facebook page, and don’t forget to like share, and follow it.
Good Luck..!
Hardeep has always been a Windows lover ever since she got her hands on her first Windows XP PC. She has always been enthusiastic about technological stuff, especially Artificial Intelligence (AI) computing. Before joining PC Error Fix, she worked as a freelancer and worked on numerous technical projects.