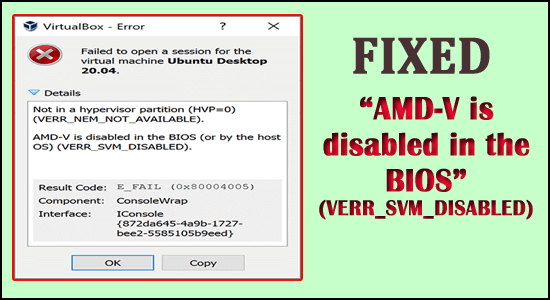
Many users have reported that they are getting the AMD-V is disabled in the BIOS (or by the host OS) (VERR_SVM_DISABLED) error notification while attempting to initiate a virtual machine through VM VirtualBox. This issue especially arises on Windows 10, Windows 8, and Windows 7. According to the analysis, the error mostly occurs on Linux distribution.
To Repair Corrupt or Missing Files, we recommend Advanced System Repair:
This software is your one stop solution to fix Windows errors, protect you from malware, clean junks and optimize your PC for maximum performance in 3 easy steps:
- Download Advanaced System Repair rated Excellent on Trustpilot.
- Click Install & Scan Now to install & scan issues causing the PC problems.
- Next, click on Click Here to Fix All Issues Now to fix, clean, protect and optimize your PC effectively.
Some users reported they manage to fix AMD-V being disabled error, by entering to the “BIOS and re-enabling the virtualization extension” but if in case this won’t work in your case then below find out all the necessary solutions which will assist you to solve the issue quickly.
But before directly heading to the fixes it is to have a look at the common causes that trigger the error.
What Cause “AMD-V is disabled in the BIOS”?
We have studied this case by examining all the various reports that we gather from the users. From our analysis, we triggered out the major root cause due to which the issue is arising. Here is the list of reasons that affected the users have identified :
- The AMD-V is disabled from the BIOS setting – The VERR_SVM_DISABLE error code allows your PC or system to keep AMD-V whereas the BIOS setting does not allow you to keep it. Due to the BIOS settings, the AMD-V gets disabled.
- AMD-V gets interfered with Microsoft Hyper V technology – If the Hyper – V gets enabled that means the built-in visualization technology was automatically turned off. In such a scenario all you have to do is you need to disconnect or disable it to permit AMD-V so that it can be used.
- A BIOS version cannot support multiple CPU cores – This error might occur due to VM VirtualBox. On the assumption, that in case the software is compelled to construct a virtual system or machine with addition to more than one CPU core. For doing so it needs hardware virtualization & it will show an error or fallacy if the features are unavailable or disabled.
- The VM VirtualBox Bugs – There are various multiple reports regarding this issue as the machines or systems are capable enough to support the hardware virtualization software or technology. In such circumstances, the error can be typically resolved by changing a few specific virtual-machine settings.
Now, below find out multiple solutions that solve the error for several affected users.
How to Fix “AMD-V is disabled in the BIOS” (VERR_SVM_DISABLED)?
Solution 1: Enable the AMD-V from BIOS settings
As said above when the AMD-V technology gets disabled from the BIOS Settings. You are most likely to see the error on your Windows system.
By default, this option is enabled in most machines and devices. The manual modification or third-party interference might disable your system.
Hopefully, AMD-V can be re-enabled by accessing or using the BIOS setting and can re-enable the Secure Virtual Machine mode out from the CPU Configuration setting.
Always remember that the measures or steps you are entering in the BIOS might be different relying on the motherboard manufacturer. To access the BIOS you have to click on the Setup key at the time of the initial startup process.
Therefore, the Setup key is either F key(F2, F4, F8, F10, F12) or else Delete Key (Del key). If you can find the startup key then make sure you watch the initial startup process or else search for the specific steps as per your motherboard.
You have to click on the BIOS key during the startup process.
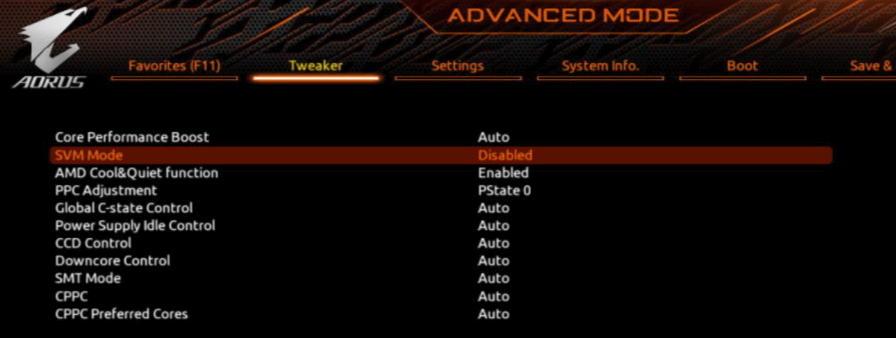
- As soon as you insert your BIOS key, look for the Secure Virtual Machine Mode and assure that you enable it. In the BIOS version, you can find the Advanced > CPU Configuration.
- When you go there you need to ensure that the Secure Virtual Machine Mode gets Enabled, then you have to save the configuration and exit the BIOS. Make sure that the Secure Virtual Machine Mode is Allow or Enabled.
Note: The actual location of the entry might change according to the motherboard model. If the Secure Virtual Machine mode is unavailable then you have to search for exact measures provided by your manufacturer. In the Acer motherboard, you can re-enable the AMD-V by setting the AMD IOMMU to be Enabled (this you can see inside the AMD I/O Virtualization Technology menu).
If you want to enforce the change restating a machine or device is not sufficient. You have to execute a cold boot process. This implies that you have to turn off your device or machine entirely and then you have to permit it to boot up out of scratch.
As soon as the next startup gets completed, reopen the virtual machine to see whether the error got fixed or not. In case you can still see the AMD-V is disabled in the BIOS (or by the host OS) (VERR_SVM_DISABLED) error, then proceed to the next solution.
Solution 2: Disabling the Hyper-V Windows
Disabling or disconnecting the Microsoft Hyper-V feature with the help of Add/Remove Windows screen feature worked for many users to fix the error
Hyper -V is a Microsoft virtualization technology that is enabled in most of the Windows versions. It creates a major issue because the built-in hardware technology gets turned off when the Hyper -V is turned on or enabled. Therefore, the VM VirtualBox requires VT-X or AMD-V to run the virtual machine, here you will receive an error notification rather than the VM.
Many users also see the VT-x is not available (verr_vmx_no_vmx) error, so if you also see the error then read our guide to fix it
Thankfully, you can easily identify this problem by following a certain set of instructions that will assist you to disable the Microsoft Hyper-V technology. Here is the instruction that you need to follow:
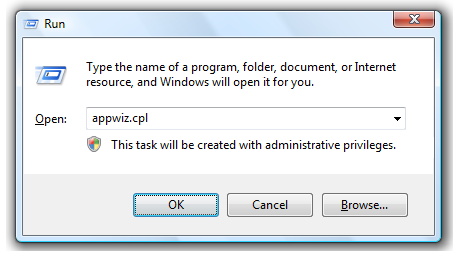
- Go to the Run option or else press Win +R key on your keyboard simultaneously. A Run dialog box will appear on your screen. Next, type “appwiz.cpl” and click on Enter to open the Programs and Features menu.
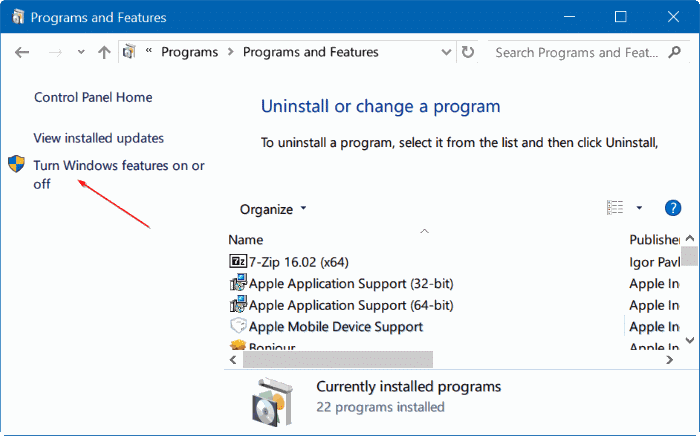
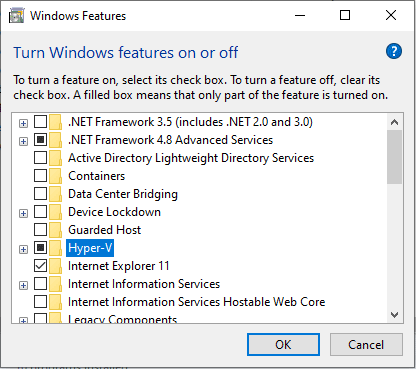
- Inside the Programs and Features menu, you have to use a right-hand menu to click Turn Windows features On or Off
- In Win features screen you need to search for the Hyper – V entry box and then you need to ensure that the box which is linked with it is disconnected or disabled. Next click on OK to save it.
- Again you need to Restart the machine and check if the issue is resolved or not.
If you still confronting the AMD-V is disabled in the BIOS (or by the host OS) (VERR_SVM_DISABLED) issue while boosting up your virtual device or machine then you need to move down and follow the next solution.
Solution 3: Modifying the numbers of CPU cores to 1
The software allocates more than 1 CPU in System settings, which compels the device or system to use the hardware virtualization to start the virtual hosting.
Yet, if your system or machine is unable to support it(if you own a Quad-core AMD or anything equivalent to it), then the process will not finish successfully and you will notice the AMD-V is disabled in the BIOS (or by the host OS) (VERR_SVM_DISABLED) error message instead.
Hopefully, you can fix this issue by revising the number of given CPUs to 1. This will most probably fix the issue. Here are the few basic steps that you need to do :
- Open the Oracle VM VirtualBox, after that you need to click right on the machines that are showing the error and then go to the Settings
- In the virtual settings machine, you need to move to the System tab (by using the left-hand sub-menu) and then access the Processor Then you need to drag the slider which is associated with Processor to 1 CPU and then click on OK to save it.
- Next, Close the settings option or menu and then again start your virtual system or machine. It should run without the AMD-V is disabled in the BIOS (or by the host OS) (VERR_SVM_DISABLED) error.
Solution 4: Modifying the Version to Windows 7 or Windows 2003 (if suitable)
This fix has helped many of the users to retrieve the usual functionality of their virtual machines. Here we have a brief guide that will help you to change the prescribed version of your virtual machine :
- Open the VM VirtualBox, next you need to click right on the machines that are indicating the error and then go to the Settings option.
- Proceed to the General sub-menu which is under the setting option and then you need to hit on the Basic tab. Next, you need to revise the Version by using the drop-down option in Windows 2003 or Windows 7 and then click on OK to save the modifications.
- Next, you need to restart the virtual machine to see whether the boot procedure is booming without the AMD-V being disabled in the BIOS (or by the host OS) (VERR_SVM_DISABLED) error or not.
So, these are the fixes that I hope work for you to solve the error on Windows 10.
Recommended Tool to Make Your Windows System Error- Free
If your Windows PC/laptop is running slow or showing errors then try the professional recommended PC Repair Tool. This is really an amazing tool designed by the professional to fix various Windows issues and errors and solve the stubborn PC problem.
It is an advanced and multifunctional tool that just by scanning once, detect and fix various PC errors. with this can fix errors like DLL errors, update errors, registry corruption, BSOD error, & many others.
If your Windows PC freezes while working this tool can help you to recover from this issue as well and enhance the PC performance & much more.
Get PC Repair Tool to Fix System Files Corruptions & other Problems
Conclusion
So now it’s time, to sum up.
Using the above-discussed solutions you can fix the AMD-V is disabled in the BIOS (or by the host OS) (VERR_SVM_DISABLED) notification then simply follow the given solutions.
In this article, I tried to provide you with all the information and I hope this article will help you to crack the error.
Apart from that if you like this article then, please hit the like the button on your Facebook page. If you have any queries then connect with our experts on our Facebook.
Good Luck..!
Hardeep has always been a Windows lover ever since she got her hands on her first Windows XP PC. She has always been enthusiastic about technological stuff, especially Artificial Intelligence (AI) computing. Before joining PC Error Fix, she worked as a freelancer and worked on numerous technical projects.