
Summary – Dealing with the VT-x is not available (verr_vmx_no_vmx) error message while starting your Virtual machines utilizing the VirtualBox or some other similar software. Then try the top 5 proven solutions to get past the error completely.
Oracle VM or VirtualBox is a program that lets programmers create and manage multiple virtual machines on a single powerful computer. However, several developers have recently reported experiencing a crash followed by the error prompt “VT-X is not available (verr_vmx_no_vmx)” while creating a virtual session.
What is Causing the VT-x is not available (verr_vmx_no_vmx)Error?
- VT-X is not activated in the BIOS settings — VT-X can be disabled manually or remotely in the BIOS settings by some 3rd party apps.
- The CPU on the computer does not support VT-X – Although rare, there are times when the error VT-X is not available in VirtualBox windows 10 occurs because the PC in question lacks the necessary hardware to implement the VT-X technology.
- Windows Hyper-V virtualization is enabled — This is probably the most prevalent source of this problem. Because Microsoft’s Hyper-V technology is known to interfere with VT-X, if Hyper-V virtualization is enabled, the OS will automatically disable VT-X.
- Anti-virus disabled the VT-X — Maybe your antivirus just published an update that effectively disables VT-X while real-time protection is active unless the user chooses to activate nested virtualization from the settings menu.
- Core Isolation is turned on — Core isolation is a Windows Defender Security feature that has been known to interfere with VT-X when it’s turned on.
As you are now aware of the common culprits triggering the error below follow the possible solutions to resolve the error in Windows 10.
How to Fix VT-x is not available (verr_vmx_no_vmx) Windows 10?
Solution 1: Turn off Hyper-V Virtualization
You can choose to disable Hyper-V virtualization to fix the error VT-X is not available (verr_vmx_no_vmx). The steps are as follows:
- In the Windows search box, type Command Prompt and select the best match.
- Then choose Run as administrator from the context menu.
- In the command prompt type the below-given commands and press Enter.
bcdedit /set hypervisorlaunchtype Off
bcdedit /set vm No
dism.exe /Online /Disable-Feature:Microsoft-Hyper-V

Close the command line window and restart your computer after the operation is complete. Then reopen the virtual machine to see if the VT-X is not available (verr_vmx_no_vmx) problem has been resolved.
Solution 2: Use Windows Defender to Disable Core Isolation.
You can also select to disable core isolation from Windows Defender to repair the issue VirtualBox Error VT-X is not available. This worked for many users to get past the VirtualBox Error in Windows 10. The steps are as follows:
- To launch Settings, press the Windows key and the I key at the same time.
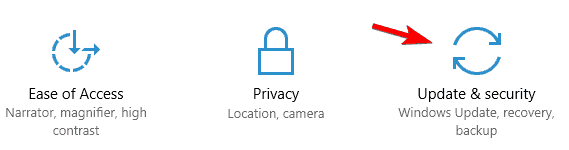
- Select Update & Security from the pop-up box.
- Then select Open Windows Security.
- Select Device Security from the right panel.
- Click Core isolation details in the pop-up window.
- Then turn the Memory Integrity toggle to Off.

After that, restart your computer to see if the VT-X is not available (verr_vmx_no_vmx) error has been resolved.
Solution 3: Enable VT-X in the BIOS
The error VT-X is not available in VirtualBox Windows 10 can also occur if the Virtualization Technology is disabled in the BIOS settings. As a result, you can enable VT-X from the BIOS options. The steps are as follows:
- Startup your PC. When the Windows logo displays, keep pressing the setup key to enter BIOS.
- Navigate to the Security tab and scroll down to System Security after entering the BIOS.
- Then see if Virtualization Technology, also known as VTx/VTd, is mentioned and activated.
- If it isn’t already enabled, set it to enabled.
After you’ve completed all of the procedures, restart your computer to see if the VT-X is not available (verr_vmx_no_vmx) has been resolved.
Solution 4: Bonus Solution
If your VirtualBox virtual machines stopped working after the Windows update with the same error notice, you must enable all Hyper-V features in the Control Panel under “Turn Windows features on or off,” then restart.
After restarting, go back to the same location and disable all Hyper-V functions before restarting. It’s for enabling and disabling the feature to fix some VT-X is not available errors in VirtualBox caused by Windows updates.
It is estimated now the error must have been fixed in your case.
Best & Easy Solution to Fix VT-X is not Available (verr_vmx_no_vmx)
Sometimes, due to the Windows system errors or glitches, you start seeing various errors. In this case, run the professional recommended PC Repair Tool.
This is an advanced tool to solve various fatal Windows errors like BSOD errors, DLL errors, difficulties with programs/applications, system files or registry issues, and others in a few clicks on your computer.
Apart from this, the tool will also safeguard your PC from different types of malware/viruses and speed up your PC for better performance.
Get PC Repair Tool, to Fix VT-X is not Available in Windows 10
Conclusion:
That’s all about the VT-x is not available in Windows 10 error. Here I tried my best to list down the best possible solutions to solve the error completely.
So follow the listed solutions carefully till you find the one that works for you.
Hope the article works in your case. You can now connect with our experts simply by heading to our Facebook page and sharing your query. We will connect with you as soon as possible.
Also, don’t forget to like and share our article.
Good Luck..!
Hardeep has always been a Windows lover ever since she got her hands on her first Windows XP PC. She has always been enthusiastic about technological stuff, especially Artificial Intelligence (AI) computing. Before joining PC Error Fix, she worked as a freelancer and worked on numerous technical projects.