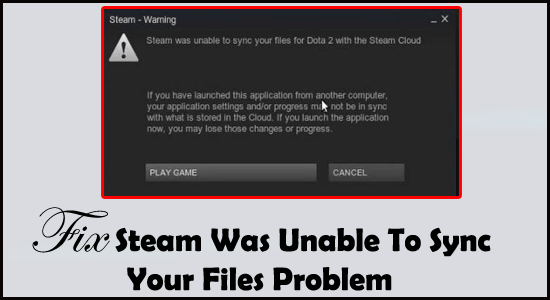
Many users reported they see the Steam was unable to sync your files error while launching the game. As per the users, the Steam game won’t launch properly and they see the error message on their screen.
The error message states that Steam can’t sync the local files to the Steam cloud and generally appears when something went wrong with the network that needed to address.
This might be as the Steam server is down or become inaccessible.
Today in this article, I am going to share some best fixes to resolve Steam Was Unable To Sync Your Files files. But before that learn the possible causes of the Steam file Sync problem.
What If Steam Is Unable To Sync Files To The Cloud?
Steam was unable to sync your files is a clear indication that your Steam won’t be able to Sync Files over the Steam Cloud. This issue occurred when something won’t wrong in the network.
If you ignore this error message and continue playing the game then potentially this causes conflict between the local and cloud files. This results in a data loss-like situation.
How To Fix Steam Was Unable To Sync Your Files Error?
1# Deletion of Userdata Folder
You can easily get the userdata folder within the directory of the Steam app. This particular folder has account details, user synchronized data, and cloud configurations. Unfortunately if somehow these files got corrupted then you will receive errors like “Steam was unable to sync your files error”. So to fix this you need to delete this userdata folder, here are the steps that you need to follow:
- At first, open your system Task Manager. After that end entire Steam-related tasks and processes.
- Now go to File Explorer first and then to the Steam directory.
- Search for the folder having the named “userdata” within the Steam folder.
- Now remove the userdata folder or just cut-paste it anywhere on the PC. (Such as Desktop, Document, etc).
- Re-launch the Steam app and then check whether the error is been fixed or not. Besides this whether your Cloud is now able to sync the profile or not.
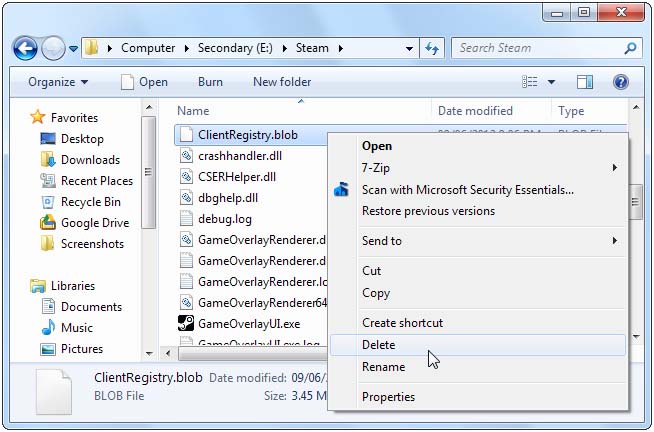
2# Delete ClientRegistry.blob
Try deleting the Clientregistry.blob file to fix steam was unable to sync your files.
This Clientregistry.blob file keeps the preferences and some other game settings. Sometimes situations may arise where this file easily gets corrupted on steam and thus you need to delete them off. Here are the steps that you need to follow:
- At first, take exit from all the Steam processes present in the Task Manager.
- After that open the File Explorer and then shift to the directory of the Steam installation. By default, you will get it at this location: C:\Program Files\Steam.
- Within Steam directory, search for the file ‘clientregistry.blob’.
- Copy and paste your file somewhere on the PC.
- After that delete clientregistry.blob file from the Steam folder.
- At last, open the Steam client and check whether the error has been fixed or not.
Note: after deleting the ‘clientregistry.blob’ file, login back into the account, and don’t forget to share your credentials before trying up this method.
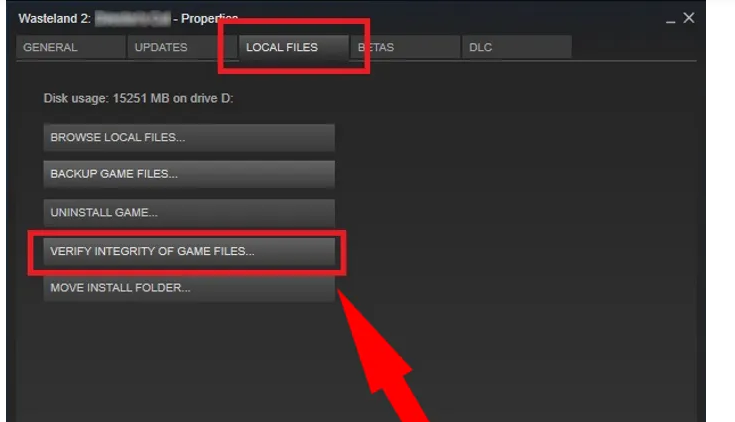
3# Verify Game Files Integrity
If your game file is somehow got corrupted meanwhile downloading or updating any process on steam.
In case, you are getting the steam was unable to sync your files error, you must try verification of the game files integrity by making use of all the dedicated options within steam settings.
In this way, all the corrupted or bad game files easily get replaced with fresh ones.
Here are the steps that you need to follow for replacing the game file integrity in Steam.
- At first, open your Steam app and then visit the Library menu which is present at the toolbar top.
- Choose the Games tab.
- Make a right tap over the problem-causing game.
- Now go to the context menu, make a tap over the Properties tab.
- After that hit the “Local Files” option and then to the “Verify integrity of game files”.
- Once the whole verification process gets over, just check whether this Steam sync files error is now been fixed or not.
4# Refresh Steam files
Another alternative solution that you can try to fix steam was unable to sync your files error is deleting the entire Steam client configurations files and then reinstalling them. Follow the steps to refresh the Steam files:
- Open the Task Manager by pressing the Ctrl+Shift+Esc keys from your keyboard. After that end the Steam processes.
- Go to the File Explorer tab and then go to the Steam installation directory.
- Now select the folders and files except the steam.exe executable file and steamappsfolder.
- Hit the Delete button from the keyboard for deleting all the files.
- At last, restart the PC and the Steam client with the administrator rights.
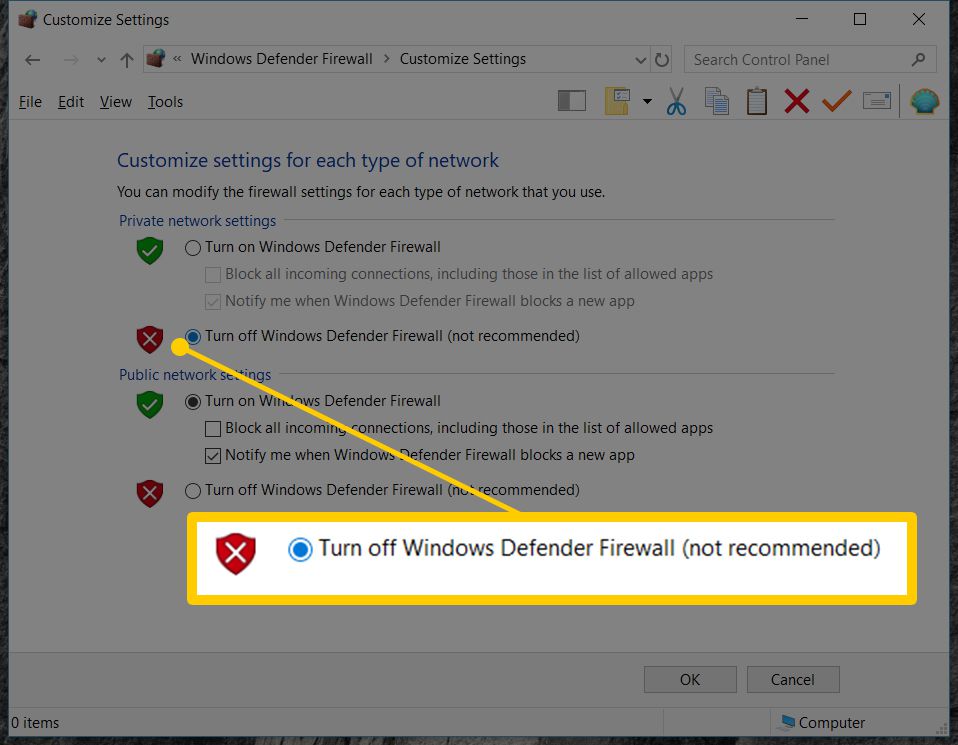
5# Disable Firewall Or Just Add Exception
If your system is installed with a firewall then prevent your steam app from getting operated at full capacity.
Undoubtedly firewall usage is best for data security but sometimes it causes problems in sync your files in steam app.
To get out of this issue, you need to add an exception for disabling the firewall system and to access the game files later on. Check whether the issue is been fixed or not. Mostly, these problems are fixed by the firewall system.
6# Add Steam To Antivirus Exceptions
Similar to the firewall, the steam process is also hindered by the antiviruses. So for this, you need to disable the antivirus protection and then check whether the problem is resolved or not.
You have the option to add steam within the antivirus exception list if in case you don’t want to disable the antivirus.
For this, just open the antivirus software and then make a tap over settings “Exceptions” and after that add Steam within the list of exceptions.
If you are using the Avast antivirus then go to the following path:
- Make a tap over Home tab and then go to the Settings option.
- On the setting, the page shifts to the General tab and hits the Exclusions option for adding steam to the antivirus exception section.
AVG users need to follow this:
- Make a tap over the Home tab and then go to the Settings option.
- On the setting, the page moves to the General tab and then to the Components tab.
- Now go to the Web Shield option and then to the Exceptions.
Other system antivirus software has also similar types of exceptions settings.
7# Repair Your Steam Library Folder
If steam was unable to sync your files then the problem is with the Steam Library folder. You have the option to repair Steam library folder. Follow the steps to use this option.
- Open the Steam client make a tap over the Steam > Settings option from the main option.
- Look for the Downloads tab.
- Tap to the Steam Library Folders within the Downloads option.
- After that, choose the Steam library folder and then make a right tap over it.
- Go to the context menu; hit the Repair Library Folder.

Now you will see that the Steam app repairs up to your library folder. Fix problems that are associated with the folder.
When the whole process gets over, don’t forget to check whether the problem is been fixed or not.
Recommended Solution: Fix Various Windows 10 PC Problems
If your system is running too slow or showing errors then go with Expert’s recommended solution for scanning your PC with the PC Repair Tool.
With this is a multifunctional tool that just by scanning once, detects, and fixes various PC problems. With this, you can also fix many computer fatal errors like BSOD errors, DLL errors, Runtime errors, repair registry entries, and much more.
This tool is completely safe and scans your PC to make it work faster.
Get PC Repair Tool, to Fix Windows 10 Issues & Errors
FAQ:
For uploading the games to Steam cloud, just follow down the below-given steps: At first, open your Steam Now from the top toolbar go to the Settings After that go to the Cloud Enable the option “Enable Steam Cloud synchronization for applications which support it”.
For disabling the Steam cloud follow this path: Go to the Steam > Settings and then to the Cloud Uncheck the option: “Enable Steam Cloud synchronization for applications”
To do this, search for your game within the Steam library and then make a right tap over it. Select the Properties> Updates and then enable the option “Enable Steam Cloud synchronization”. If this option is disabled then steam won’t automatically download the cloud saves nor upload any new ones.
When Steam Network fails to connect then the error message “Could not connect to Steam network” occur when trying to log-in to the steam account. By restarting the steam app driver and network settings like issues can easily get fixed.
Maybe the reason is the slow internet connection speed which is a very important part of the Steam cloud sync upload time. Even though your connection speed is too fast, steam won’t upload at a far slower rate than maximum speed. How Do I Upload Games To The Steam Cloud?
How Do I Disable Steam Cloud?
How Do I Force Steam To Cloud Sync?
Can Not Connect To Steam Network?
Why Is Steam Sync So Slow?
Conclusion:-
This is how you can easily fix off this steam was unable to sync your file issue. Just follow down the above-listed fixes to fix Steam file sync problem.
If have some more tricks which I missed out on or if you have any queries to ask regarding this error then share your opinion on our Facebook page.
Don’t forget to like, share, and follow it. Good Luck..!
Hardeep has always been a Windows lover ever since she got her hands on her first Windows XP PC. She has always been enthusiastic about technological stuff, especially Artificial Intelligence (AI) computing. Before joining PC Error Fix, she worked as a freelancer and worked on numerous technical projects.