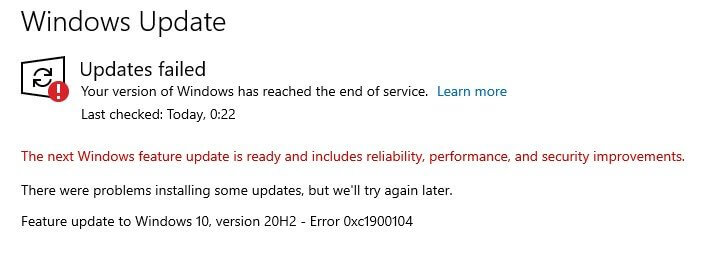
You may see the Error 0xc1900104 while installing the Windows 10 feature update. The error simply means that the update process gets stuck or won’t complete within the required time (MOSETUP_E_PROCESS_TIMEOUT).
Well, there are also chances that the reserved or the recovery drive of your system is running out of space. And as a result, the 20H2 update gets failed or stuck during installation at a certain percentage like 61% or 99% and display the error message on the screen.
The Windows 10 Update Error 0xc1900104 is very irritating and after investigating we find out the main reason responsible for the update hangs with error 20h2 error 0xc1900104 is the installed Conexant driver.
So, before heading towards the fixes it is important to understand the common culprits that trigger the error.
What Causes Windows 10 Update Error 0xc1900104?
- Low on space – Another most possible reason responsible for Windows Update Error is low disk space. Installing the feature update requires at least 16 MB, so if you are running out of space then free up disk space to install the update without error.
- System’s BIOS is Outdated: If your system BIOS is missing due to bug fixes or the latest security patches, your Windows update becomes incompatible while installing the latest version and you may encounter error code 0xc1900104 on your Windows 10 system.
- Incompatible Conexant Device or its Driver: If your OEM and your Conexant audio driver are out of date, then your system cannot install any new updates and you will face error 0xc1900104 on your Windows 10 PC.
So, before jumping into troubleshooting methods, check whether you don’t have other updates pending to install rather than 20H2. And also make sure to check the system drivers are updated or not.
If you find that everything is fine, continue with the troubleshooting methods one by one until you resolve the Windows update error 0xc1900104.
How to Fix Windows 10 Update Error 0xc1900104?
Fix 1 – Run Windows Update Troubleshoot
Here it is suggested to run the Windows Update Troubleshooter. It is a Windows pre-built tool that deals with the bugs or glitches that causes the update to fail and solve the update related problems.
Follow below instructed to run Windows Update Troubleshooter:
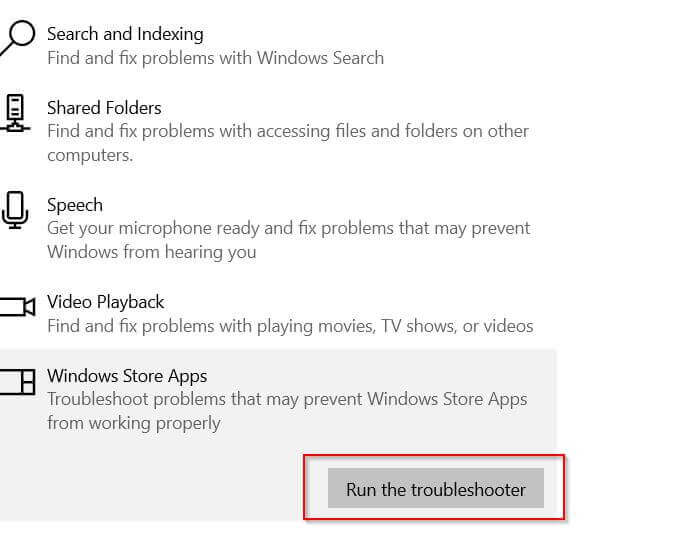
- Click on the Windows icon and then click on the setting option.
- Now, click on the Update & Security option.
- From the right side of the menu, click on the Troubleshoot option
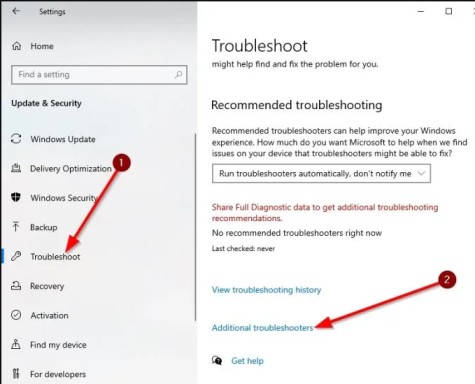
- After that, click on the Additional troubleshooter option.
- Now, from the list, select the Windows Store Application option.
- Click on the Run troubleshooter option.
After completing the process troubleshooter tool will scan your problem and fix it. Once the process gets finished close the Windows troubleshooter application.
Now, try to update Windows 10 once again and see the problem gets fixed or not.
Fix 2 – Disable Conexant Audio Device & Delete Conexant Driver
As already confirmed on the Microsoft official community that the Conexant drivers might cause the update to the stuck and unable to install the 20H2 update on your Windows 10 PC.
So, if you are using the Conexant audio device then disable the Conexant Audio device, uninstall Conexant drivers from the device managed might work for you to get past the error.
Follow the instructions to do so:
- Press Windows + R keys and in the Run box that appears type devmgmt.msc and hit Enter

- Now in device manager, expand the option Sound, Video, and Game Controllers and then right-click on Conexant audio device option.
- Choose Disable Device and confirm for disabling the Conexant audio device.
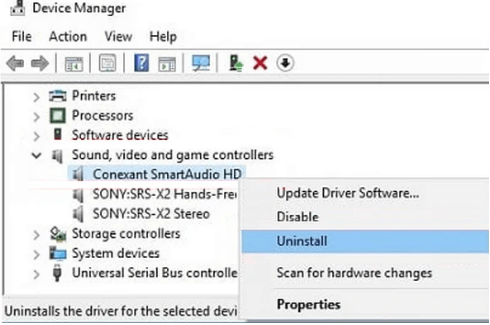
- Then on the Conexant audio device right click and choose Uninstall.
- Click the checkbox next to Delete the Driver Software of This Device and click on OK
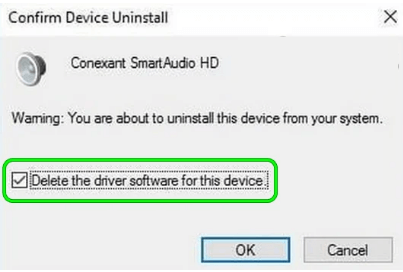
- Then follow the onscreen instructions for uninstalling the Conexant driver
- Now repeat the process for removing Conexant Audio Devices under Audio Inputs and Outputs (if available) in the Device Manager.
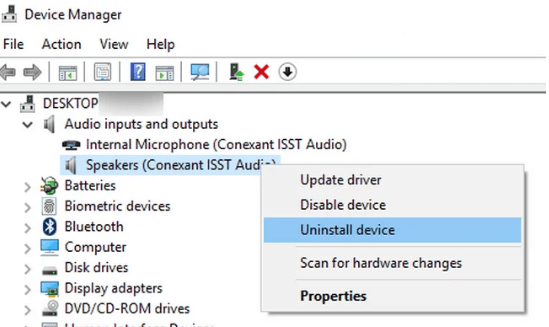
- Now choose to Restart your PC option
Once your PC reboots try installing the Windows 10 20H2 feature update and if you still see the error 0xc1900104 then follow the next possible solutions.
Fix 3 – Increase System Partition Size
The main reason behind the error is the low system partition size. The latest Windows update requires 16 – 32 MB of System space and if your system space is low on space then increase it.
Running the Disk Management tool helps you reduce the volume of other partitions on your disk and add space to your system partition. Sometimes your C: drive becomes very small, you have to extend the partition.
If you have unallocated space next to partition C: then you can increase it. To increase the partition space, use any partition management software. Sometimes Windows 10 system tools can’t do it. But you can shrink the system partition size of C: driver and build a new partition. here are the easy steps to do so:
- First, click on Windows + R key together to open the Run dialogue box.
- After that in the text box type diskmgmt.msc, and then click on Enter button to open the Disk Management.
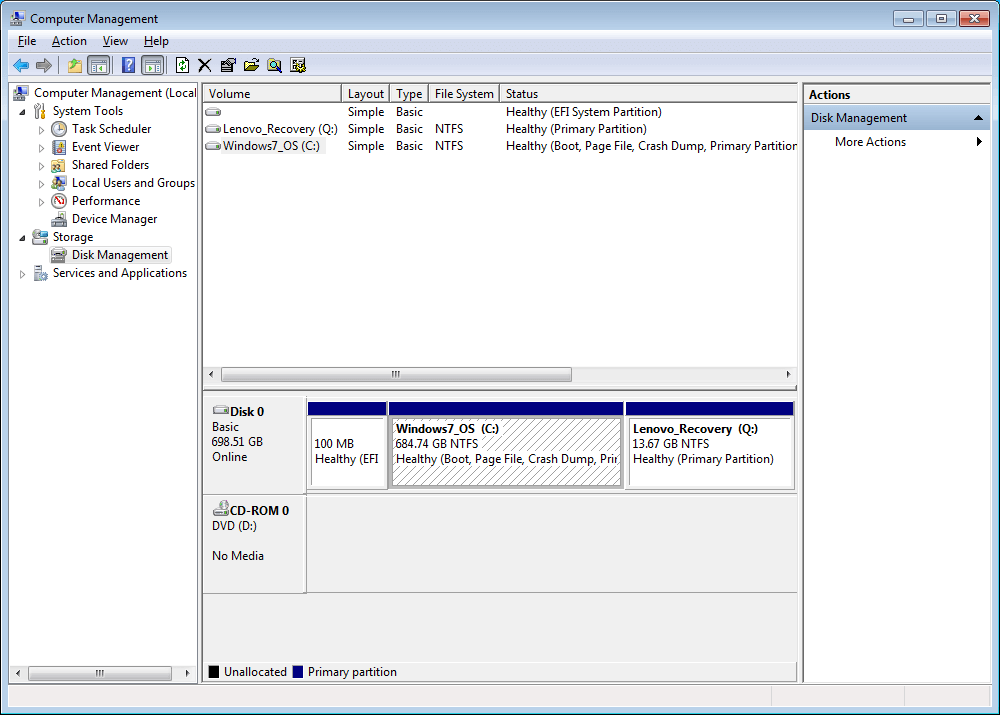
- Now, Right-click on the C drive and select the Shrink Volume option.

- On the other screen, You can set the shrinking size.
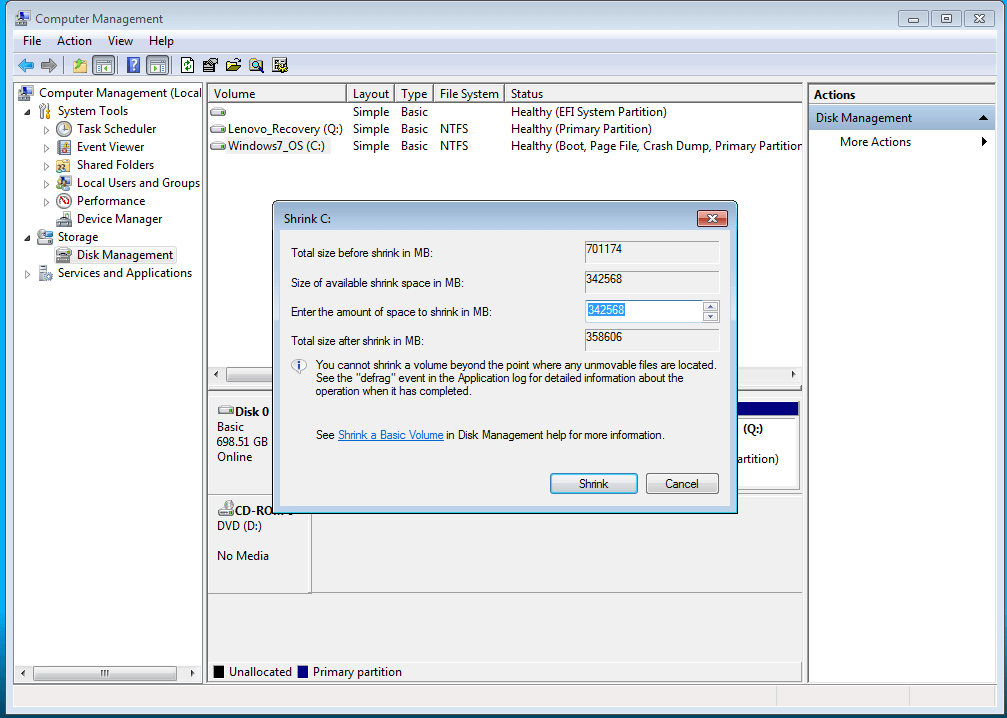
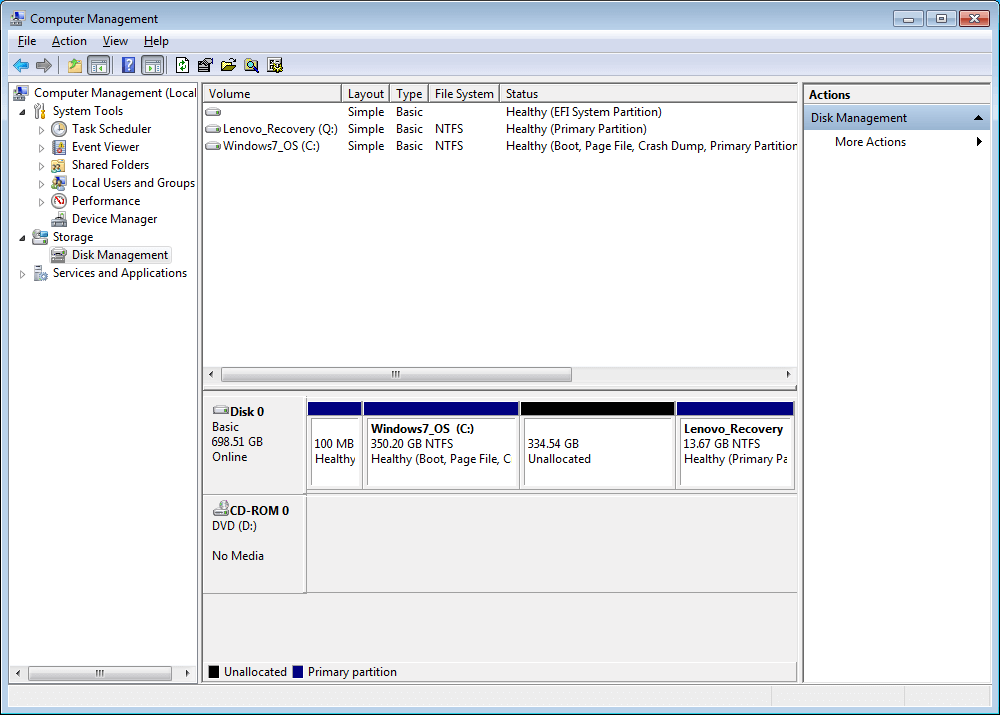
- After that, drive C will shrink and a new unallocated disk space
- You can also create a new partition on unallocated disk space. You just need to right-click on the New simple volume and select it.
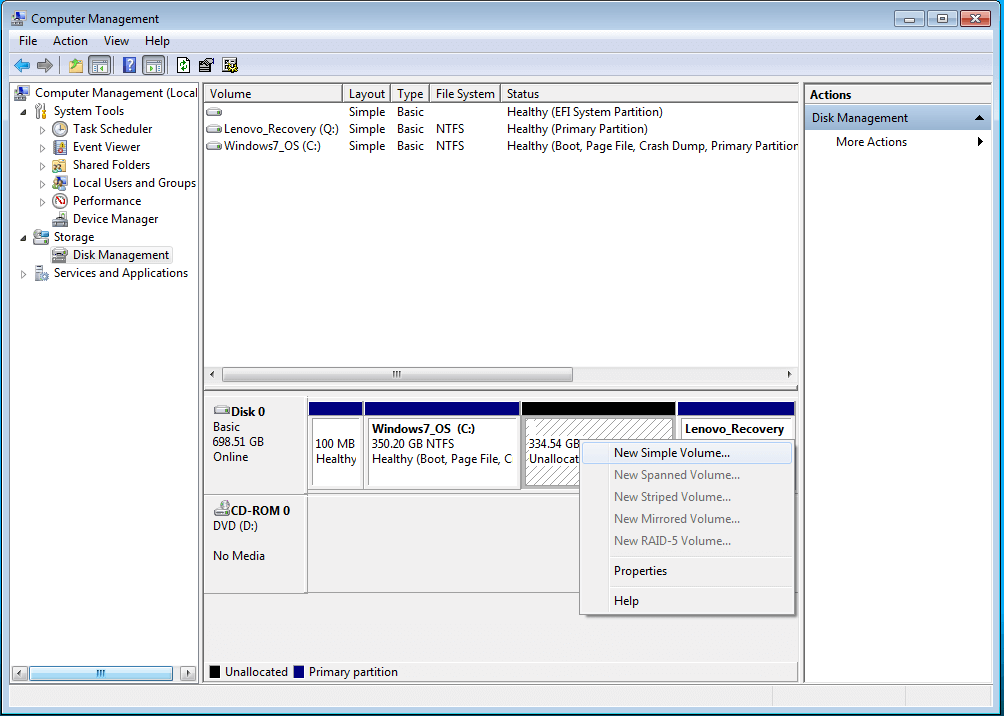
- Here you have to select the size for your partition and then hit on the Next button to finish the process.

If increasing the system space won’t work for you to fix error 0xc1900104 when installing the 20H2 update then follow the next possible fix.
Fix 4 – Rename SoftwareDistribution folder
Changing the name of the SoftwareDistribution folder can fix this problem for sure. Follow the below-given instruction to change the name of the SoftwareDistribution folder:
- Press Win + R keys together to open the run command
- In the text box type cmd and hit the Enter button.
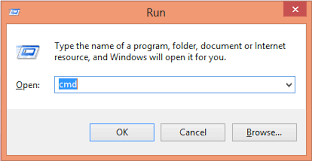
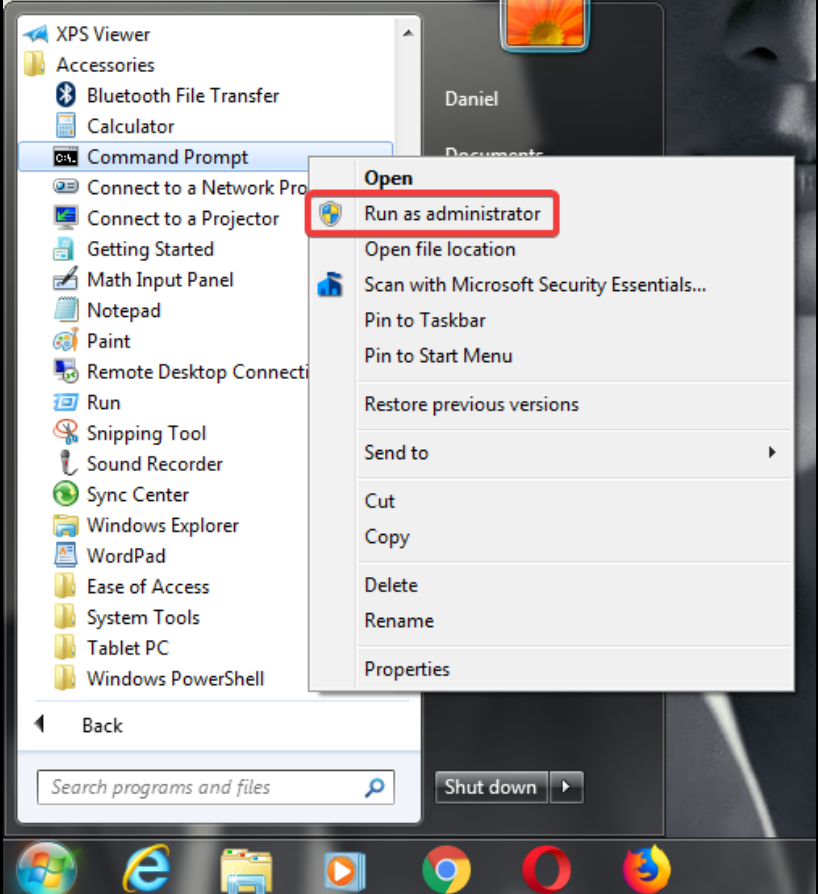
- Now, open CMD as an administrator.
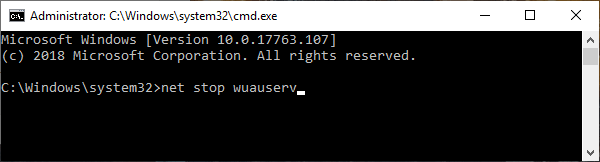
- There are 3-step processes in the 1st step you have to freeze some of the services. For that, you have to type the below-given commands and press Enter after each command.
net stop wuauserv
net stop cryptSvc
net stop bits
net stop msiserver
- After that, execute the below-given command to change the name of the existing folder. With the help of this command, you can rename the folder in place of the old one.
ren C:\Windows\SoftwareDistribution SoftwareDistribution.old

- Once you have edited the name of the folder, you will have to resume those stalled services. To do so, execute these 4 commands in the terminal.
- After doing so, now execute the below-given command:
net start wuauserv
net start cryptSvc
net start bits
net start msiserver

Once all the commands have been run on your computer, close the Windows command prompt.
After that, Restart your PC and check for updates again after restarting your computer.
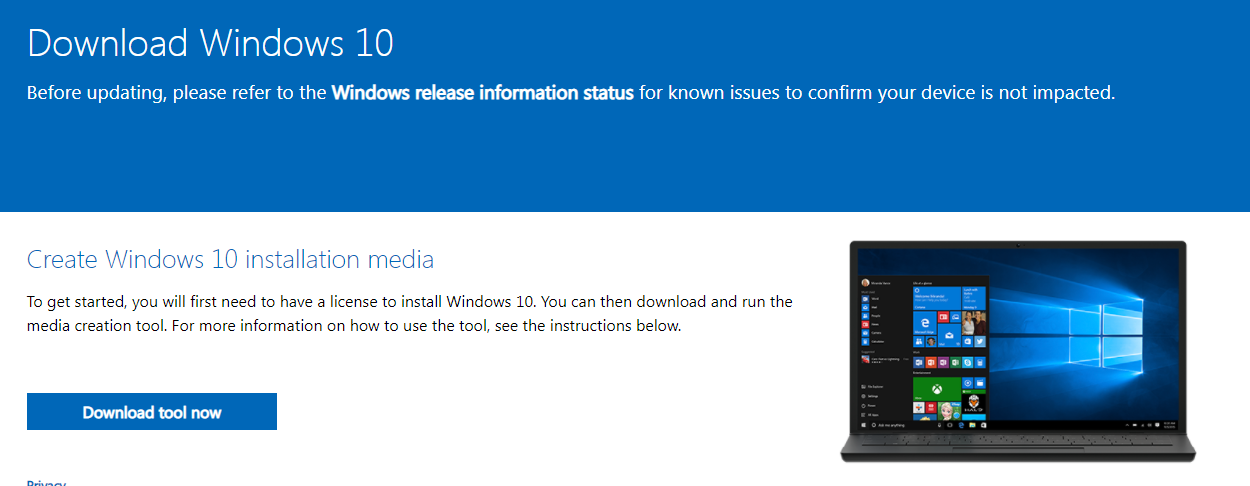
Fix 5 – Use Media Creation Tool
After trying all the above solutions, still, the update failed to install then install the update manually using the Media Creation Tool (MCT) that will help you update Windows 10 easily. To do so, follow the instructions given below:
- First, Open the official Microsoft Software Download page.
- Now, scroll down and hit the “Download tool now“.
- Select a location where you want to save your downloaded file.
- Hit the Save button to save the file/package.

- Now, open the downloaded file in the File Explorer window.

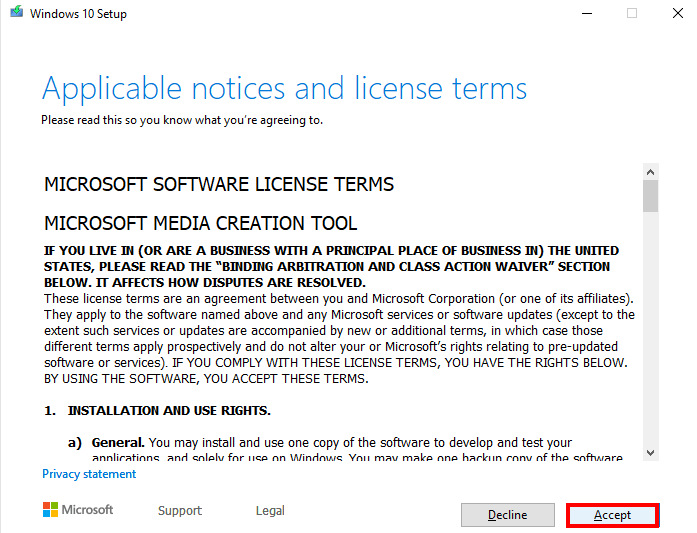
- After that, double click on the “MediaCreationTool2004“ and then click on Accept button
- Here click on the radio button next to Upgrade this PC now and update your PC.
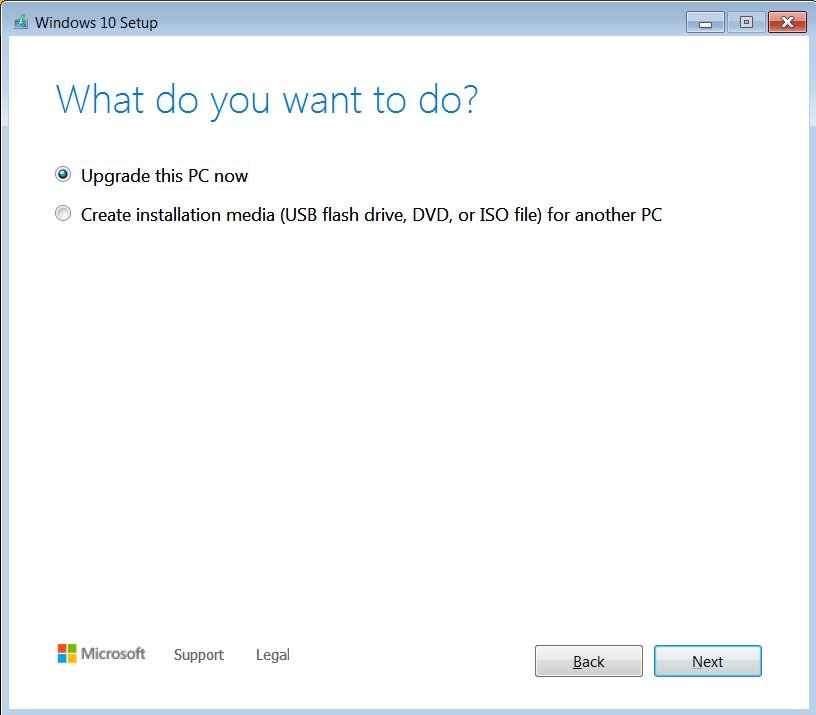
- Now click on the Button Next to start the upgrading process.
After completing the process reboot your PC, and it is estimated the Windows 10 update error is resolved.
Best Solution to Fix Windows 10 Update Error 0xc1900104
Sometimes due to internal glitches or bugs, your system is unable to install the update, so if the given manual solutions won’t work for you to solve the error then scan your system with the professional recommended PC Repair Tool
This powerful tool scans your PC and fixes the corrupted or missing files from your PC. Not only that, it can also fix various problems such as deleting unwanted junk files, internal PC errors, cleaning the registry, preventing viruses or malware, and many more.
You don’t need to do anything, just download this powerful tool and install it on your PC, and then this tool will do its job automatically.
Get PC Repair Tool, To Fix Windows 10 Update Error 0xc1900104
Conclusion:
This is all about Windows 10 update error 0xc1900104, here I did my best to provide you with the most effective solutions to overcome the error on your Windows 10 PC.
Hope with the help of the above solutions you can easily fix the Windows 10 update error. If you find this article helpful, please like it and share it.
In addition, if you have any questions or doubt regarding this topic, please share them on our Facebook page.
Thank you.
Hardeep has always been a Windows lover ever since she got her hands on her first Windows XP PC. She has always been enthusiastic about technological stuff, especially Artificial Intelligence (AI) computing. Before joining PC Error Fix, she worked as a freelancer and worked on numerous technical projects.