
Snip and Sketch is a popular tool developed by Microsoft for capturing screenshots on Windows PC. But just like any other software, there are cases when the Snip and Sketch tool encounter issues and stopped working due to some sort of hindrance.
So, if you are the one dealing with Snip and Sketch not working or not launching at all problem, then this article is for you. In this article, we discuss why is Snip and Sketch not working and what to do when Snip and Sketch fail to work.
Keep reading the article to learn more about it.
To repair corrupted Windows system files, we recommend Advanced System Repair:
This software is your one stop solution to fix Windows errors, protect you from malware, clean junks and optimize your PC for maximum performance in 3 easy steps:
- Download Advanaced System Repair rated Excellent on Trustpilot.
- Click Install & Scan Now to install & scan issues causing the PC problems.
- Next, click on Click Here to Fix All Issues Now to fix, clean, protect and optimize your PC effectively.
Why is Snip and Sketch Not Working?
- The screen scaling of your computer is not set to the appropriate percentage; thus, when you try to take a screenshot, it gets messed up.
- The Snip and Sketch tool is not running in the background. Hence, the process is unsuccessful when you capture screenshots from other apps.
- With the focus assist and auto copy features enabled on your computer, you cannot use Snip and Sketch properly. You are advised to disable these features if they are enabled.
- The outdated graphics card driver on your computer will not let the PC function in its regular tasks.
- The apps registered using Windows PowerShell may be corrupt sometimes, and you cannot use them for a while. Hence, there arises a need to re-register the apps again through PowerShell.
- If there are any misconfigured or corrupt installation files of the Snip and Sketch, there are no other ways to solve this issue rather than to reinstall the app.
How to Fix “Snip And Sketch Not Working”?
Solution 1: Set the Screen Scaling of the PC to 100%
You have to ensure the screen scaling of your computer must be set to 100%; if not, this might break the normal operation of the Snip and Sketch tools. This usually happens when you use a multi-display setup with various scaling levels of displays. Follow the below instructions to correct the screen scaling of all connected displays to 100%.
- Launch the Windows Settings by pressing the Start + I keys
- Now, click on System and select the Display
- Then, go to the Scale & Layout section, and change the Scale to 100%.
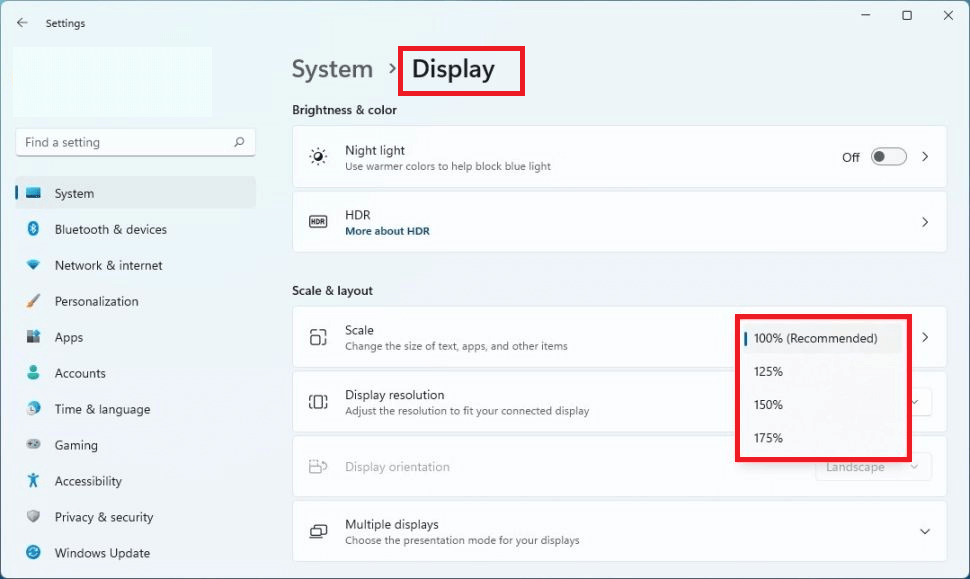
- Repeat the same steps for all the displays connected to your device.
- Again, relaunch the Snip and Sketch tool and check if it works now.
Solution 2: Allow Snip and Sketch Tool to Run in the Background
The Snip and Sketch Tool must run in the background to enable the Snip & Sketch feature whenever you press the Windows + Shift + S keys. This tool is power-optimized by default, yet you can always change the tool to run in the background, and fix snip and sketch not working problem.
- Press the Windows + R key to launch the Windows Settings
- Now, go to the Apps menu and click on Apps & Features.
- Then, click on Advanced options next to Snip & Sketch tool.
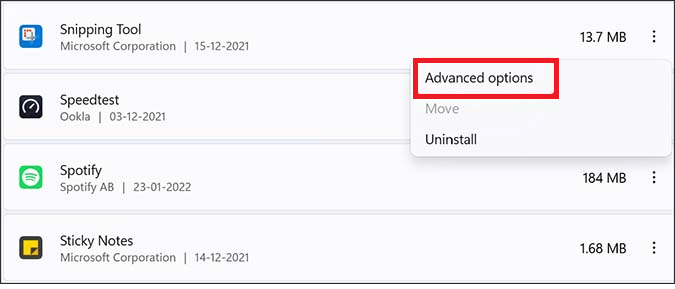
- Next, select the Background apps permissions.
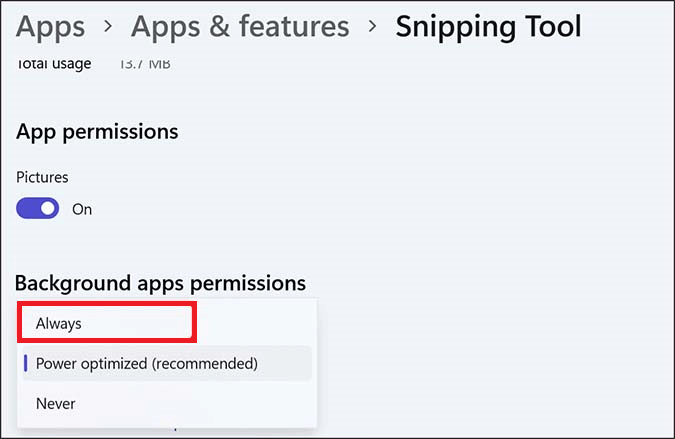
- Then, expand the drop-down menu and click on Always. Although this solution will consume more battery, you will not face any issues with Snip & Sketch now.
Solution 3: Use Classic Snipping Tool
A few users have suggested that the classic snipping tool (executing the snipping tool from the SnippingTool.exe ) helped them fix snipping tool not working.
Follow these instructions to use the classic snipping tool on your Windows 11 PC.
- Open File Explorer on your Windows 11 PC by clicking the Windows + E keys
- Then, go to the drive on which the Operating System is installed. It would usually be C:\Windows\System32.
- Then, find the SnippingTool.exe application and double-click on it.
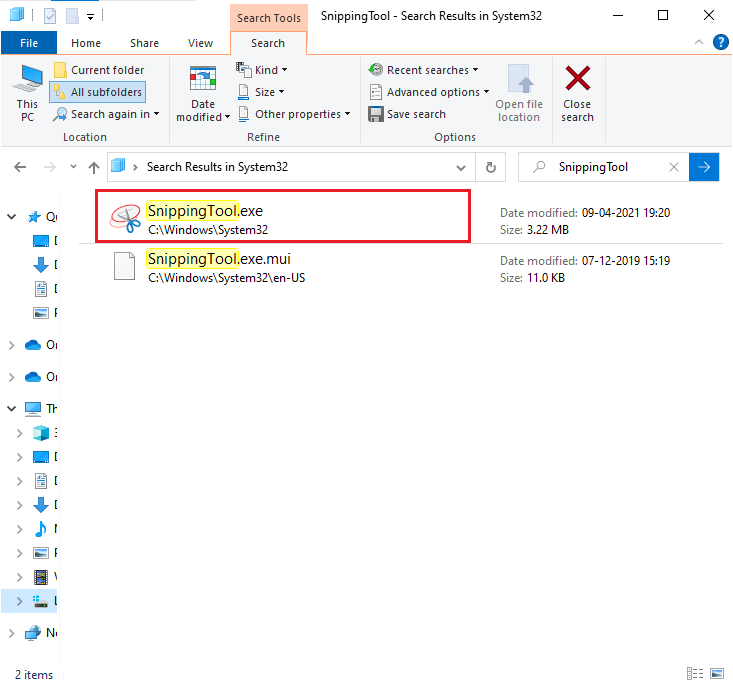
- Now, the tool opens, and check if you can take screenshots without any issues or errors.
Solution 4: Disable Focus Assist
The Focus Assist feature in Windows 11 PC helps you stay on your process track by minimizing distractions. It works with integration from the Clock app with the help of features like a focus timer and music integration.
When you have enabled this Focus Assist feature, a focus timer will be displayed on your screen, do not disturb mode will be turned on, taskbar apps will not flash to alert you, and badge notifications on apps in the taskbar will be turned off. All these processes will not let the Snip & Sketch app function properly.
Follow these instructions to disable this feature on your Windows 11 PC and fix snip and sketch not working.
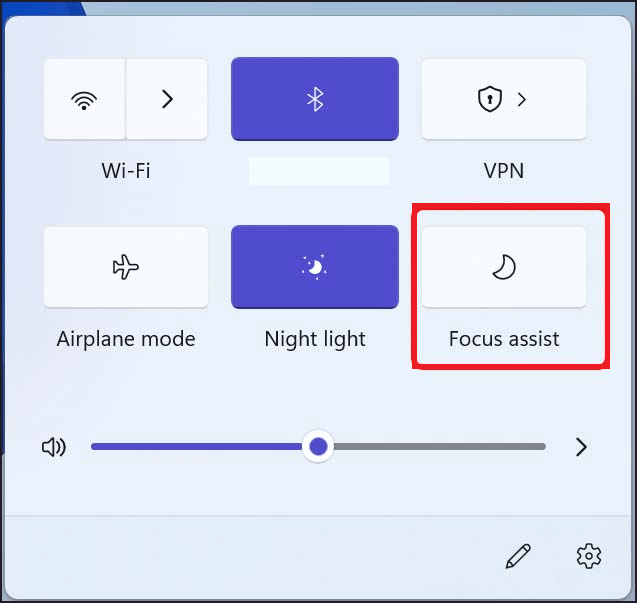
- Press the Windows + I key to open Windows Settings and click on System.
- Then, click on Focus Assist. You can also open the Action Center from the taskbar and click on the Focus Assist icon (if enabled already) to disable the feature.
- You can exclude the Snip & Sketch tool from the Focus Assist feature. Here are a few instructions.
- In the focus assist setting screen, click on the Priority only radio button and then press the Customize priority list.
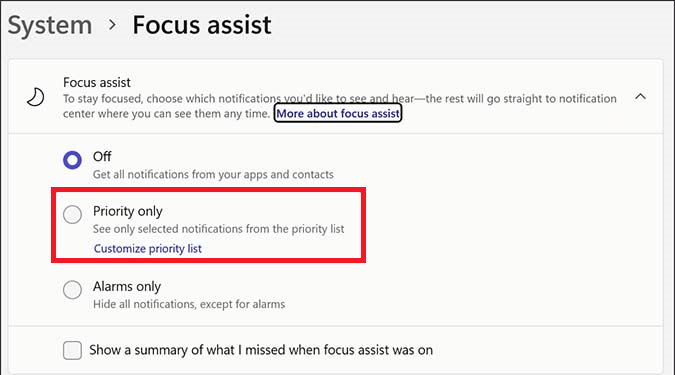
- Finally, add the Snip & Sketch app to the priority list. Once done, check if you can launch the app without any issues.
Solution 5: Re-register Apps using PowerShell
Re-registering the app via PowerShell will reset the app and fix the glitches with the app that might be stopping the Windows snip and sketch tool from functioning properly.
Follow the steps to do so:
- Go to Windows 11 search bar and type Windows Powershell. Open it with administrative rights.
- Copy and paste the following command in the Windows PowerShell window and hit the Enter key.
Get-AppXPackage -AllUsers | Foreach {Add-AppxPackage -DisableDevelopmentMode -Register “$($_.InstallLocation)\AppXManifest.xml”}
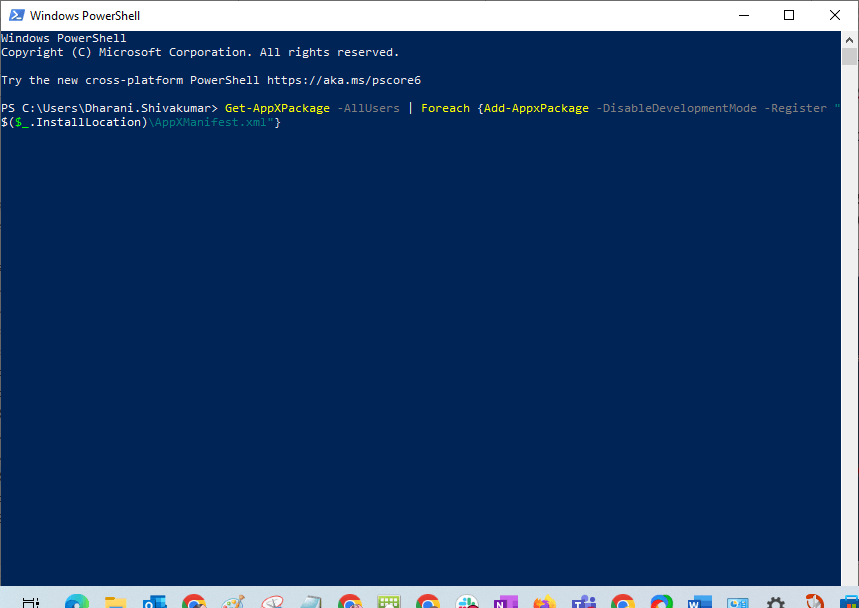
- Reboot your computer to save the changes. Then, launch the Snip & Sketch app and check if it opens without any issues.
Solution 6: Update the Graphics Driver
If your graphics driver is outdated it conflict with the apps and stops it from running or functioning properly. So, here it is suggested to update the driver and then check if the snip and sketch not working on Windows issue is resolved.
Follow the steps to do so:
- Go to the Start menu and type Device Manager in the search box. Now, click on Open.
- Then, double-click on Display adapters. This opens the driver.
- Now, right-click on the device driver and click on the Update driver option.
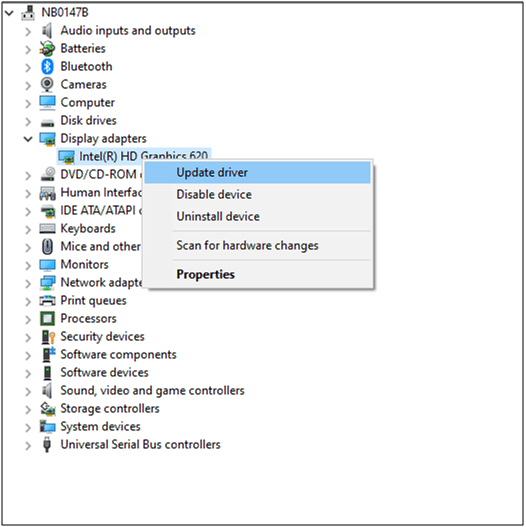
- Click on Search automatically for updated driver software
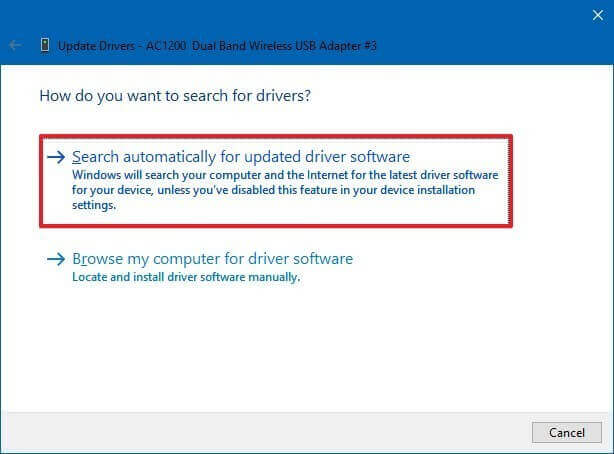
- Close all the windows and reboot your PC once you have installed the latest drivers.
Moreover, you can also update the driver using the automatic Driver Updater tool. This is an advanced tool that, just by scanning once, detects and updates the entire system drivers.
Get Driver Updater to update entire drivers automatically
Solution 7: Repair & Reset Snip & Sketch Tool
If you still face the Snip and Sketch not working Windows 11 issue even after trying all these methods, you can try repairing and resetting this tool as instructed below.
- Hit the Windows key and type Snip & Sketch in the search box.
- Now, press the App settings.
- Scroll down to the Settings screen and press the Repair
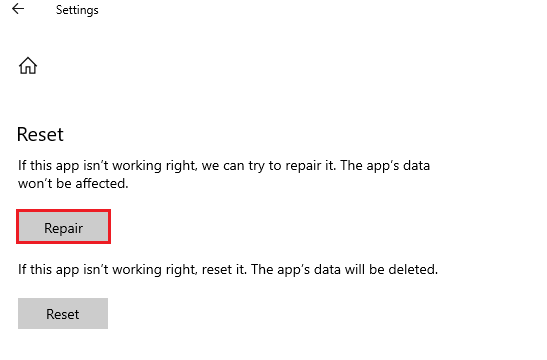
Note: If you reset the Snip and Sketch app, your app data will not be removed.
- Wait until the repairing process of Snip and Sketch is completed and launch it again. When you face issues again, repeat these steps and press Reset.
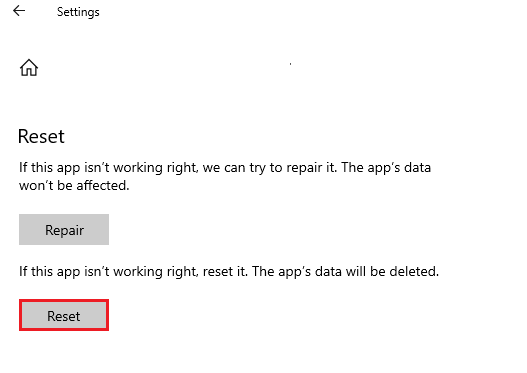
Note: When you reset the Snip and Sketch app, the app data will be deleted.
- Finally, restart the computer and launch the tool. This time, it opens without any issues.
Solution 8: Tweak Regedit in Windows 11
If you cannot see the Snip & Sketch tool in the menu or in the File Manager, you can kickstart this app using the registry editor. This involves using a new key and setting a DWORD value for the Snip & Sketch tool. Follow as instructed below.
- Open the Run dialog box by pressing the Windows and R keys
- Then, type regedit and click on OK.
- Now, navigate to the following location in the registry editor.
Computer\HKEY_LOCAL_MACHINE\SOFTWARE\Policies\Microsoft
- Now, right-click on the Microsoft folder and click on New > Key as shown below.
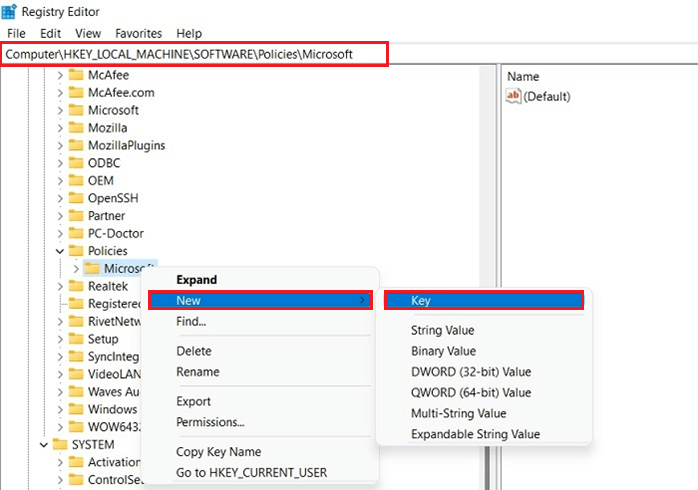
- Then, create a new TabletPC key, and right-click on the newly added key. Now, add a new DWORD (32-bit) value.
- Name this key as DisableSnippingTool.
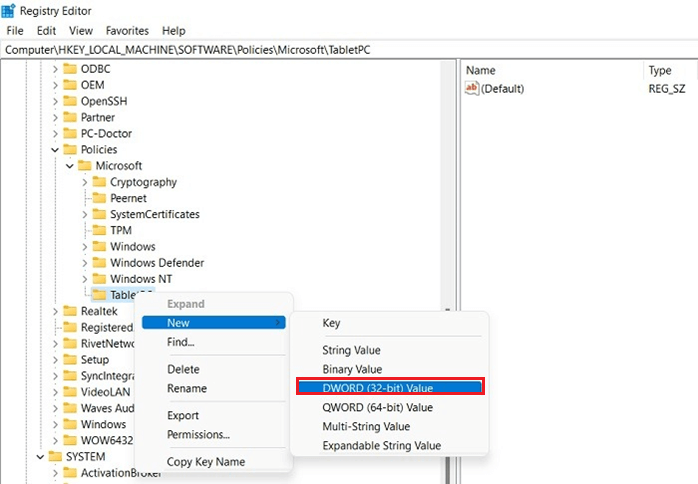
- Right-click on this DWORD (32-bit) value string key and fix the value as 0. The default value will be 1; changing it to 0 will enable the tool.
Solution 9: Reinstall the Snip & Sketch Tool App
If none of the above-listed solutions works for you to solve snipping tool not working problem, then reinstalling the app is recommended. Uninstalling the app will remove the corrupted files stopping the Snip and Sketch tool from functioning properly.
- Press the Windows + I key to open the Windows Settings.
- Then, open Apps and go to Apps & Features.
- Find the Snip & Sketch tool and click on the three-dotted icon.
- Now, press Uninstall.
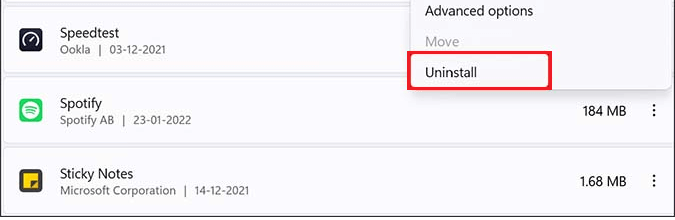
- Confirm to proceed with the uninstallation and delete it from your computer. Restart your PC and start downloading Snip & Sketch tool from the Microsoft Store again.
1: Can I Restore Snip and Sketch?
Yes, you can easily recover Snip and Sketch by following the backup and restore process. Follow these instructions to do so.
- Close the app and background processes of Snip & Sketch.
- Open the File Explorer ( Windows + E keys) and navigate to the below location.
- %LocalAppData%\Packages\Microsoft.ScreenSketch_8wekyb3d8bbwe
- Within the folder, find and copy the Settings folder to your desktop.
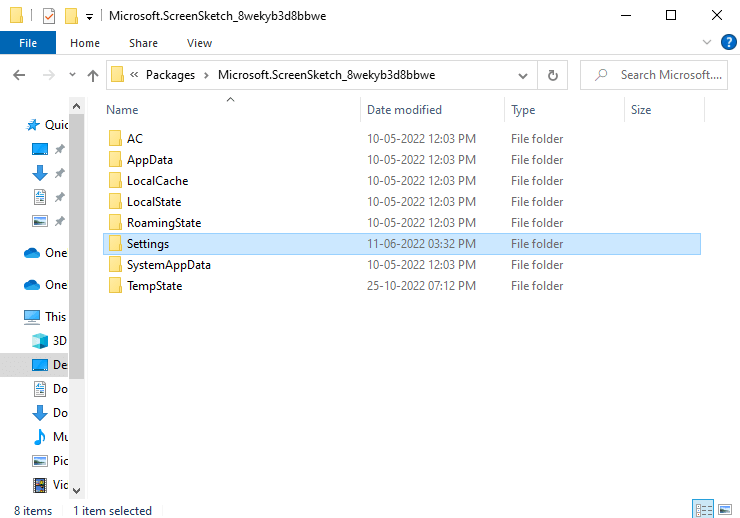
- Now, move this Settings folder on your desktop to some directory where you want to keep it as backup. You can rename it as you needed.
Note: To restore this backup for any purpose, open a new File Explorer window and navigate to the below location, copy paste the backup folder.
-
- %LocalAppData%\Packages\Microsoft.ScreenSketch_8wekyb3d8bbw\Settings
- Now, open the backed-up Settings folder from the desktop, and copy all the contents in it.
- Paste it in the following location.
- %LocalAppData%\Packages\Microsoft.ScreenSketch_8wekyb3d8bbwe
- If you are prompted, click on Replace the files in the destination
2: Does Snip and Sketch Save Snips Automatically?
No, Snip and Sketch do not save automatically. You would need to press the Save button on the menu bar or click on the CTRL+S keys on your keyboard. Yet, the screenshots you have taken from Snip and Sketch can be freely copy-pasted to any other document like Word or pdf without saving the images.
3: What Are Some Alternatives To Snip And Sketch?
Here are the top alternatives to Snip and Sketch tools that you could enjoy taking screenshots on your PC.
- Greenshot: This is a lightweight software that could help you to take screenshots of a selected region, including scrolling captures from the browser, etc.
- Droplr: It allows you to take screenshots and screen recordings that are automatically saved to your cloud that can be shared with anyone. In addition, the link to the file is automatically saved to your clipboard.
- Screen Master: It is free and easy to use and you can capture screenshots by simply touching the floating button. Using this tool, you can easily take screenshots on your Android, phone or tablet.
- Lightscreen: It is a simple tool that helps to automate the process of saving screenshots on your device. You can use hotkeys to take screenshots of preferred files.
- TinyTake: It is a free, screen recording software that allows you to take images and videos of your PC screen. You can also add comments to the file and share them without any problems.
- Lightshot: This is a useful tool that helps you to find any similar images from the internet. You can edit the files as soon as you capture the images.
- CleanShot X: With this tool, you can instantly save, copy or drag & drop screenshots
Frequently Asked Questions:
You can take screenshots on Windows 10 computer by pressing the Ctrl + PrtScn keys. Now, the screen turns out gray including the open menu. Move the arrow to the New button and choose the type of snip you need to capture.
The snipping tool snips get saved automatically to the Snipping Tool window where you can make changes, save, and share.
The Snipping tool is an easy-to-use app. You can take screenshots on Windows 11 PC via this app or any shortcut. Using the settings of this app, you can use the Print Screen button instead of the Windows key + Shift + S shortcut.
To open the Snipping Tool with a keyboard and mouse shortcut: Press the Windows logo key + Shift + S. Now, the screen turns out grey including the open menu. Move the arrow to the New button and choose the type of snip you need to capture. 1 - How do you take a screenshot on Windows 10?
Full-screen snip: Capture the entire screen
Rectangular snip: Drag the cursor around and capture a selective region.
Window snip: Choose a window, such as a dialogue box or any specific window to capture.
Free-form snip: You can draw a free-form shape around the screen to capture it. 2 - Where do snipping tool snips get saved?
3 - How to get started with the Snipping Tool app in Windows 11?
4 - How to open the Windows 11 Snipping Tool with a keyboard shortcut?
Recommended Solution to Fix Various Windows Errors
If none of the above-given solutions works for you, then it is worth scanning your system with the PC Repair Tool. This is an advanced repair utility that, just by scanning once, detects and fixes various computer-related issues and errors.
With this, you can also fix various PC-related issues such as DLL errors, registry corruption, blue screen error, application error, and more.
It not only fixes errors and issues but also improves the performance of your PC, making it run smoothly as a new one.
Get the PC Repair Tool to Optimize Your PC Performance
Conclusion
That’s it! This guide has covered all possible solutions to fix snip and sketch not working on your Windows PC.
Make sure to follow the solutions given carefully. I hope the article works for you to solve snipping tool not working problem.
But if there is anything that I missed out, then feel free to share it with us on our Facebook page. Also, don’t forget to follow us on our social media handles to get more exciting guides and helpful tips to keep your computer safe from errors and issues.
Good Luck..!
Hardeep has always been a Windows lover ever since she got her hands on her first Windows XP PC. She has always been enthusiastic about technological stuff, especially Artificial Intelligence (AI) computing. Before joining PC Error Fix, she worked as a freelancer and worked on numerous technical projects.