
Many Windows users reported the “Secure Boot greyed out in BIOS” and they are unable to change it, so if you are also the one struggling with the same problem then you are at the right place.
This is a common problem generally reported by HP laptop user. But this doesn’t mean it is only limited to HP brand computers Other brands like Acer, Asus as well as DELL users also reported the error in the official forum community and looking for the fixes:
My laptop model is HP Laptop 15q-bu09TU. I am using Win 10 (64 bit). In my BIOS the secure boot option is grayed out, hence I can’t change it. I need to enable secure boot option to install Win 10. I tried to disable Legacy Boot menu, but no help. I also set Administrator password but the secure boot option is still grayed out. Please help me to enable secure boot option.
Originally posted in Microsoft community
In this article learn how to fix Secure Boot option greyed out in BIOS on your PC, and also find out how to enable the secure boot option.
To repair corrupted Windows system files, we recommend Advanced System Repair:
This software is your one stop solution to fix Windows errors, protect you from malware, clean junks and optimize your PC for maximum performance in 3 easy steps:
- Download Advanaced System Repair rated Excellent on Trustpilot.
- Click Install & Scan Now to install & scan issues causing the PC problems.
- Next, click on Click Here to Fix All Issues Now to fix, clean, protect and optimize your PC effectively.
But before starting with the solutions here have a look at why the secure boot option is greyed out in BIOS.
What Causes “Secure Boot is Greyed Out in BIOS”?
- Fast Boot: If the Fast Boot option is enabled in the BIOS Settings, it starts causing the problem in the BIOS, as the Fast Boot option starts the system by reducing the processes so there is ample option that disables the secure boot option.
- BIOS Password: Some configuration requires a BIOS password to access the Secure Boot and if you haven’t set the BIOS password on your computer, it can cause the issue.
- Wrong BIOS Settings: If you have messed up the BIOS settings by tweaking it in the wrong way then it can face problems in establishing the connection and cause problems.
- Outdated BIOS Firmware: If you haven’t updated your BIOS firmware for a long time, then it can also cause an issue.
So, these are some of the possible culprits causing the problem now follow the fixes given to solve the Secure Boot option is greyed out in BIOS.
How to Fix Secure Boot is Greyed Out in BIOS?
Fix 1 – Disable The Fast Boot Option
The fast boot process in Windows helps the users to boot the computer faster by disabling some useless startup processes and services running in the background. You can try disabling the Fast Boot option in Windows and check if it helps you to solve the Secure Boot is greyed out in the BIOS issue. To disable the fast boot option follow the steps mentioned beneath:
- If your computer is powered on, then restart it and click on the BIOS Settings.
- Go to the Advanced Mode in BIOS settings.
- Now click on the Boot tab.
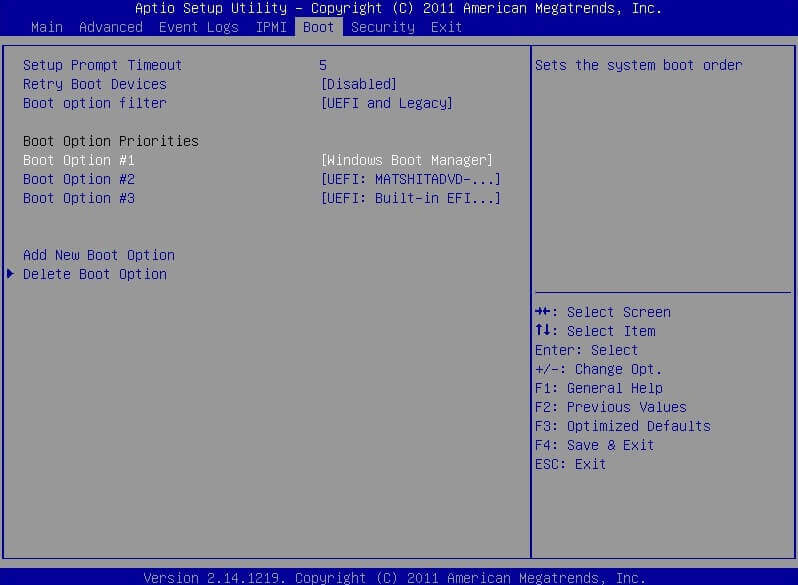
- Click on the Fast Boot option.
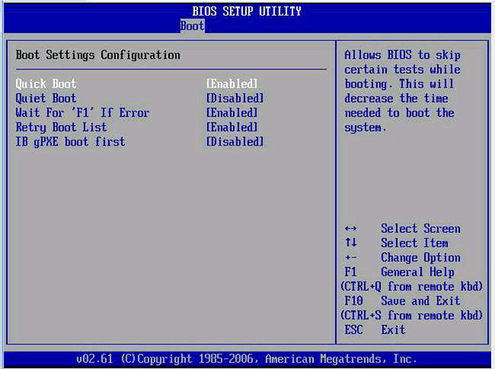
- And disable the Fast Boot option and press F10 to save the BIOS settings.
- Now press OK and exit the BIOS settings and restart your computer and check if the issue is resolved or not.
Fix 2 – Set BIOS Admin Password
It is not essential for all computers but some of them require a BIOS admin password on Windows to access the Secure Boot option. So it is recommended to set a password and check if it helps you to solve the issue. To set the Admin password in BIOS follow the steps mentioned beneath:
- If your computer is powered on, restart your computer.
- And get into the BIOS settings and click on the BIOS tab.
- Find and click on the Administrator Password
- Enter a password and confirm it.

- Now save the settings and exit the BIOS settings and restart your computer.
Check if the Secure boot is enabled now or not.
Fix 3 – Reset the BIOS Settings to Factory Default
If you have tweaked a ton of settings in your BIOS settings then this might be a culprit causing the problem. So there are two options to fix this issue, either revert all the settings manually or set the settings to default we will prefer you to select the set the settings to default as it will be far easier than the manual one. To change set your BIOS settings to default follow the steps mentioned beneath:
- If your computer is powered on restart your laptop.
- Go to the BIOS settings and press the F9 key to restore the Settings to default.
- A pop-up will show up, just press yes to complete the process.
- If you are using a Dell computer, then in the BIOS settings, click on the Security tab and click on the Restore Security settings to Factory Defaults
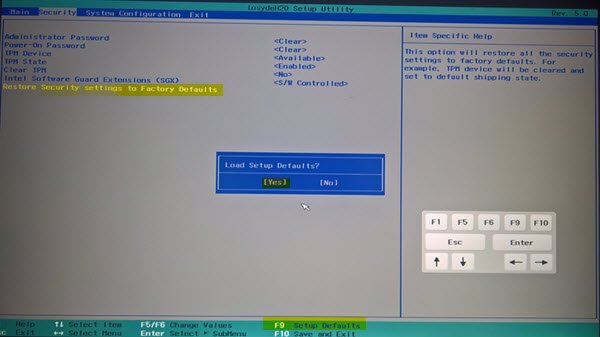
- If you are using an HP computer then press the F2 key on your keyboard on the boot screen to get into the BIOS menu. Now click on the Load Setup Defaults option under the Exit tab. Now click on the Yes button on the pop-up.
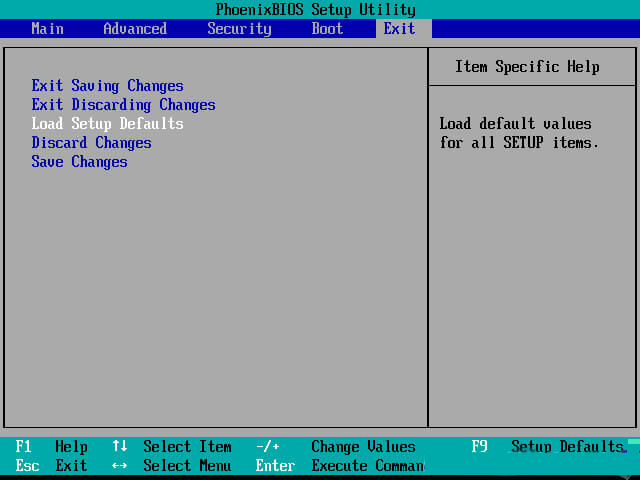
- Now restart your computer and check if the issue is solved or not.
Fix 4 – Update BIOS Firmware on the HP laptop
If you haven’t updated the drivers and BIOS Firmware of your computer for a very long time then it can cause the issue. So it is recommended to update the BIOS firmware of your computer and check if it helps you to solve the issue. To update the BIOS firmware of your computer follow the steps mentioned beneath:
- To update the BIOS firmware of your computer, you need to download and install the BIOS update manually.
- Go to your computer manufacturer’s official site and click on the Drivers
- Now select the type of your device and the model number of your device.
Note: Make Sure your BIOS update is for your computer model, you can confirm this by seeing the system information. A wrong BIOD update can cause severe damage to your system motherboard.
- Search for drivers and in the list of drivers, search for BIOS firmware and download it, after disabling the antivirus program installed on your system.
- Now install it manually and restart your computer and check if the issue is resolved or not.
Fix 5 – Check For Secure Boot Availability
If none of the methods mentioned above worked for you to remove the Secure Boot greyed out and enable the secure boot then we will recommend you check the availability of Secure Boot in your computer, to do so follow the steps mentioned beneath:
- Go to the Start menu and search for System Information in the search bar.
- Now search for the Secure Boot option in the menu and if it is ON or OFF.
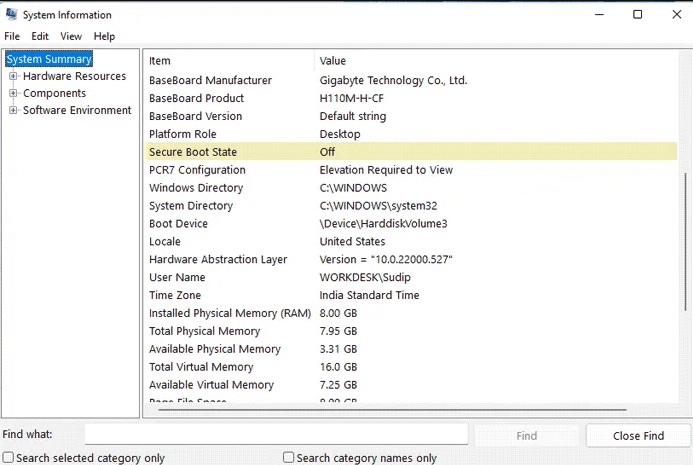
- If it is showing ON, then Secure Boot is available for your computer.
Best & Easy Way to Optimize Your Windows PC Performance
If your Windows PC/laptop is running slow or experiencing any performance issues, then you must scan your computer with the PC Repair Tool.
This is an advanced multifunctional tool that is capable of fixing any performance-related errors and issues on a PC. It optimizes the settings on the PC so that users can experience maximum performance.
Apart from this, it also fixes a wide range of PC errors, such as BSOD errors, runtime errors, game errors, DLL errors, application errors, removes malware, prevents file loss, and much more. So, it’s worth giving it a try.
Get PC Repair Tool to Fix Various PC Problems & Optimize its Performance
Conclusion:
So, this is all about the Secure Boot is greyed out in the BIOS issue.
Try the solutions mentioned in the article one by one to fix Secure Boot is greyed out in the BIOS problem.
Hope after following the fixes given the problem gets resolved and you are able to change the secure boot and enable it.
Try the steps given one by one carefully. And let us know whether this guide helped you in fixing the problem. You can share your experience and suggestions with us on our Facebook page. We would love to hear back from you.
Good Luck..!
Hardeep has always been a Windows lover ever since she got her hands on her first Windows XP PC. She has always been enthusiastic about technological stuff, especially Artificial Intelligence (AI) computing. Before joining PC Error Fix, she worked as a freelancer and worked on numerous technical projects.