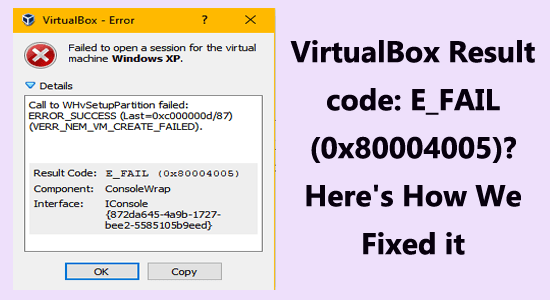
The Result Code: E_FAIL (0x80004005) error appears when the VirtualBox is unable to open the virtual box machine.
Generally, the error is encountered if there is a problem with the memory leak and works properly with the visual studio.
Despite this, there are factors as well causing the e_fail (0x80004005) error like outdated VirtualBox, virtualization is disabled in BIOS, memory integrity feature interfering with the process, and so on.
Luckily there are fixes that work for you, follow the solutions given one by one and solve the VirtualBox error in no time.
To repair corrupted Windows system files, we recommend Advanced System Repair:
This software is your one stop solution to fix Windows errors, protect you from malware, clean junks and optimize your PC for maximum performance in 3 easy steps:
- Download Advanaced System Repair rated Excellent on Trustpilot.
- Click Install & Scan Now to install & scan issues causing the PC problems.
- Next, click on Click Here to Fix All Issues Now to fix, clean, protect and optimize your PC effectively.
How to Fix VirtualBox Result Code: E_FAIL (0x80004005)?
Solution 1: Restart & Disable Hyper-V via Command Prompt
Starting with version 6.0, VirtualBox has the capability to interact with the Hyper-V API, allowing it to run alongside Hyper-V. If you are using an earlier version of VirtualBox, it may not be compatible with Windows Hyper-V. When Hyper-V is enabled, VirtualBox Virtual Machines will not start.
Restarting the hypervisor will refresh the system and clear any corrupt files causing the error. It also helps to clear any memory issues that could be causing the error as well as any other hardware-related issues.
Here are a few instructions to restart Hypervisor.
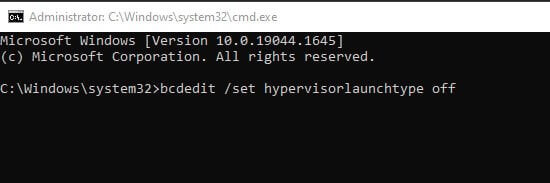
- Press the Windows key and in the search box type CMD.
- Right-click on the command prompt and choose the Run as administrator option.
- Launch the Command prompt with admin rights.
- Type the following command in the command window and hit the Enter key to execute it:
bcdedit /set hypervisorlaunchtype off
- If you are using more than one Operating System, execute the below command.
bcdedit /set {current} hypervisorlaunchtype off
- Restart your system, and now check if the error is fixed. But if still see the error then you can enable the Hyper-V.
- Launch the command prompt with admin rights.
- Execute the following command.
bcdedit /set hypervisorlaunchtype auto
- Restart your system and launch the virtual machine again.
Solution 2: Check the VM XML File
If you experience the E_FAIL (0x80004005) error, you should go to the “C:\Users\COMPUTER_NAME\..VirtualBox\Machines\VM_NAME” directory and look for two files:
- VM_NAME.xml-prev
- VM_NAME.xml-tmp
VirtualBox requires an XML file to start a VM, but when the error occurs, the “VM_NAME.xml” file isn’t present. To solve this problem, you must copy the “VM_NAME.xml-prev” file and rename it to “VM_NAME.xml“. Once that is complete, restart VirtualBox and the issue should be resolved.
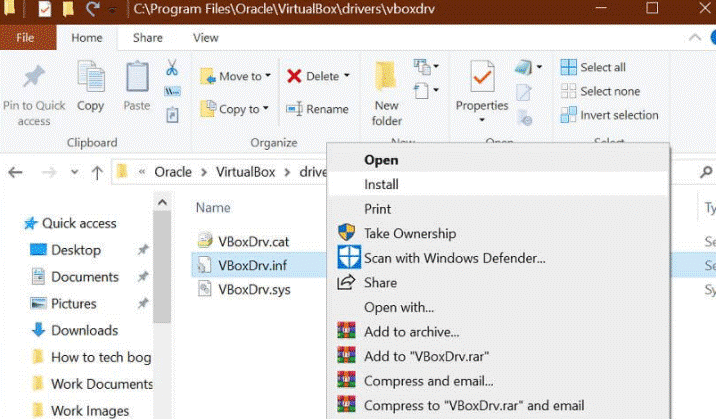
Solution 3: Install VBoxDrv.inf Manually
The driver VBoxDrv.inf is essential for VirtualBox, however, it can sometimes not be installed properly due to permission issues. This will cause the Virtual Machine to not start, resulting in VirtualBox result code: E_FAIL (0x80004005). To resolve this, the VBoxDrv.inf should be manually installed.
- To do this, locate the inf in the VirtualBox installation folder (by default, it is C:\Program Files\Oracle\VirtualBox\drivers\vboxdrv).
- Right-click the file and select the option to install it.
Solution 4: Enable Virtualization in BIOS
Enabling virtualization in the BIOS provides better support for virtual machines and their associated applications. This can help to reduce errors caused by incompatibility between the virtual machine and the underlying hardware, as well as improve overall performance. Additionally, it may help to reduce the occurrence of the E_FAIL code, since it can be caused by a lack of resources available to the virtual machine.
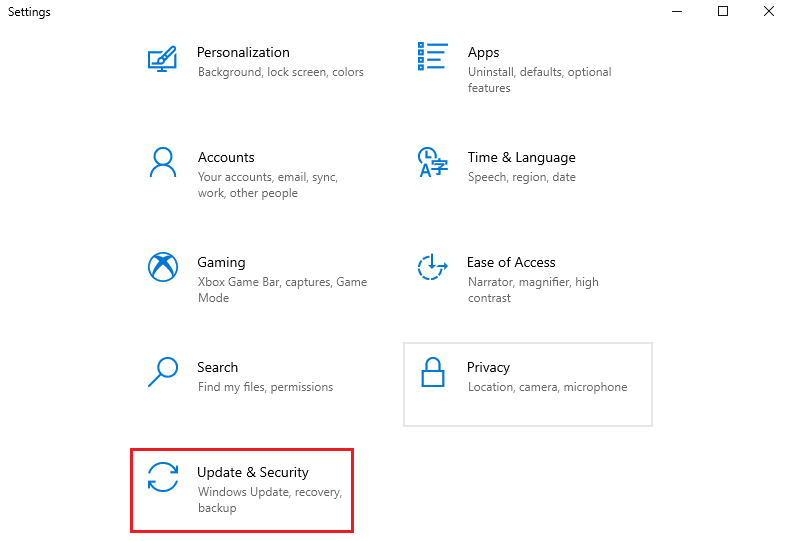
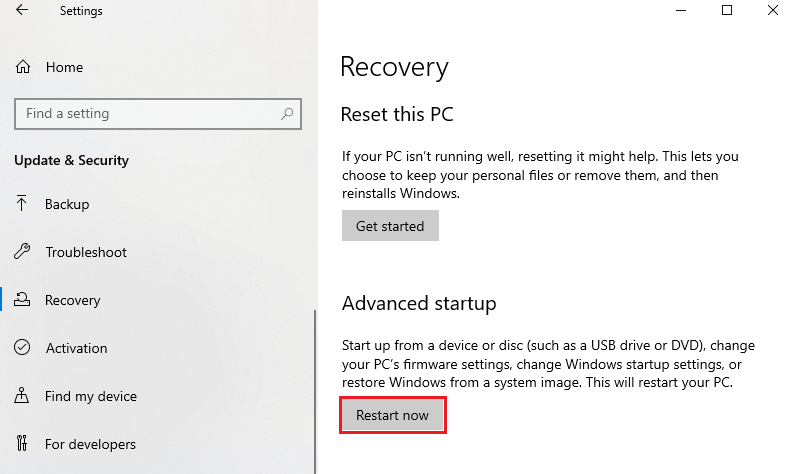
- Press the Windows + I key to open Settings.
- Then, press the Update & Security option from the list.
- Then, go to the Recovery tab and click on Restart now button under the Advanced startup menu as shown.
- Wait until the computer restarts and look for the CPU options tab, which can be in an Advanced Mode panel, and navigate to the CPU configuration/settings menu.

- Locate the Virtualization Technology option, which can be displayed as Intel Virtualization or AMD-V for Intel or AMD CPUs, or SVM for some systems.
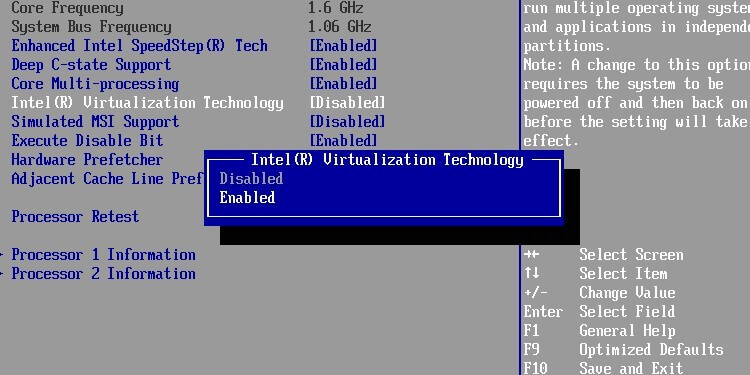
- Enable Hardware Virtualization by selecting the box next to it or setting it to Enabled in the drop-down menu.
- Don’t forget to save the changes before you exit the BIOS menu, then restart the computer for the settings to become active.
Solution 5: Update VirtualBox
Updating VirtualBox can help to fix the E_FAIL (0x80004005) code by ensuring all components of the virtual machine are running on the latest version of the software.
This can include updating the operating system, the virtual machine, and any other components that are part of the virtual machine. Additionally, installing the latest version of the VirtualBox Guest Additions can also help to resolve the issue.
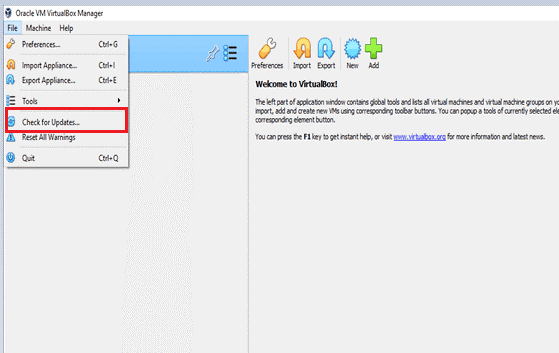
- Launch the VirtualBox and click on File and then on Check for Updates. Wait until the latest version is checked on the internet.
- If you find the downloadable latest version of the file, click on the download link.
- Wait until the latest VirtualBox is downloaded from the internet.
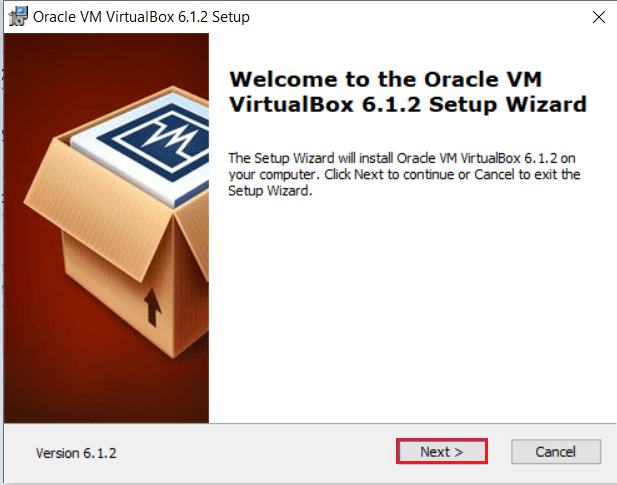
- Once you have downloaded the VirtualBox setup file, close the program and run the setup file as administrator.
- Select the Next button to continue with the installation process.
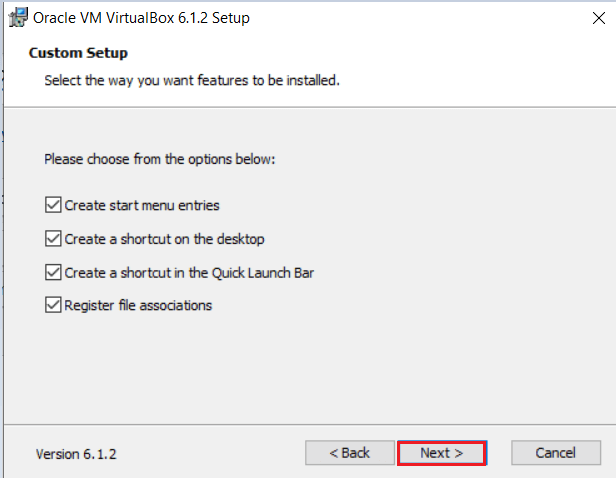
- Choose and configure the features, you want to install in your Custom Setup.
- Proceed with creating the shortcuts for the start menu and the desktop.
- In the warning window, click on Yes to proceed.
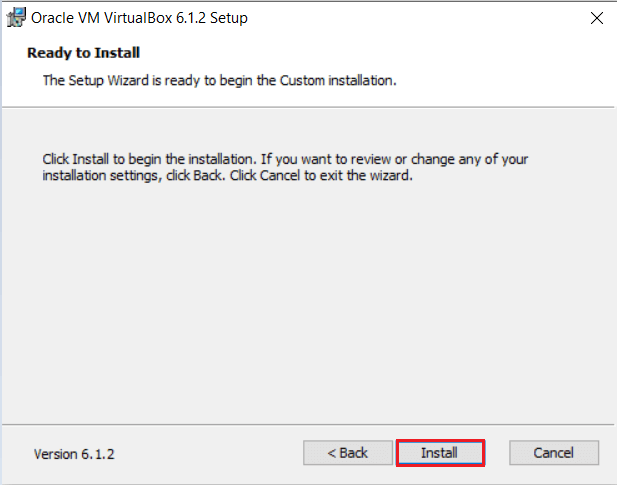
- Now, click on Install in the Ready to Install window.
- Now, launch VirtualBox and click on Download. This downloads the latest version of Extension Pack Software.
- Click on Install once the Extension Pack is downloaded.
- If you are prompted with a window that says an older package version is installed, click Upgrade to continue.
- Now, accept the Extension Pack license agreement.
- Now, click on OK once the installation is complete and click on Delete to remove the downloaded packages.
Solution 6: Disable Hypervision Processes
For versions of VirtualBox up to and including 5.X, it is not possible to run VMs with active Hyper-V. Because Hyper-V consumes a significant amount of virtualization resources, it prevents VirtualBox from launching a VM. Therefore, in order to correct the issue, all Hyper-V processes must be disabled.
Follow these instructions to disable all the Hypervision processes on your system.
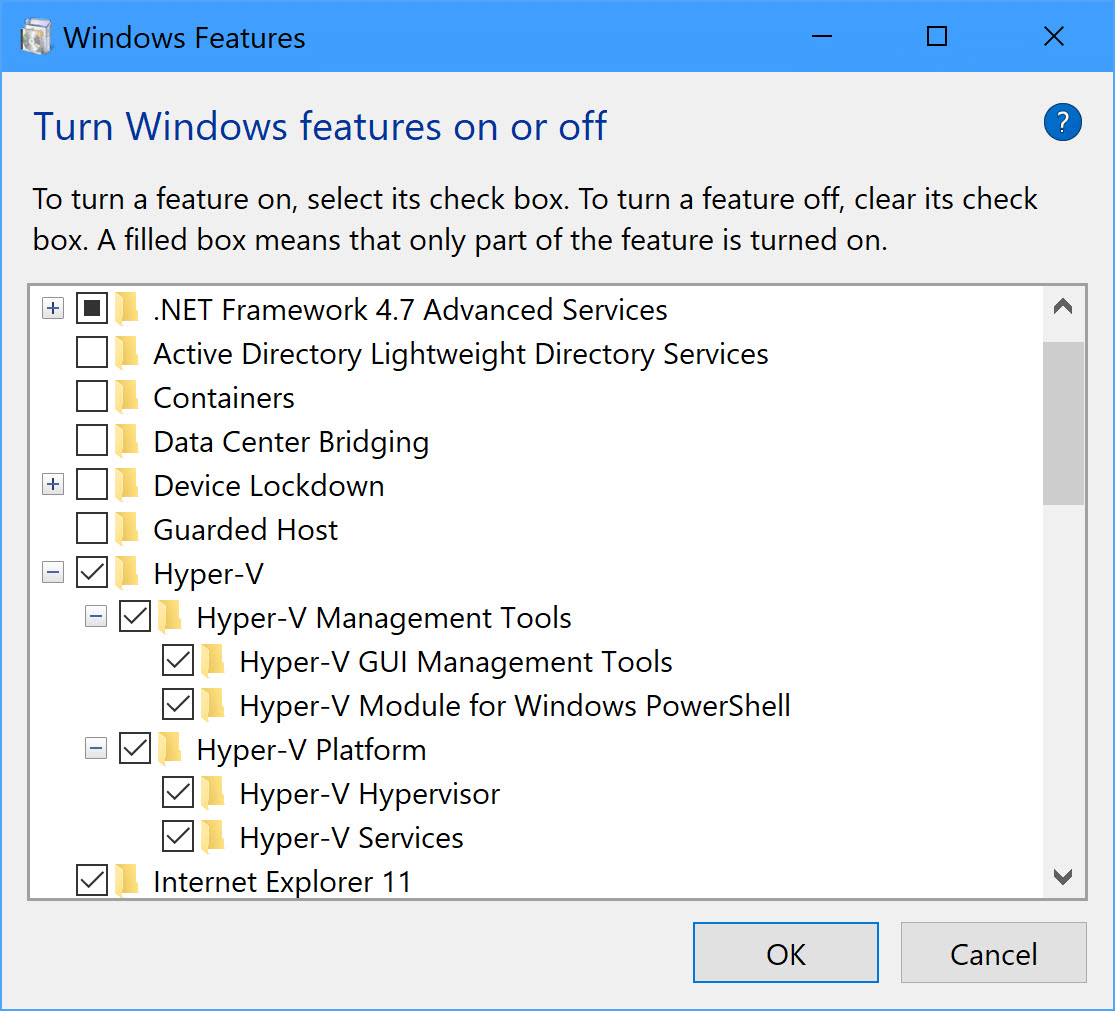
- Press Windows + I to open Settings > Apps > Optional Features to access the Turn Windows Features on or off wizard.
- Look for and unselect the options for the below:
- Hyper-V,
- Containers,
- Windows Hypervision Platform,
- Windows Subsystem for Linux.
- Close the wizard and open the Command Prompt with administrative rights.
- Type in bcdedit /set hypervisorlaunchtype off into the Command Prompt and press enter.
- Reboot your PC and check if the result code: E_FAIL (0x80004005) is fixed or head to the next solution.
Solution 7: Disable Device Guard or Credential Guard
The Device Guard and Credential Guard use virtualization technology to protect your computer and credentials from any external threats. However, activating this feature will reduce the virtualization resources available and may cause errors. So, to prevent the error here it is suggested to follow the below-given method to deactivate the feature.
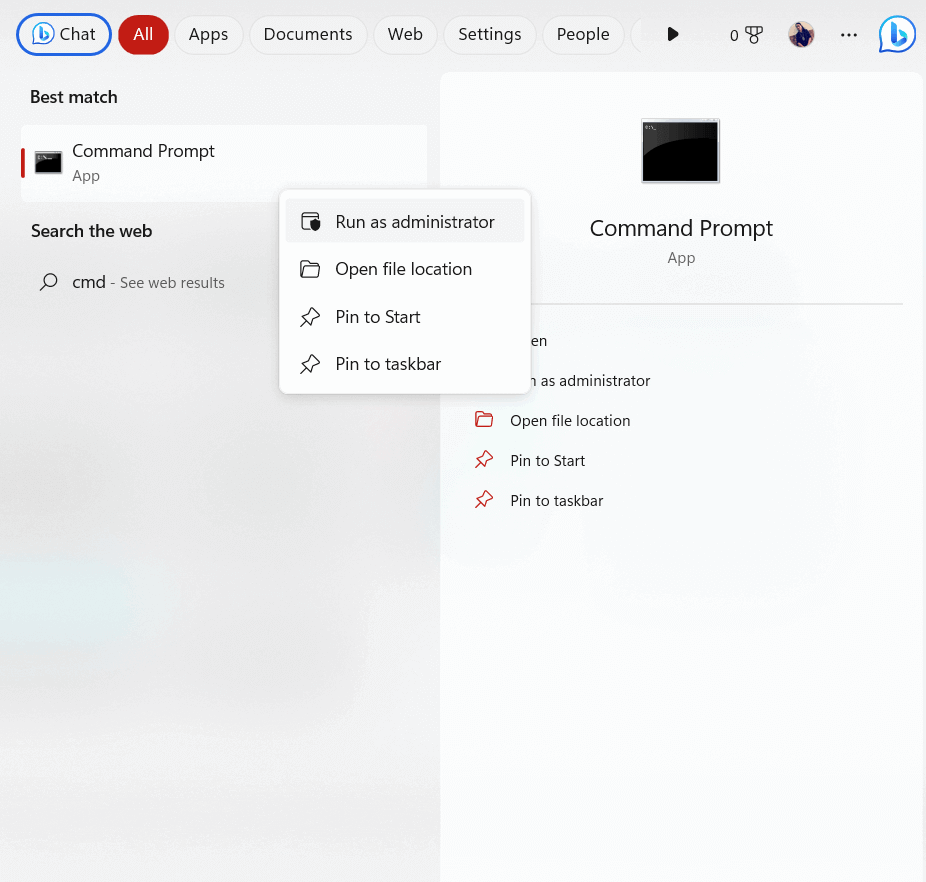
- Click on the Windows icon and in the search box type CMD.
- Now right-click on the command prompt and choose the Run as administrator option.
- Launch the command with admin rights and type in the following commands.
mountvol X: /s
copy %WINDIR%\System32\SecConfig.efi X:\EFI\Microsoft\Boot\SecConfig.efi /Y
bcdedit /create {0cb3b571-2f2e-4343-a879-d86a476d7215} /d “DebugTool” /application osloader
bcdedit /set {0cb3b571-2f2e-4343-a879-d86a476d7215} path “\EFI\Microsoft\Boot\SecConfig.efi”
bcdedit /set {bootmgr} bootsequence {0cb3b571-2f2e-4343-a879-d86a476d7215}
bcdedit /set {0cb3b571-2f2e-4343-a879-d86a476d7215} loadoptions DISABLE-LSA-ISO
bcdedit /set {0cb3b571-2f2e-4343-a879-d86a476d7215} device partition=X:
mountvol X: /d
- Note: Replace X with your unused drive in the above command.
Solution 8: Disable Memory Integrity
As with the above situation, Memory Integrity utilizes virtualization to separate activities while defending your core system from outside dangers. But this may cause the result code: e_fail (0x80004005) error, so you should disable the memory integrity feature and check if this works for you.
Follow these instructions to do so.
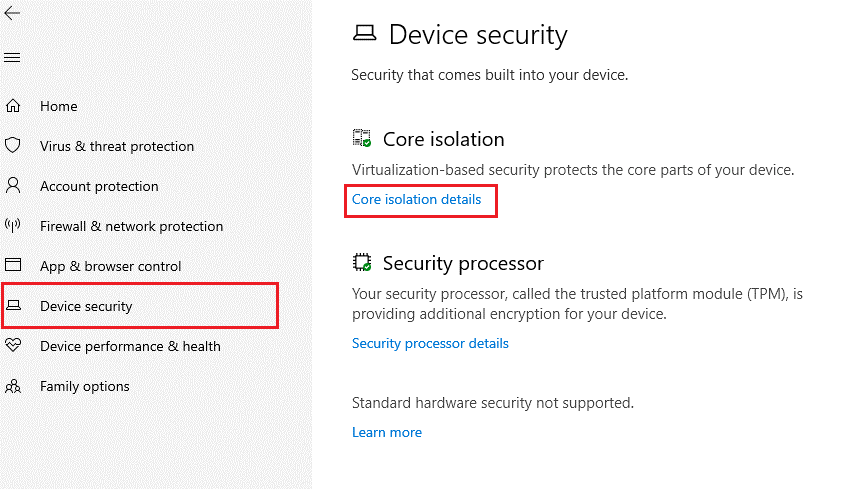
- Sign in to your PC as an administrator, hit the Windows key on your PC, and type Windows Security in the search menu.
- Then, click on Open.
- Now, switch to the Device security tab in the left pane.
- Next, click on the Core isolation details option as shown.
- Now, toggle off the Memory integrity setting as shown below.
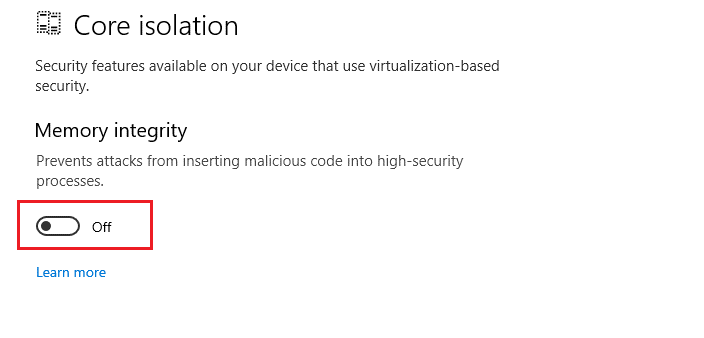
- Reboot your computer when asked.
Solution 9: Reinstall VirtualBox on Windows
Reinstalling VirtualBox can help to fix the E_FAIL (0x80004005) error by replacing any corrupted files, resetting any incorrect settings, and reinstalling any missing components that are necessary for the program to run properly.
This can help to resolve the issue and allow VirtualBox to run without encountering the error. Follow these instructions to reinstall VirtualBox on your PC.
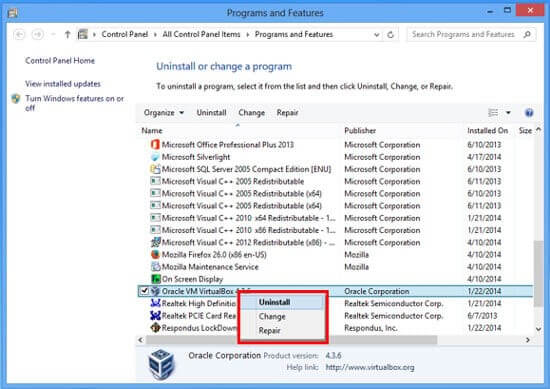
- Download the most recent version of VirtualBox as well as the corresponding ExtPack.
- Go to Control Panel > Programs and Features > Uninstall a program and uninstall the VirtualBox application.
- Navigate to the installer file from the first step.
- Right-click it and opt for Run as administrator.
- Follow the instructions that appear on the screen.
- On the last installation page, tick the box for Start Oracle VM VirtualBox…after installation and then click Finish.
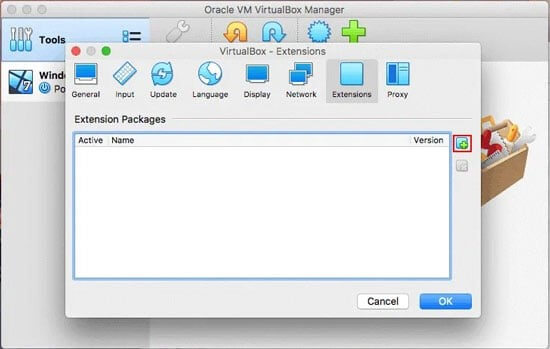
- On the VirtualBox, choose File > Preferences > Extensions.
- Press the icon with a downward orange arrow and pick the ExtPack.
It is estimated after following the solutions listed above now the VirtualBox result code: e_fail (0x80004005) on Windows is fixed.
Recommended Solution to Fix Various Windows PC Errors
If your PC is freezing crashing or lagging at regular intervals of time then you must switch to the advanced solution. Here, it is recommended to use the PC Repair Tool.
It is an expert tool developed by professionals in order to deal with several problems of Windows PC. Use this tool to scan your PC and fix various PC errors.
It is able to fix DLL errors, BSOD errors, registry errors, browser errors, update errors, repair corrupted files, protect PC from malware, boost the performance of your computer, and much more.
Get PC Repair Tool to Fix Various Windows PC Errors
To Wrap Up:
In conclusion, the result code: E_FAIL (0x80004005) error is a bit problematic. With the right knowledge and steps, you can quickly fix the error on Windows and start using the VirtualBox on Windows with ease.
Here I tried my best to list down the potential fixes that worked for users to get past the issue. So, try the fixes given one by one till you find the one that works for you. Hope one of our solutions managed to fix the error in your case.
If in case you find any doubts or queries related to this particular article, you can get back to us on the Facebook page.
Good Luck..!
Hardeep has always been a Windows lover ever since she got her hands on her first Windows XP PC. She has always been enthusiastic about technological stuff, especially Artificial Intelligence (AI) computing. Before joining PC Error Fix, she worked as a freelancer and worked on numerous technical projects.