Does your HP Printer is showing missing or failed Printhead error and due to which you are unable to print anything?
This Printhead missing failed or incompatible message mainly appears on the printer’s control panel. The error is followed up with its cause: “The Printhead appears to be missing, not detected, or incorrectly installed.”
Well, as the error message states, it is clear what causes the HP missing or failed Printhead error. And if you are looking how to fix HP Officejet missing or failed Printhead error.
Not To Worry…! As in today’s post, we will do a detailed discussion on missing or failed Printhead errors and figure out some best fixes to resolve them.
What Does Missing Or Failed Printhead Mean On HP Printer?
HP Officejet missing Printhead error signifies that either your Printhead is set loose or cartridge is identified incorrectly. Make use of the original cartridge and follow the user manual to check whether the cartridge is installed properly or not.
Sometimes this error also occurs when cartridges get clogged because of improper storage or infrequent use. In that case, you need to take the help of built-in tools for cleaning up the heads.
What Causes Missing Or Printhead Failure Error?
Knowing the exact cause behind missing or failed Printhead error because then only you will approach for the right solution.
Outdated Firmware – Outdated printer and firmware also result in the missing or failed Printhead HP 8620 error. If your printer’s firmware is outdated then your printer won’t be capable of reading about any of your assigned tasks. These ultimately generate missing Printhead errors. So always try to keep your firmware updated.
Impaired or Missing Printhead – Second reason can be the missing or damaged Printhead in the cartridge. Even a small scratch can also result in the failure of Printhead. So check if there is any scratch or dent over the Printhead is appearing.
Printer Failure – The missing Printhead error may have arisen due to the failed printer. In such a case resetting the Printhead or cartridge will surely work to fix HP Officejet Pro 8610 Missing Or Failed Printhead error.
Even after resetting these components if the problem still persists then the chances are high that your printer is in an error state.
Cartridge Is Having Insufficient Ink – Chances are also that your printer is not having a sufficient amount of ink and that’s why you are getting the ‘HP Officejet missing Printhead’ error.
Even though the Printer gives you a warning about the ink shortage but many times it is seen that the printer fails to fetch the actual issue. So it’s better to make a cross-check over the printer’s ink.
What Types of Missing or Failed Printhead Errors Commonly Occurs?
Many users found reporting about different types of missing or failed Printhead errors. Some frequently encountered error messages are:
- The Printhead appears to be missing
- Missing or failed Printhead HP 8610
- The Printhead appears to be missing not detected or incorrectly installed
- Missing or failed Printhead HP Officejet 8620
- missing or failed Printhead HP 7520
- Printhead missing failed or incompatible 0xc19a0003
- missing or failed Printhead HP Officejet pro 8610
- missing or failed Printhead HP Photosmart 7520
- HP Officejet 6700 premium Printhead
- missing or failed Printhead HP 7110
- HP Officejet 6600 missing or failed Printhead
- missing or failed Printhead 8600
How Do I Fix Missing Or Failed Printhead Error?
Fix 1: Reset Your HP Printer
To fix missing or failed Printhead HP errors, you need to reset your HP printer.
- Turn on your printer first.
- Don’t perform any action let the printer be in the ideal and silent mode.
- From the printer’s back portion eject the power cord when the printer switches on.
- After that remove the cord from the power socket.

- Wait for 60 seconds and then again plug in the power cord back into the source outlet.
NOTE: HP always recommends its user to connect the printer’s power cord directly with the outlet of the power source.
- Once again, you need to connect your power cord with your printer’s back socket.
- If your printer won’t turn on automatically then manually do this.
- Don’t do any activity until the printer gets stable.
If this step successfully fixes the missing or failed Printhead HP error, then you don’t need to go to the next solution.
Fix 2: Reseat Printhead Of HP Printer
Sometimes you require reseating the Printhead of your printer to fix the missing or failed Printhead HP error.
- For this, you require to open your cartridge entrance door by dragging the printer’s left slot in the forward direction.
- Unplug the power cable from the printer’s back as this will fix your carriage in one place and won’t let it move.
- Now pull the latch upside on the right side portion of the printer’s carriage.
- Drag the Printhead only a bit not completely out from the carriage.
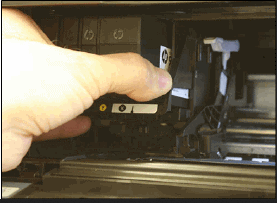
- Now put your Printhead firmly inside the carriage to set it completely.
- Before closing the cartridge entrance door, don’t forget to put the printer’s carriage latch down.
- After that connect the unplugged power cable with the printer’s back socket.
- Now turn on your printer.
Fix 3: Clean Printer’s Ink Cartridge
Missing or failed Printhead error also fix by cleaning your ink cartridges.
For this, you have to eject your ink cartridge from Printhead. After that clean your cartridge’s copper portion using distilled water and lint-free cloth.
Now let the cartridges dry by whipping them with a clean dry cloth and after that only put it back into the printer.
Fix 4: Update Your Printer Firmware
- Check whether your HP printer is having the latest firmware. To check this out, you need to open the HP printer’s Driver and Software Downloads page in your browser.
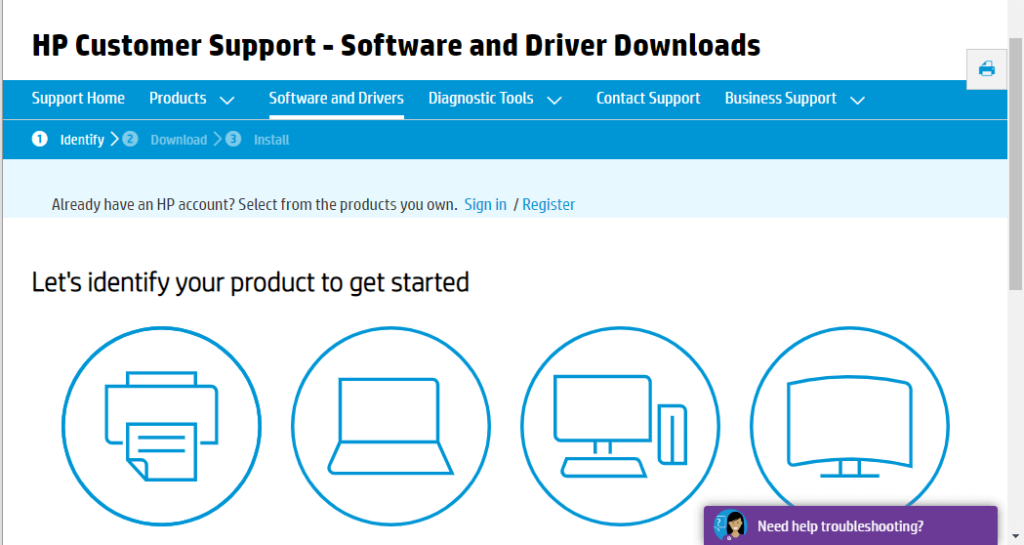
- Hit the Printers option and enter your model number. After that tap Submit
- On the software page of the printer, you need to expand the Printer’s Firmware category.
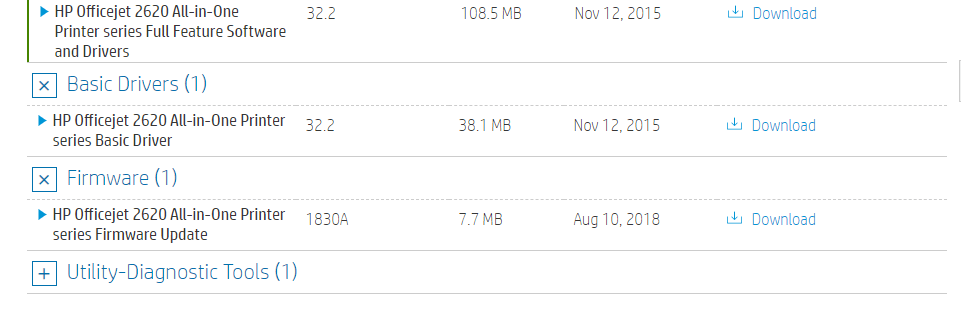
- Hit the Download button for saving up the listed firmware within the folder.
- Now open up the folder having your freshly downloaded firmware. After that open your firmware file for installing up the latest printer’s firmware.
If you don’t want to go through this manual procedure then as an automatic solution you must try the Driver Updater tool.
This advanced tool scans and detects the faulty driver. After that, it automatically updates your entire system drivers. It is very easy to use because you just need to download and install this tool.
Get Driver Updater to update the printer driver automatically
Fix 5: Replace HP Printer Printhead
Important: Before removing up the cartridges ensure that you have a new Printhead to replace with your old HP Printer Printhead.
HP highly recommended the users not keeping the cartridges outside the printer for more than 30 minutes. Doing this can damage your cartridges and printers.
Step 1: Check For The Printhead Warranty Status
If you are using a defective Printhead or cartridges then quickly check whether it’s under the warranty period or not. Also, make a visit to the Printer and to the Page Yield overview for getting an idea about the warranty period for toner or ink supplies.
Step 2: Order The Printhead
If your Printhead is under warranty then HP will surely replace it. In replacement, you will get a new Printhead assembly kit along with the instruction guide and well setup cartridges.
By subscribing to the HP Instant Ink you can easily get a fresh piece of Instant Ink cartridges. Firstly you need to install your SETUP cartridges otherwise you will start getting the cartridge error.
If your Printhead assembly has exceeded the warranty period then you can purchase the new one.
Step 3: Replace Your Printhead
At last, you need to replace your old Printhead with the new one.
Fix 6: Replace Non-HP Cartridges
If all the above fixes fail to resolve the missing or failed Printhead HP error then at last try replacing your cartridges.
Mainly such a case arises with the non-HP cartridges so make sure that you will replace it with a genuine HP cartridge pack.
Fix 7: Perform the Factory Reset
To remove the HP Printhead failure error you need to apply factory reset to your printer. For this, you need to press the back button at least 4 times unless you get the Support menu window.
Now scroll down, as here you will see the Reset Menu. Within the reset menu, you can easily get different types of resetting options like full reset, partial reset and semi-full reset.
Let’s know about each of them in detail.
- The partial Reset:
Partial reset only refreshes the printer and free up waste memory from the printer. Such type of reset fixes up minor printing problems like cartridge errors and slow printing etc.
- The Semi-Full Reset:
It is the most useful type of reset as it removes all custom settings from the printer and takes it back to the default factory settings status.
- Full Reset:
A full reset is the most effective type of reset when all other reset procedures fail to resolve the issue.
It completely removes entire printer settings and any type of interruptions meanwhile the reset process takes the printer to an unusable state.
So, pay close attention while performing this step.
Hopefully, applying factory reset to the printer will remove the problem but if in case it fails to works then proceed further.
Fix 8: Monitor the Inside Circuitry
In the HP laser printer, there is a microchip inside it that connects the cartridges with the printer.
So if this chip’s connection gets loose then the circuit between the cartridges and printer won’t complete. As a result of which HP printer starts showing the Printhead failure error.
To check whether the chip connection is correct or not, follow the below steps:
- Switch off your printer and then remove the printer’s plug out from your main socket.
- Now open the printer cover and bring out the cartridge from it.
- Look for the microchip that is present over the cartridge toner. Check whether it’s clean or not.
- If on the chip excessive carbon gets accumulated then wipe out using an eraser. Also, clean the metal pins present within the printer.
- Now place the cartridge again inside the printer. But keep in mind that all the pins and microchip is connected firmly otherwise the cartridge fails to detect the printer.
- Close your printers cover now and then restart your printer by connecting the printer’s plug with the main socket.
- Turn ON your Printer to check out whether the error still persists.
Recommended Solution To Optimize Performance Of Windows PC
If you are Windows 10 PC user and you are dealing with lots of stubborn errors and issues. Or facing a slow PC problem then it’s recommended to use the PC Repair Tool.
With this multifunctional and highly advanced tool, you can easily detect and fix almost every kind of PC error automatically.
This tool is quite efficient in fixing Registry errors, BSOD errors, DLL errors, Application issues, protect your system from virus or malware programs, and much more.
Feel free to download it, as it is quite easy and safe to use.
Get PC Repair Tool, to Fix PC Problems & Optimize PC Performance
Wrap Up:
Even after trying all the above troubleshooting methods if still, you are facing the HP Officejet missing or failed Printhead error. In that case, it’s better to replace the Printhead.
Users having their Printhead under warranty period can easily get new Printhead assembly kits from HP after replacement.
You can also connect with us on our Facebook Page, to catch more informative articles like this.
Good Luck..!
Hardeep has always been a Windows lover ever since she got her hands on her first Windows XP PC. She has always been enthusiastic about technological stuff, especially Artificial Intelligence (AI) computing. Before joining PC Error Fix, she worked as a freelancer and worked on numerous technical projects.