
Are you frequently seeing the BSOD error on your Windows 10 or 11 PC and the memory crash Dump file points to the ntkrnlmp.exe as a culprit? Wondering what this ntkrnlmp.exe blue screen error is and how to fix this BSOD error.
Then don’t get tense as in today’s post I am going to share the best possible fixes that worked for various affected users to resolve ntkrnlmp.exe BSOD errors.
Many users managed to fix ntkrnlmp.exe Blue screen error by disabling the EIST & C-states in BIOS (described below). But if this won’t work for you then updating the driver may help you.
We have done our complete research on the error and after investigating we find out there are many different reasons that trigger the error, so here find out the complete information related to the error along with the potential fixes.
Let’s get started..!
What is Ntkrnlmp.exe?
ntkrnlmp.exe (NT Kernel Multi-Processor) is one such executable file that is associated with Windows OS. Whenever the Windows OS starts executing along with that ntkrnlmp.exe program are also starts loading into the RAM. This program runs as an NT Kernel & System process.
But there is such a situation that arises where you will start rendering ntkrnlmp.exe blue screen error. And the blue screen of death after crashing attributes to the ntkrnlmp.exe when the user check the crash logs.
But this won’t mean that the ntkrnlmp.exe file causes the BSOD error. This is just an indicator that the ntkrnlmp.exe file deal with the bad data during the crash.
What Causes Ntkrnlmp.exe BSOD Error in Windows?
Kernel of the system OS is mainly responsible for this holding multitude of processes, programs so that PC will run seamlessly.
When any of these programs hit any kind of issue, it will cause Ntkrnlmp.exe BSOD error and crashes the PC.
Here check out some of the possible ones:
- Damaged adapters and power cords.
- Any Application on your PC can restrict the driver installation.
- Installation of 3rd party software that is not verified or poorly programmed.
- Malware or Viruses intervention in PC.
- Wrong settings of the Window’s file’s or OS System
- The driver you have installed is not compatible or does not meet with system requirement of your system.
- If you are using a corrupted, damaged, missing Broadcom Bluetooth driver.
- Incorrect installation of the Bluetooth driver on your PC/laptop.
How To Fix Ntkrnlmp.Exe Blue Screen Error?
Fix 1: Boot Your PC in Safe Mode
Due to a BSOD error, you can’t access your login screen. So, if in your case you are unable to boot your PC after seeing the ntkrnlmp.exe BSOD error then very first boot in safe mode.
Try the below-given steps to boot your PC in safe mode.
- Connect Windows installation media devices like CD/ DVD, USB Flash drive, USB Flash drive, and then press the power button.
- Hit the function key F2, F8, F10, F12, or Delete, backspace, Esc.
- Select the language as per your preference. Hit the next button for more processes.
- Move further and make a tap over the “Repair your computer” option appearing at the bottom.
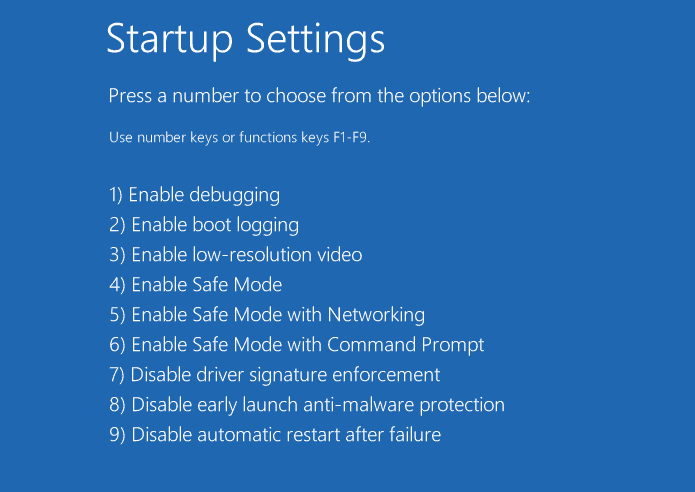
- Hit the Troubleshoot category that is followed by “Advanced Options”.
- Choose the “Startup Settings” and then wait for the next option.
- Go to the succeeding window choose “Enable Safe Mode” along with the supported function key.
- At last, make a tap over the restart button and wait until your PC completely gets started.
After booting your PC in safe mode you are more likely to won’t see the error message as this start the PC with minimum resources and drivers. Now start following the fixes given one by one to fix the error permanently.
Fix 2: Update The Graphics Card Driver
The main cause of the ntkrnlmp.exe BSOD error is improper synchronization between the driver and the Windows OS.
This issue can be fixed by updating the faulty driver to fix the BSOD problem. Here are the steps that you need to follow:
- Make a right-click over the Start icon which is present at the bottom-left corner of your taskbar. Select the Device Manager.
- Expand the section of “Display adapters from the list” and then make a right-click over the graphics card driver option.
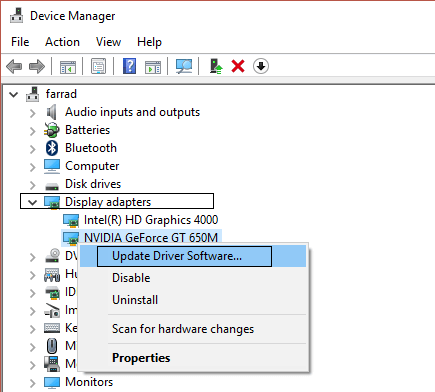
- Select Update driver and then the context menu.
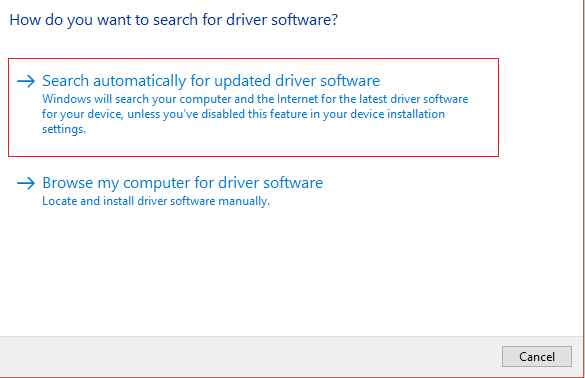
- On the opened screen, tap the “Search automatically for updated driver software” option. Keep some patience until the whole task gets over.
When the whole process gets over, just restart your PC. Now make a cross-check whether the ntkrnlmp.exe BSOD error is resolved or not.
Alternatively, you can also update the graphic drivers easily without following any time-consuming manual steps by using the Driver Updater tool.
Driver Updater recognizes your PC and fetches the right driver and install it automatically.
Get Driver Updater to Update Graphics Card Driver Automatically
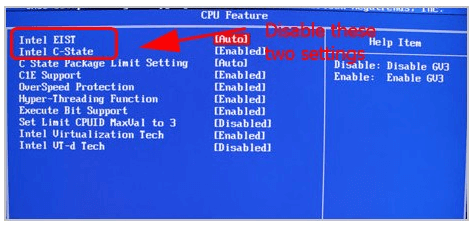
Fix 3: Disable The EIST & C-states In BIOS
Intel Enhanced Intel SpeedStep Technology [EIST] is one such power-saving feature that allows you to manage the clock speed of your Intel processor cores.
And the blue screen ntkrnlmp.exe error is also encountered when this feature is kept on. So to fix this issue you need to disable C-states and EIST in BIOS to fix the problem.
Here are the steps that you need to perform:
1) Switch off your PC.
2) Turn on your PC by pressing the Power button.
3) Boot the PC into BIOS mode. Well, these steps may vary from one PC to another. Just press the F2 or DEL key when on your screen you will see the logo.
4) Go to the Advanced menu and hit the CPU configuration.
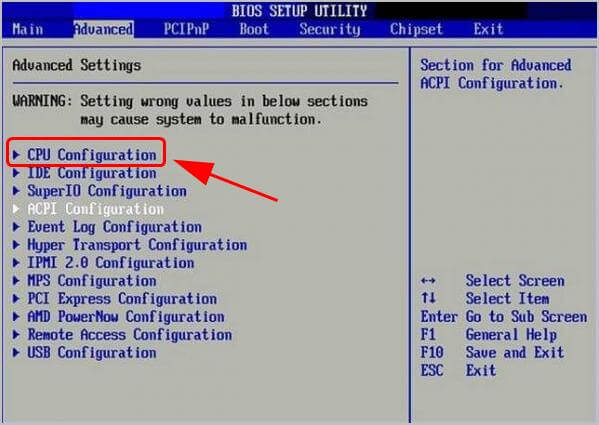
5) Go to the CPU Power Management.
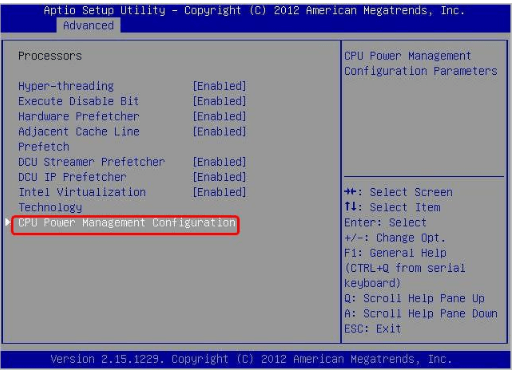
6) Disable Intel EIST and C-state.
7) Save all your done changes and take the easy exit.
8) Restart the PC to check whether the issue has been resolved or not.
Fix 4: Repair Corrupted Windows System Files
The ntkrnlmp.exe BSOD error also arises due to damaged, missing or corrupt system files on PC. So repairing the Windows system files works for you to get past the error.
Run SFC scan
You can use the inbuilt System File Checker (SFC) command this helps in easy scanning of your complete system files. After that repair lost or corrupted system files.
Follow the below steps to run an SFC scan:
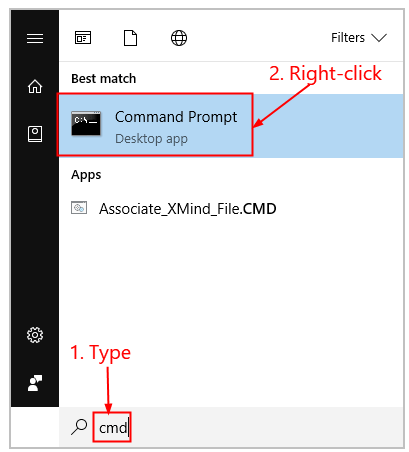
1) From your keyboard, hit the Windows logo key, and in the search box type the text “cmd”. After that make a right-click over the Command Prompt and then hit the Run as administrator.
2) Hit the Yes button to make confirmation.
3) In the opened command prompt window, assign the command “sfc /scannow” and hit the Enter button.
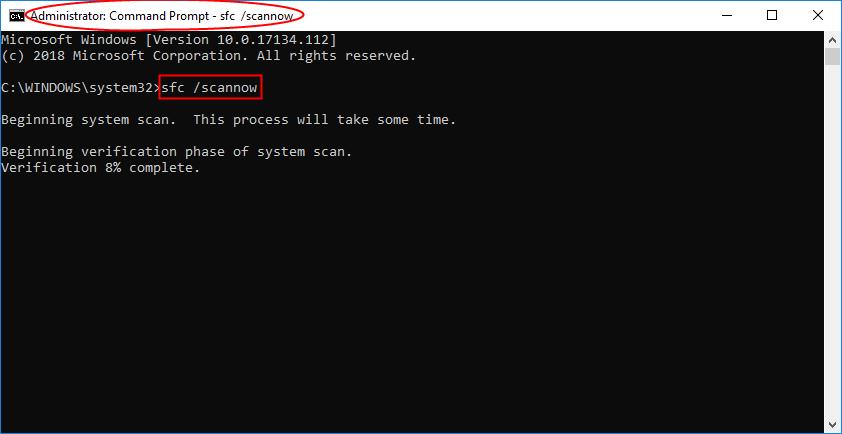
The whole processes take some time to replace corrupted system files with a new one.
4) Restart the PC to see all your done changes.
5) Check whether the ntkrnlmp.exe error gets fixed completely or not.
Fix 5: Disable Driver Verifier
Many users confirmed that disabling the driver verifier works for them to fix error ntkrnlmp.exe. Let’s know how it is to be done:
- Open Command Prompt right click on it to Run as Administrator.

- Tap to the “Yes” option on the UAC prompt for easy authorization of access.
- Go to the prompt area and then type the verifier. After that hit the Enter button for executing the code.
- Now from this, opened Driver Verifier Manager Window you have to choose the “Delete existing settings” checkbox. At last hit the Finish button.
- At last, hit the Yes button and then restart your PC.
Fix 6: Scan For Virus And Malware Infection
Malware or virus also causes blue screen error ntkrnlmp.exe and then prevent your PC to start normally. So, make sure to perform a deep antivirus scan with a good antivirus tool.
No doubt the process is time-consuming but it’s worth doing. Sometimes the Windows defender fails to detect the nasty virus program so, it will be better if you go with some trusted 3rd party anti-virus application like SpyHunter Virus Removal Tool
Get SpyHunter to Remove Virus/Malware Infection Completely
Fix 7: Configure Driver Verifier Manager
Driver Verifier manages graphic driver and kernel-mode drivers. It helps in the easy detection of drivers in the system and assigns available solutions for this type of issue.
Here’s is how to do this:
- Type the cmd text within the search box. Make a right-click on the Command Prompt application and choose the Run as administrator option.
- Hit the Yes option to verify the UAC.
- In the opened command prompt window type the verifier command. Hit the Enter button.
- Now from the opened Driver Verifier Manager window. Choose to Create standard settings, and then hit the Next button.
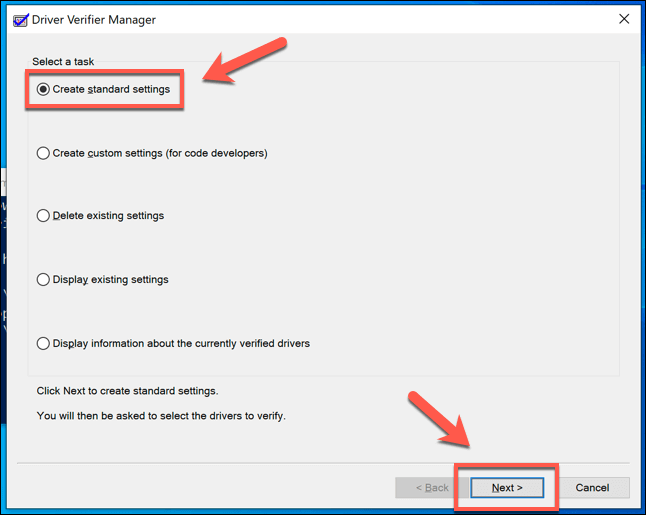
- Tap the “Automatically select all drivers installed on this computer” option. At last, hit the Finish button to make confirmation.
- And click on the OK button as this will restart the PC.
- Once everything gets over you will need to report for driver status in the PC. After that follow the given steps to solve the process
Steps to stop the Driver Verifer process:
- Type the cmd text within the search box. Make a Right-click on the Command Prompt application and choose the Run as administrator option.
- Hit the Yes option to verify the UAC.
- In the opened command prompt window type the verifier command. Hit the Enter button.
- Now from the opened Driver Verifier Manager window. Choose delete existing settings, and then hit the Finish button.
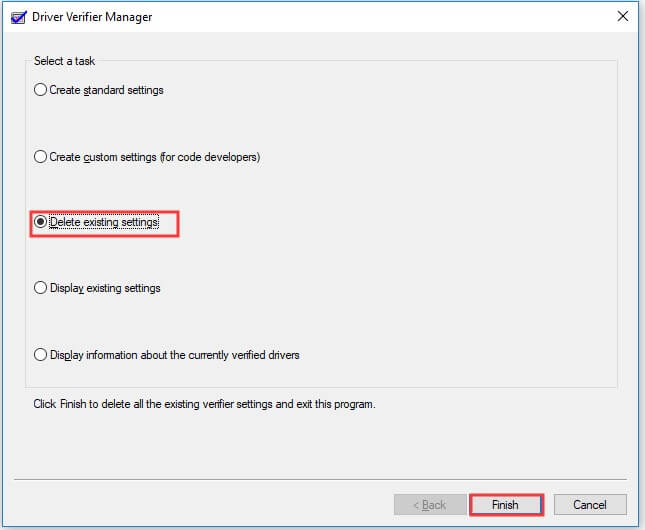
- Tap the Yes button and then restart the PC.
Fix 8: Perform System Restore Point
It is estimated the above-listed works for you to fix error Ntkrnlmp.exe BSOD, but if still seeing the error then performing a system restore may work for you.
This will roll back your system to the previous settings when no problem has occurred. But you can get the benefit, only if you have created a system restore point. So, the solution is only for the users who created the restore point earlier.
Follow the steps to do so:
- If you are a Windows 10 user then go to Cortana and in the search box type the “system restore”.
- After that make a tap over the option of “Create Restore Point” to open the window.
- Go to the “System Protection” tab and then choose the System Restore present over the same box.
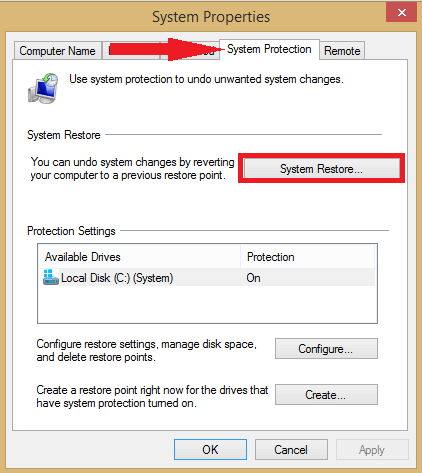
- To move further press the next button.
- Choose the restore point that you have created before Ntkrnlmp.exe BSOD, after that hit the Next button.
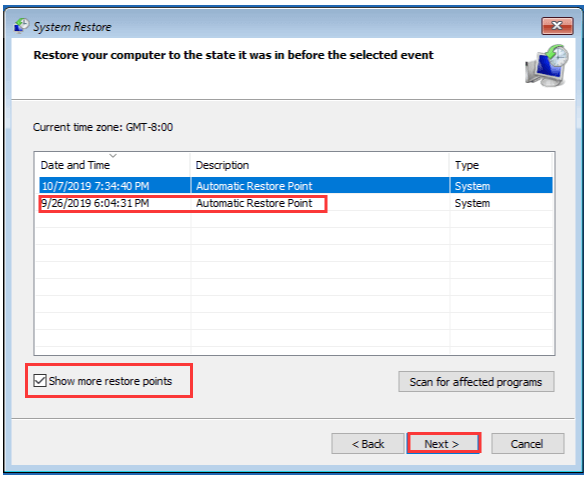
- After this, you will see that the PC will automatically get rolled back to previous settings. Avoid recently installed drivers and apps.
- Once the whole process gets over, don’t forget to reboot your PC.
Fix 9: Recommended Tool To Fix ntkrnlmp.exe BSOD Error
Mostly it is seen that Windows PC/laptop tends to slow down after a certain period of time or starts showing various stubborn BSOD errors. So, in this case, it is suggested to scan your system with the PC Repair Tool.
This is a multifunctional tool that juts by scanning once detect and fix various computer errors and issues. This is capable to solve problems with different brands of laptops and PC.
Using this tool you can solve resolve various errors like BSOD errors, DLL errors, protect your system from virus or malware infection, application errors, prevent files loss, and repair corrupted system files, and many others.
It is easy to download just download and install the tool the rest work is done automatically.
Get PC Repair Tool, to fix ntkrnlmp.exe BSOD Error
Conclusion:
It is estimated that after following the given fix of this post you won’t have to face problems like ntkrnlmp.exe BSOD errors.
I hope this article is helpful for you, and do let us know your opinion regarding the fixes of this post. If you find this article helpful then do like and share it. You can also stay connected with us and share your ideas with us on our social media Facebook page.
Thanks for reading..!
Hardeep has always been a Windows lover ever since she got her hands on her first Windows XP PC. She has always been enthusiastic about technological stuff, especially Artificial Intelligence (AI) computing. Before joining PC Error Fix, she worked as a freelancer and worked on numerous technical projects.