Still using the Windows 10 version 1909? Now, want to upgrade it but Windows 10 stuck on 1909 update?
It’s a very common issue with the Windows 10 users running this version as they keep getting notifications that the OS they are running is about to reach the end of its life. But when they tried to upgrade the computer, they failed badly.
Even after trying multiple times, users are still unable to upgrade their computers due to Windows 10 version stuck on 1909 update. If you have the same issue with your OS and are looking for a solution, then you must check out this article.
However, before moving to the fixes, I would like you to learn a bit about the reasons behind this issue. So, here you go.
Why My Windows 10 is Stuck on 1909 Update?
Talking about the causes, there could be several reasons for Windows 10 not upgrading to the latest version. Some of the most common reasons are:
- Corrupted Windows System Files
- Damaged/corrupted Windows Update components
- Not having enough disk space
- Running outdated Conexant audio driver
How to Fix Windows 10 Stuck on 1909 Version Issue?
Solution 1: Make Sure You Have Enough Disk Space
Lack of hard drive space is the biggest reason for Windows 10 stuck on 1909 update. So, make sure you have enough space on the drive where you want to download the update files (by default C drive).
It is suggested to have at least 20 GB of free space on the hard drive to install the latest Windows updates and to avoid any such Windows update errors or issues.
What if your computer doesn’t have enough space to install the latest Windows 10 update?
Well, there are various workarounds to overcome this problem.
1: Use External Flash Drive
You can download the newly released Windows 10 updates and features on the external flash drive. Next, simply connect the USB flash drive to your computer > download the updates > run the setup.exe file from the external drive location.
2: Download ISO File
The second alternative solution is using the ISO file. First, download the ISO file & extract it on an external hard drive > search for the setup.exe > click on it > launch the latest Windows feature upgrade.
Solution 2: Run Windows Update Troubleshooter
Whenever you run into Windows update-related issues, the first thing you should do is run the Windows update troubleshooter. This tool itself is enough for dealing with a wide variety of update errors and issues users commonly experience on Windows 10 PC.
To run this Windows 10 in-built tool, follow these steps:
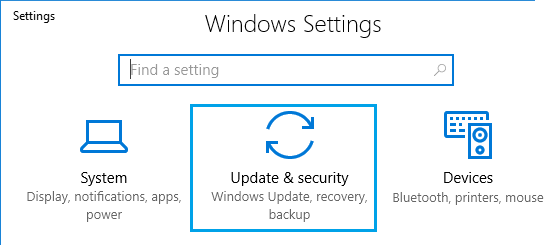
- Press Windows + I keys > click on the Update & Security option.
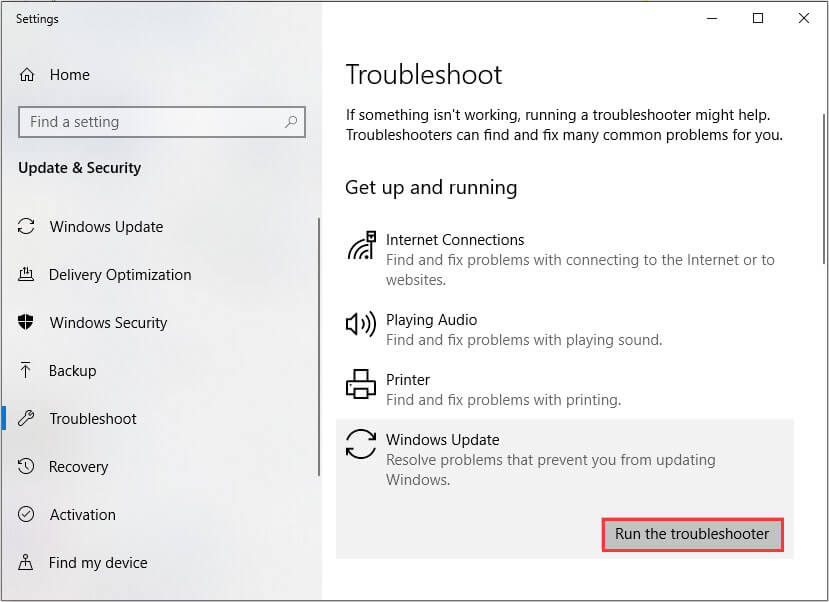
- Click on the Troubleshoot tab.
- Go to the Windows Update section and click on the Run the troubleshooter button.
- Now, this utility will scan your computer to check if there is an issue that is causing the Windows 10 stuck on 1909 version.
- Once the process is finished, check if the tool is showing any issue. If you found the issue, then follow the on-screen instructions to fix the problem.
Running the Windows Update Troubleshooter possibly will fix the issue, but if it failed, then go with the next solutions.
Solution 3: Run SFC Scan
Windows update issues often occur due to corrupted system files. Hence, make sure you have no damaged or corrupt Windows system files present on your computer.
To check this, you can run the System File Checker (SFC) tool. It is also a Windows inbuilt tool that scans the computer to check and fix the damaged files.
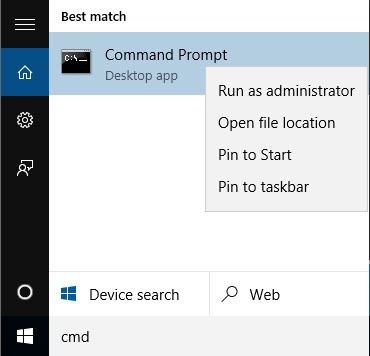
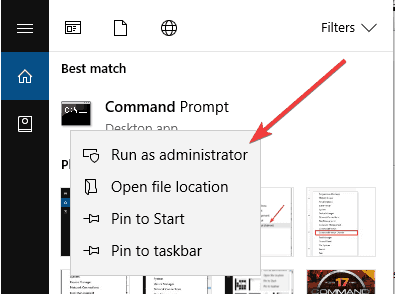
- Type cmd in the Windows Search box.
- Right-click on the Command Prompt > select Run as administrator option.
- In the Command Prompt window, enter the following command and hit the Enter key to execute it:
sfc /scannow
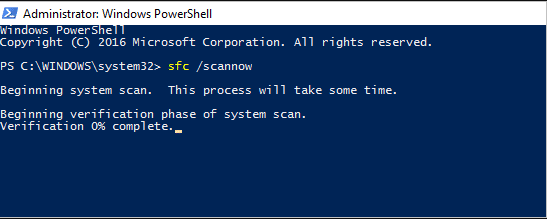
- Let the scanning process be finished.
- By the end of the process, all the corrupted files will get fixed on your Windows computer.
Solution 4: Run DISM Tool
Sometimes, running the SFC tool is not enough to fix missing and corrupted files on Windows 10 computers. In such a situation, you need an advanced tool. So, here you need to use the Deployment Image Servicing and Management (DISM) tool to replace the corrupted files with their healthy copy.
- Open Command Prompt with the admin rights.
- In the Command Prompt window, type these commands and press the Enter key:
DISM /Online /Cleanup-Image /CheckHealth
DISM /Online /Cleanup-Image /ScanHealth
DISM /Online /Cleanup-Image /RestoreHealth
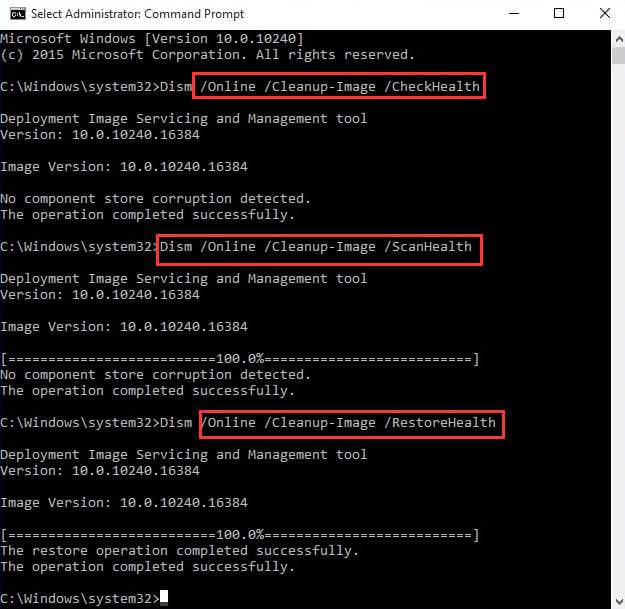
- Now, this tool will scan your PC and repair the damaged system files.
Now, try to update your Windows 10 PC and check if the issue has been resolved or not.
Solution 5: Uninstall Conexant Audio Driver
Another known reason for causing the Windows 10 update stuck on 1909 is Conexant audio driver. Well, this driver doesn’t create a Windows update issue on all the systems.
The Conexant HD or ISST audio driver doesn’t roll out the updated driver for all the systems. So, if your device can’t update the Conexant audio driver to the latest version, then you have no option but to uninstall it.
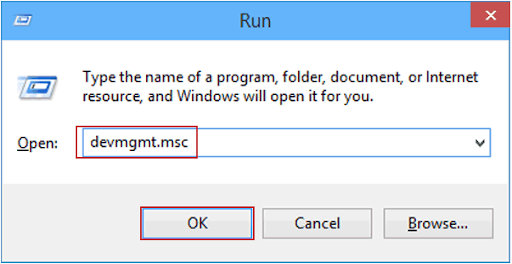
- First, press Windows + R keys to open the Run dialog box.
- Type devmgmt.msc and click on the OK button.
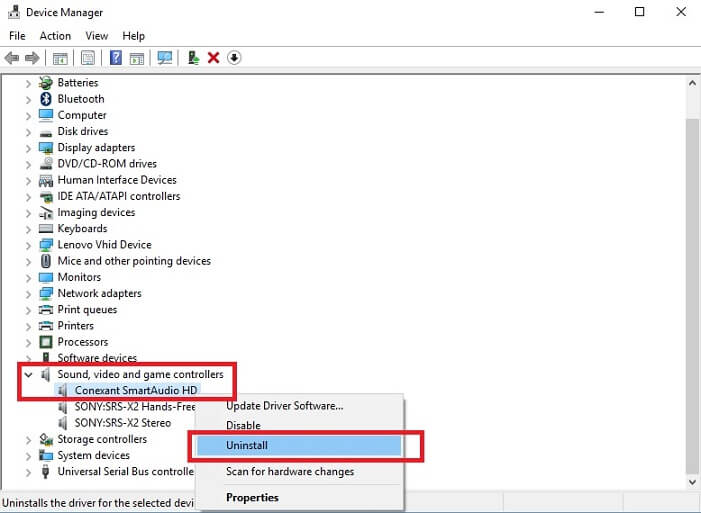
- In the Device Manager window, go to the Sound, video and game controllers.
- Right-click on the Conexant audio driver and select Uninstall.
- Now, go to this link and follow the given instructions to reinstall Windows and upgrade to the latest version.
Solution 6: Reset Windows Update Components
Windows Update components are the most crucial service that Microsoft requires to keep your PC updated and avoid any such update issues. But if these components are corrupted on your system due to any possible reason, then you must reset the update components.
- Click on the Windows Cortana Search box and type “command prompt“.
- Right-click on the Command Prompt and select Run as administrator.
- Type the following commands on the Command Prompt window, and press the Enter key after each command:
net stop wuauserv
net stop cryptSvc
net stop bits
net stop msiserver
Ren C:\Windows\SoftwareDistribution SoftwareDistribution.old
Ren C:\Windows\System32\catroot2 Catroot2.old
net start wuauserv
net start cryptSvc
net start bits
net start msiserver
- After executing these commands, exit the Command Prompt window.
Solution 7: Install latest .NET Framework
If you are running the old version of the .NET framework, then also you can be stuck on Windows 10 1909. So, here it is strongly recommended to install the latest version of the .NET framework.
But before doing this make sure to uninstall the old version of the .NET framework on your computer.
For this, you need to do the following:
- Type control panel in the Windows Search box.
- Click on the Control Panel.
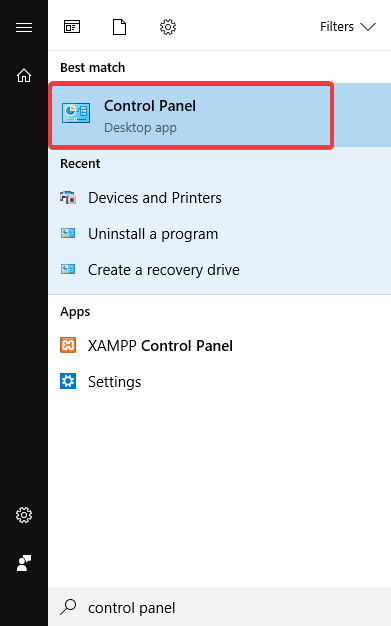
- Now, click on the Uninstall a program link.
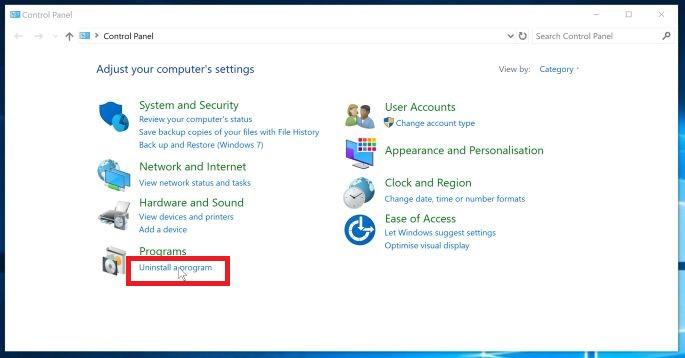
- Search for the .NET framework in the list of installed programs > right-click on it > click on the Uninstall option.
- Follow the on-screen instructions to uninstall the framework.
- Now, go to this website and download the latest version of the .NET framework.
- Next, install it on your computer.
Now, try to upgrade your Windows 10 computer and see if the Windows 10 stuck on release 1909 issue has been resolved or not. If you are still experiencing the same issue, then move towards the next solution.
Solution 8: Use Registry Editor
You can fix Windows 10 stuck on version 1909 issue by using the Registry Editor and making some changes in the registry value. To do this, follow the below-given steps:
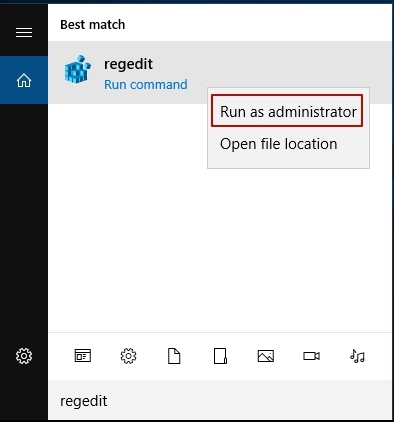
- Go to the Windows Search box > type regedit.
- Right-click on the regedit and select Run as administrator.
- Navigate to the following location:
HKEY_LOCAL_MACHINE\SOFTWARE\Policies\Microsoft\Windows\WindowsUpdate
- Right-click on the Windows Update > select New.
- Select the Dword (32-bit) Value.
- Enter TargetReleaseVersion and set its value to 1.
- Again right-click on the Windows Update > select New and then String Value.
- Now, name the String Value as TargetReleaseVersionInfo.
- Net, set the value of this string according to the targeted Windows version. For example, if you want to upgrade your computer to the 20H2 version, then enter 20H2 as the value of TargetReleaseVersionInfo.
Recommended Solution to Fix Windows Errors and Issues
If you are experiencing any kind of error or issue with your Windows PC and you don’t want to fix it manually, then I recommend you to use the PC Repair Tool.
Using this tool you can fix almost all kinds of PC errors, such as DLL, driver, BSOD, game, update, registry errors, etc. Also, this tool repairs the corrupted system file, prevent sudden data loss, keeps your PC safe from malware or any other threats.
Adding to this, you can also improve the PC’s performance with the help of this tool. So, install this tool on your PC and get rid of all PC issues.
Get PC Repair Tool to Fix PC Errors and Issues
Conclusion
Keeping your PC updated is important for its security, performance, and many other aspects. But sometimes, we fail miserably to update Windows due to several reasons.
So, if your Windows 10 update stuck on 1909 version and you are unable to upgrade it to the latest version, then you can follow the fixes I have mentioned above in this article.
After applying these solutions, you would be able to upgrade your Windows 10 computer. Now, if everything worked out in your favor and you liked this article, then give us a like on Facebook or Twitter.
Hardeep has always been a Windows lover ever since she got her hands on her first Windows XP PC. She has always been enthusiastic about technological stuff, especially Artificial Intelligence (AI) computing. Before joining PC Error Fix, she worked as a freelancer and worked on numerous technical projects.