If you are unable to update your Windows system due to the Update 0x80070522 Error “Privilege Not Held” then you are at the right place. In this tutorial you will learn how to get rid of Windows 10 Update 0x80070522 Error “Privilege Not Held” and update the system with ease.
But, before applying any fixes to overcome from the Windows update errors, it is suggested to know about 0x80070522 “Privilege Not Held” Error.
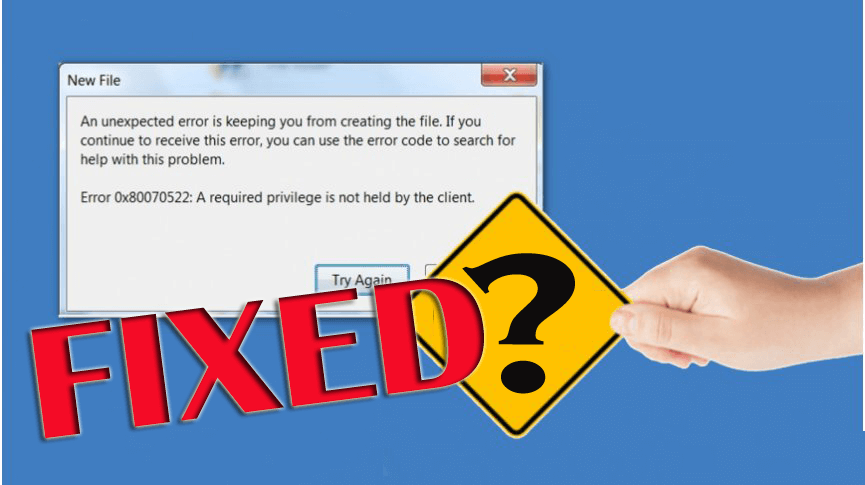
This strange error is very irritating, it blocks the Windows update process every time. According to me, this error is related to the File Explorer. Once the File Explorer gets damaged it aborts the create/copy/move/modify files under system drive (usually C:). Hence, whenever the user tries to perform any type of File related operations, you will face the following error message:
An unexpected error is keeping you from creating the file. If you continue to receive this error, you can use the error code to search for help with this problem.
Error 0x80070522: A required privilege is not held by the client.
Now coming to the point, you should follow the below-given solution one by one in order to fix Windows 10 Update Error 0x80070522.
How to Fix Windows 10 Update Error 0x80070522
Solution 1: Disable Admin Approval Mode
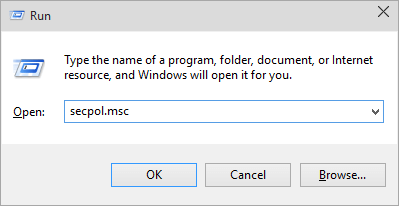
- First, open the run dialogue box. Press the Windows and R button.
- In the run box, you need to type secpol.msc and hit Enter key. If any confirmation window will appear then click on the OK.
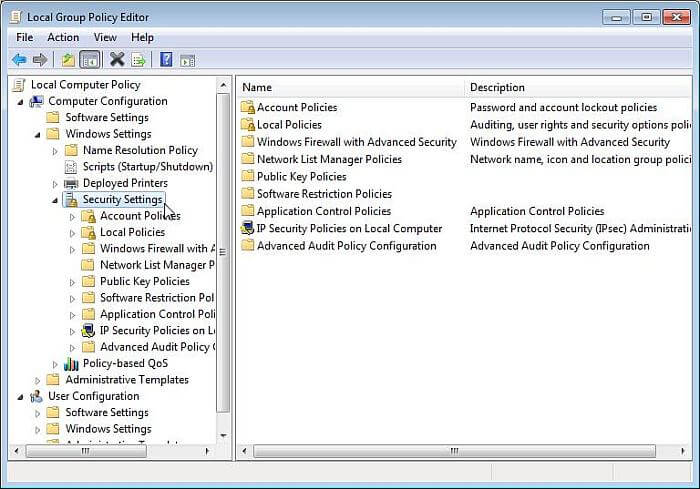
- This will open up the Local Security Policy Now, you need to navigate to the Local Policies present at the left pane and click on Security Options.
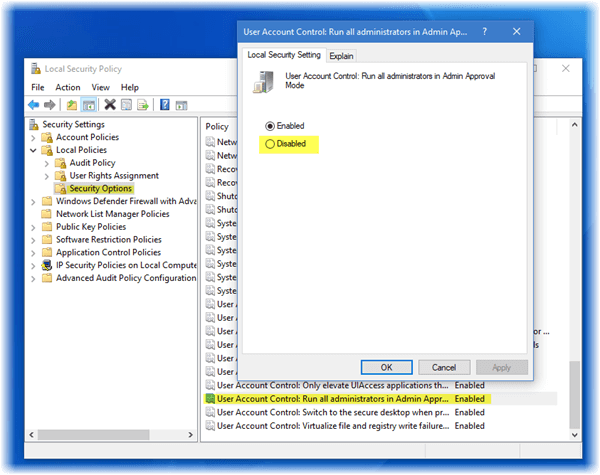
- After it, scroll down and find User Account Control: Run all administrators in Admin Approval Mode.
- It is by default set to Enabled. You need to choose Disable > click on the Apply and then OK to save all the modifications. Now exit from the Local Security Policy window and restart your device.
After disabling admin approval mode, try to update your PC or laptop.
Solution 2: Using File Explorer
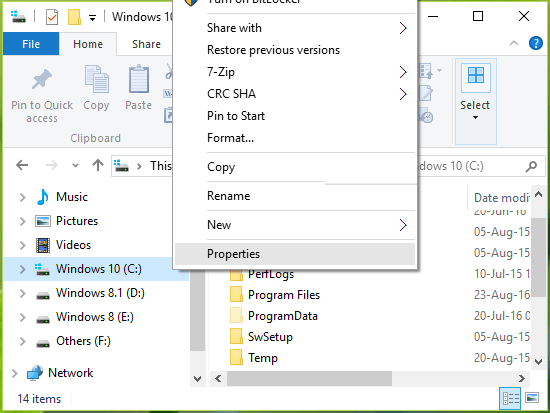
- To do this first you need to right-click on your system drive (generally c driver) in File Explorer and choose Properties.
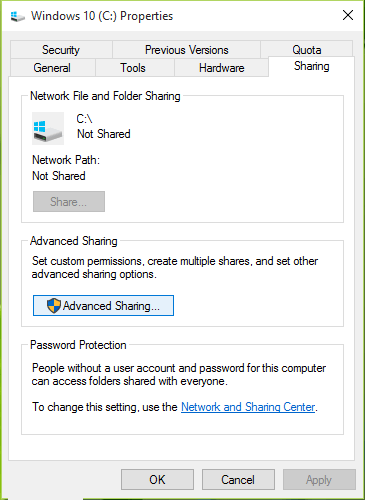
- Navigate to the Sharing tab and click on the Advanced Sharing button.
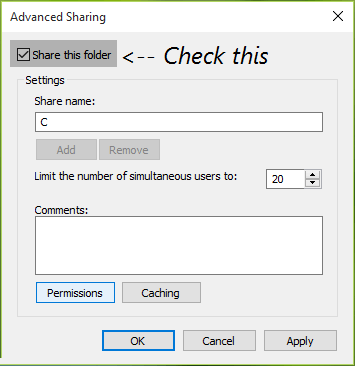
- After opening the Advanced Sharing window, check Share this folder and click on Permissions.
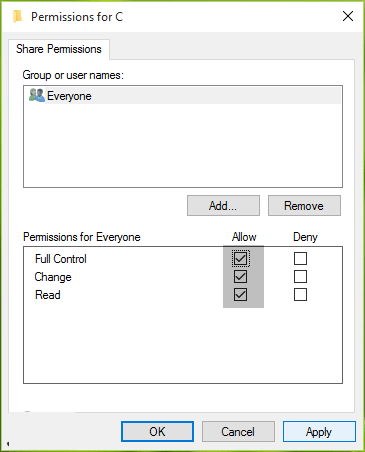
- In the permissions window, you should verify that Everyone is listed under Group or user names section. If it is not then, click Add and type Everyone, choose check names and then click OK. After it, check Full Control, Change and Read options to provide full control to ‘Everyone’.
At last, click OK then Apply and exit from the File Explorer. Reboot the File Explorer with the help of Task Manager and verify the status of the issue.
Solution 3: Use Registry Editor
Please Note: Manipulating the registry database manually is very risky and difficult too. A small mistake can damage your entire system, so if you are not very advance then avoid follow the manual steps.
You can run the Registry Repair Tool, to fix registry issues and errors. Despite this also make sure to create a System Restore point before doing any modifications in the registry.
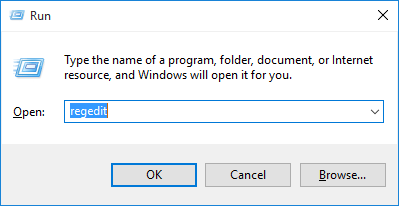
- Press Window + R to open the run dialogue box, type Regedit in the Run box and hit Enter key to open the Registry Editor Window. If any confirmation window appears, then click on the OK.
- Now, you need to navigate to the following registry key:
HKEY_LOCAL_MACHINE\SOFTWARE\Microsoft\Windows\CurrentVersion\Policies\System
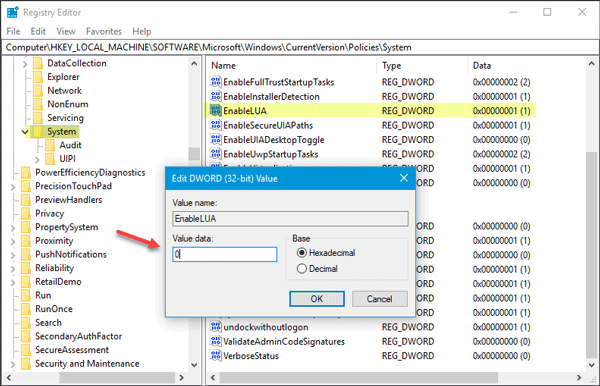
- In the right pane of System key, search for the registry DWORD (REG_DWORD) named EnableLUA which should be equivalent to Value 1 as its Data. Double click on the DWORD to modify its value:
- Now you need to change the value, go to the Edit DWORD Value box, set the Value data as 0, and click OK. Exit from the Registry Editor Window and restart your PC.
After applying the above-given steps, the issue should be fixed.
Solution 4: Use the Official Update Assistant app
First of all make sure that you are logged in as the administrator, in case you are logged in as a guest or user then log out and again login as administrator. After it, you need to visit the Microsoft website (https://support.microsoft.com/en-us/help/12387/windows-10-update-history) and download the official Update Assistant. To download, click on the “Get the Anniversary update now” button.
After downloading Update Assistant run the downloaded file. Click on the “Update now” button.
In this window you will see the three categories – CPU, memory, and disk space checkmark all -> click “Next” and the update will start to download.
After downloading you will get a window with a notification and a countdown timer to automatic restart. Exit from all other programs and click on the “Restart now” button.
Your PC or laptop will restart several times and at last, a screen will appear with the user login screen. After selecting the administrative account, another screen will appear with several new privacy features. You can change them according to your requirement, click on the “Customize”. Or, click “Use Express settings”.
Go to the Privacy section, and scroll down and turn off the options. After it, click on the “Next”.
At last, you need to check the three browser security settings, leave them active. Click on the “Next”, you can change these three sets of choices later on from the Windows 10 Settings app.
After a few seconds, your Windows 10 will boot with an updated operating system. I hope the error 0x80240034 is fixed in Windows 10.
Best & Easy Solution To Fix Error 0x80240034
Well, if none of the above-given solutions work for you then to fix Windows 10 update error 0x80240034 scan your system with the PC Repair Tool.
This is a highly advanced repair utility that just by scanning once detect and fix various Windows update related errors. With this, you can also fix other errors like registry junk issues, DLL problems, BSOD errors, and more.
It will scan your entire computer/Laptop and get rid of all types of problems residing in your PC and boost the performance of your system.
Get PC Repair Tool, to Fix Various Update Errors Easily
Conclusion
The Windows 10 update error 0x80070522 is a common error, being faced by multiple users.
In this blog, I have discussed various effective fixes to fix error 0x80070522. You should try them one by one to find which one works in your case.
However, if the manual fixes won’t work for you or you are unable to follow the manual solutions than run repair utility to get rid of error 0x80070522 in Windows and also boost the Windows PC performance.
I hope this article works for you.
Good Luck!!!

Always up to help others with their PC-related issues, Jack loves to write on subjects such as Windows 10, Xbox, and numerous technical things. In his free time, he loves to play with his dog “Bruno” and hang out with his friends.