Are you receiving any of the following Nintendo Wii errors 51330, 51030, 51331, 51332, 50299, 52030, 52130?
Mostly these types of Nintendo Wii error codes occur when your gaming console denies getting connected with the internet.
You can fix Nintendo Wii error messages by changing the security type in Wii System settings, restarting or rebooting the Nintendo device.(Detailed steps given below)
To catch detailed information about these fixes you need to go through this post. But first, understand why you get errors on Nintendo Wii
What Are The Causes Of Nintendo Wii Error?
In most of cases, the main culprit behind the Nintendo Wii error is your router or the access point which is facing some network connection issue while getting connected with the console.
Along with the error codes, you will start receiving the following error message: “Unable to connect to the internet”.
All these things happen because of the wrong security key assigned to the access point that is configured within the Internet settings of the gaming console.
Well in some cases, these Wii errors also arise when some problem has occurred in the wireless interference or access point’s end.
What Are The Type Of Nintendo Wii Error Codes?
You may have seen or heard about several error codes which frequently encounters on Nintendo Wii console. But do you know why these errors occur?
If not then let’s know about each of these Nintendo Wii console errors.
- Wii Error code 50299 – Nintendo Wii Error code 50299 occurs when your gaming console fails to connect with online features or services. This happens when settings of the gaming console access point are incorrectly configured or when it’s not configured.
- Wii Error code 51030, 51331 and 51332 – Nintendo Wii 51030 error arises when none of the wireless networks within the gaming console is compatible or configured. In that situation, your console tries hard to get an internet connection.
- Wii Error code 52030 – This Error code 52030 is a clear indication that some wrong password is assigned for your wireless network through which your gaming console is connected. So, the point is that password is changed or it was incorrectly configured on your gaming console.
- Wii Error code 52130 – Nintendo Wii error 52130 occurs when the Wii gaming console fails the network connection test.
How To Fix Nintendo Wii Error Codes?
Fix 1: Cross-Check The Wi-Fi Password
If you are getting the Wii error code 51330 after entering the Wi-Fi password then chances are high that you have put the wrong password.
- Go to the network’s settings to get completely assured about wireless passwords; whether you have entered the right one or not.
- Properly note down the security type and wireless password. Within the Wii Settings, both security type and wireless password should be entered correctly.
So, re-enter the password again to check whether the Nintendo Wii error still persists or not.
If still, you are getting the same error in the Nintendo Wii console even after assigning the right correct Wi-Fi password then move on to the next fixes.
Fix 2: Restart/Reboot The Nintendo Device
Restart or rebooting the Nintendo console will definitely work to fix Wii internet error code.
At first, you should reboot the network device after that check whether the problem persists or not.
If in case of error code appears again then resetting the network device is the best option to try. Here are the steps that you need to follow for resetting the network device.
Press the “Power” button for at least 3 seconds and then choose the “Power Options”. After that press the “Restart” button on your Nintendo device.
Fix 3: Change Security Type In Wii System Settings
Another option that you can try is changing the security type in Wii system settings•
If your Nintendo Wii device has detected the wrong security type meanwhile the initial setup then by updating this setting within the existing Internet connection you can easily fix this issue.
Nintendo console supports WPA-PSK(AES), WEP and WPA2-PSK(AES) security protocols.
If a different security protocol is used in your router apart from the mentioned one then change it to supported protocols.
Follow the below-given steps to modify the security protocols type to the WPA2-PSK (AES):
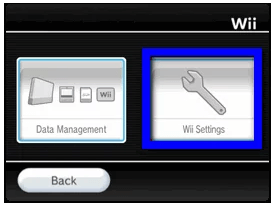
- Go to the Wii Menu and then choose the Wii button by making use of the Wii Remote.
- Select the Wii Settings.
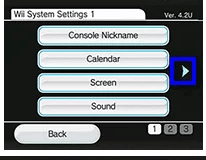
- Now on the opened menu of “Wii System Settings”, hit the arrow sign present on the right section of your screen for moving onto the 2nd page of the screen.
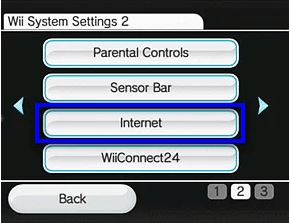
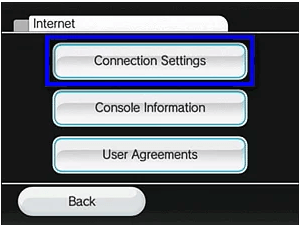
- Choose the Internet> Connection Settings.
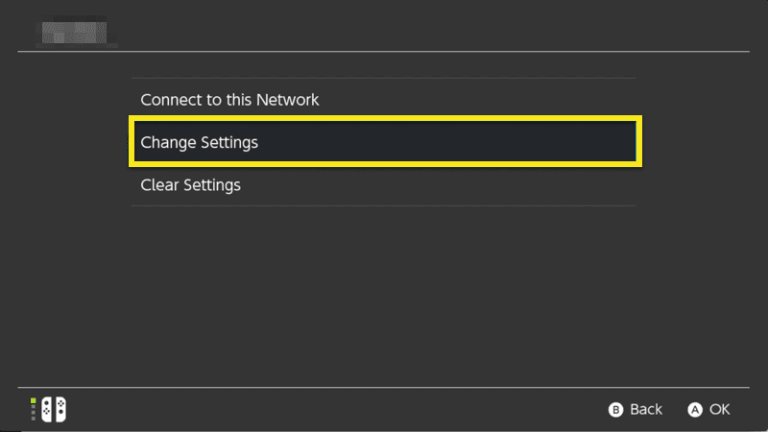
- After that choose the connection file which you are willing to edit. Now hit the Change Settings option.
- Using the arrow key you can move to the 2nd page of your screen and then choose the WPA2-PSK (AES).
- In the opened white box, you have to enter the password of your wireless network and then hit the ok button.
- Choose the “MAC Filtering” option in the router. If this option is enabled then add the system’s MAC Address in the allotted list.
- If in case you can’t put MAC address in the allotted list then disable the MAC Filtering.
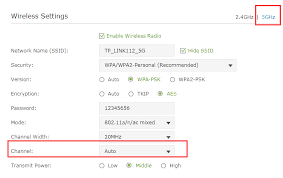
Fix 4: Change Router’s Channel Setting To 11 Or 1
By default, routers get broadcasted on channel 6. In this channel, you may have to face problems like overlapping with some other channels or poor network connection. As a result of which internet speed gets too slow and it’s become hard to get accessed by Nintendo Wii.
Just because channels are been facing the least amount of interfaces or wireless. You have to switch the router’s channel setting to 11 or 1 because in these channels network issues are very least.
Here are the steps that need to follow:
- Go to the router’s settings.
- Search for the wireless channel setting. Mostly it is present under the tab of “Wireless Network”.
- From the opened drop-down list, you have to choose 1or 11 router’s wireless channels.
- Now save all your done changes.
Fix 5: Change DNS & IP Address
Another option that you can try to fix Nintendo Wii error code 51330, 50299, 51030, 51331, 51332, 52030, 52130’ is by manually changing the DNS and IP Address.
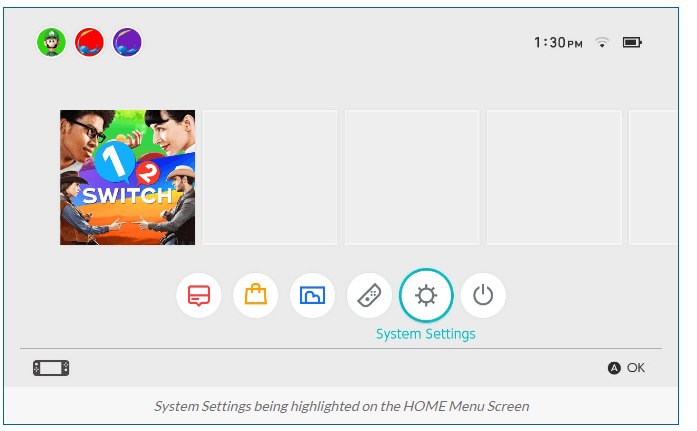
1: Go to the Wii Menu first and then choose the System Settings.
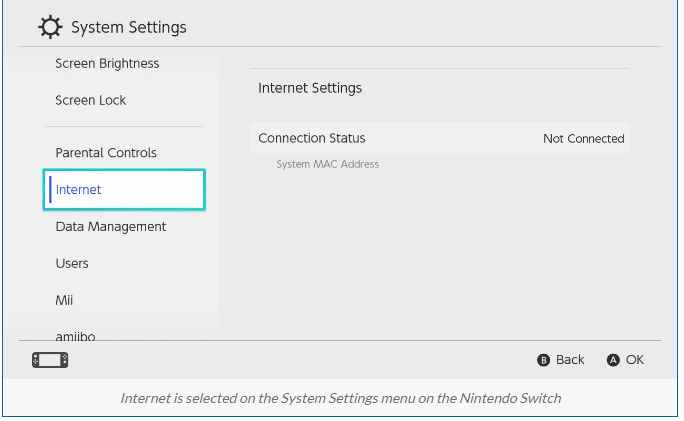
2: Use the arrow sign which is present on the right side of your screen and then go to the 2nd page. Here you have to choose the Internet option and then press the A button from your keyboard.
3: Select the Connect to the Internet option and hit the X button from your keyboard.
5: Make a selection for the network connection that you want to use.
6: Select the Change Settings option.
7: Using the arrow present on the right side you can select the IP Address.
8: Choose the “Don’t Auto-Obtain” option and assign the following detail within the network settings (note: don’t neglect the “.” that is present at the very end part of numbers?) like:
- IP address: 168.1.4
- Tap Gateway
- Subnet Mask: 255.255.000
9: Hit the Confirm button.
10: Select the Configure option if you are asked for configuring the DNS settings.
11: Now select the “Don’t Auto-Obtain option” and then assign the following details.
- Primary DNS: 8.8.8.8
- Secondary DNS: 8.8.4.4
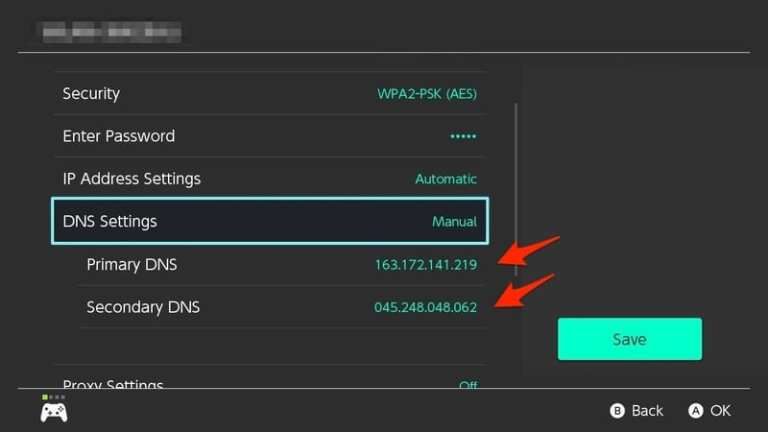
12: Again hit the Confirm button.
13: After completing all this, hit the Save option.
14: Choose the option of Connection Test for testing up your connection. After successful completion of the connection, test hit the OK button.
Fix 6: Check Wireless Mode Compatibility With Wii Console
You need to get ensure that the wireless mode of the router’s settings is well compatible with the Wii console or not.
As the Nintendo Wii gaming console has full support for 802.11g and 802.11b wireless formats. In some routers, this wireless format is also known as “Up to 54Mbps”.
If the router is making use of 802.11n only “Up to 300Mbps” mode. You have to change the setting to allow Wii for connecting with the home network.
Fix 7: Re-Create Network Connection
If in case your router is set with the SSID because of security reasons then you need to manually re-add the Nintendo Switch.
Well, this step should be performed only if you are an advanced technical user.
For manual creation of the internet connection within the console. You have to update the SSID setting. Leave the rest of the setting as it is.
For updating the SSID, follow down the steps:
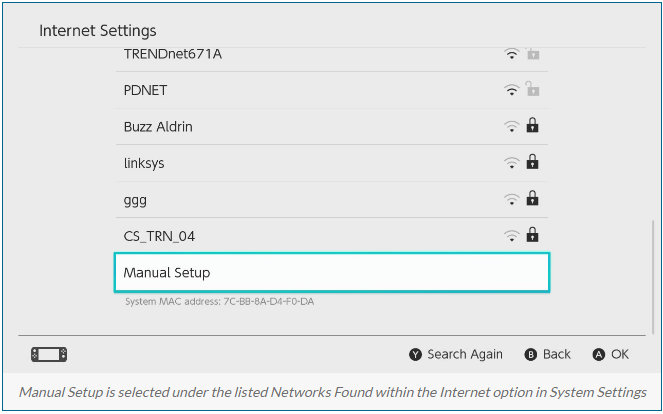
- Go to the System Settings and then the Internet tab.
- Now go to the Internet Settings and hit the Networks Found.
- Choose the Manual Setup.
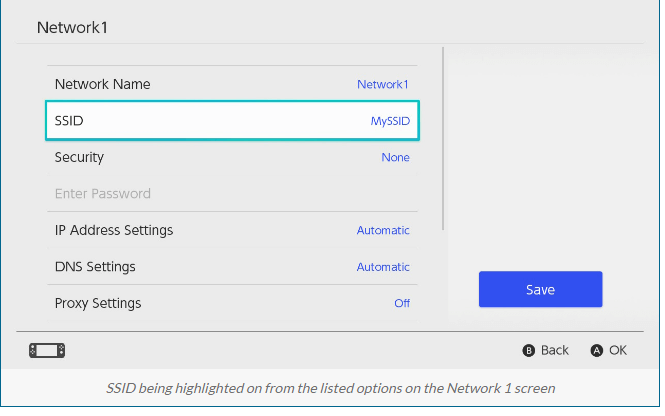
- You can also use the option to broadcast the SSID instead of hiding it. Now choose from the following listed options, and then enter the most appropriate network detail:
- Network Name
- SSID
- Security
- IP Address Settings
- DNS Settings
- Proxy Settings
- Connect to a Hidden Network
- Hit the Save option.
- Choose the Connect to this Network for testing up your saved connection.
Wrap Up:
So, this is all about the Nintendo Wii Error Code 51330 and others. I hope, after following the solutions you managed to get past the error codes easily.
Moreover if while playing the game on Windows OS you encounter a low FPS freezing issue, then use the Game Booster, to enhance the low FPS and improve the gaming experience. It boosts the game and you will get a better FPS rate. Apart from this, it optimizes your PC for smoother and responsive gameplay.
Do share your experiences regarding this post, whether the fixes worked to resolve Nintendo Wii error 51330, 50299, 51030, 51331, 51332, 52030, 52130.
Good Luck..!
Hardeep has always been a Windows lover ever since she got her hands on her first Windows XP PC. She has always been enthusiastic about technological stuff, especially Artificial Intelligence (AI) computing. Before joining PC Error Fix, she worked as a freelancer and worked on numerous technical projects.