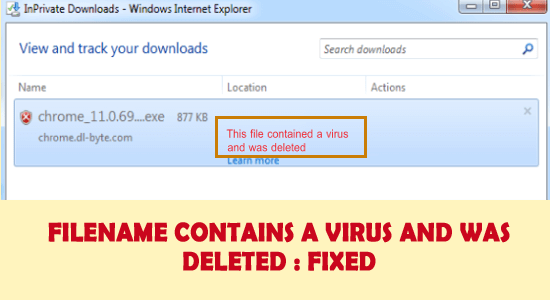
How to fix error “Filename contains a virus and was deleted”? If this is what you are searching on the web then this article is for you. Here get to know the complete information related to the error, why you are seeing the Filename contains a virus and was deleted and the possible fixes to solve the error.
Any user of computers connected with the internet is prone to face frequent threats in the form of viruses. Trojan horse is one famous virus responsible for disrupting processes and worse, compromising critical data and destroying the device forever.
One such variant of Trojan is responsible for showing some users with the message “Filename contains a virus and was deleted.” If you have received any such messages over time, let’s know the problem in detail.
Why You are Seeing “Filename Contains a Virus and was Deleted” Error?
While using the internet, if you come across a “Program contained a virus and was deleted” message, this means your system is affected by the ZeroAccess rootkit. This is a Trojan Horse Virus that is circulating across the internet and has the intention to take complete access of the machine by adding a ZeroAccess bug on the system and downloading additional malware consequently.
This remains hidden for a while and downloads components for botnet users. The purpose of the malware is targeted at spending spam messages and ensuring the malware is spread across the receiver’s system.
From a generic perspective, pirated software comprising Keygens and Crack files that are responsible for cracking legal licenses contain these viruses.
How Do I Fix “Filename Contains a Virus and was deleted” Error?
Solution 1: Boot in Safe Mode and Networking On
Booting is a way to replenish possible bugs and errors in the system and helps fix a program that contained a virus that was deleted. That being said, using Safe Mode would ensure the device does not malfunction and starts with basic functions only. In this case, boot Safe Mode with Networking and perform the steps,
- Restart the PC
- On the Sign-in page, press and hold Shift Key, while choosing Power and follow up with a restart
- Choose the “Troubleshoot” option among the list of options provided
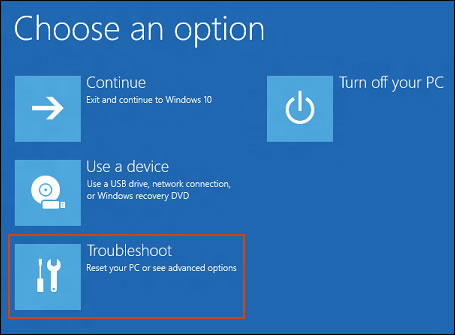
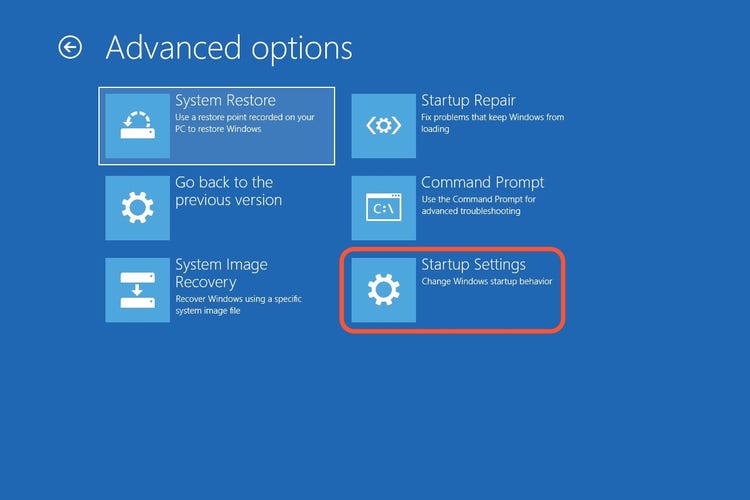
- Choose Advanced Options
- Now select the Startup Settings
- Tap on Restart, now click on F5 for choosing Safe Mode and Networking
- Once you are in Safe Mode, try performing Clean Boot
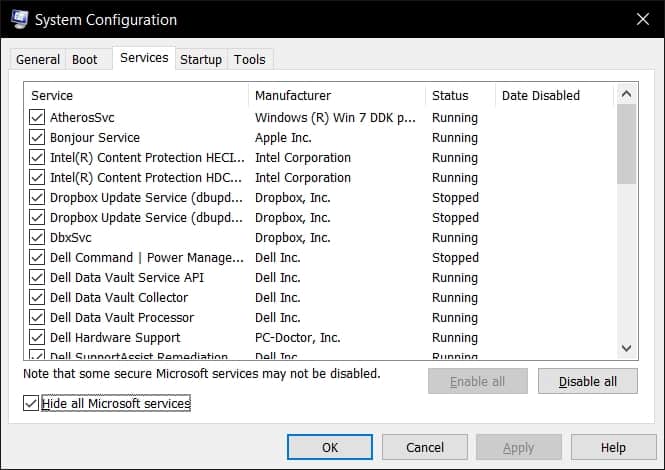
Steps to Perform Clean Boot:
- Click on the Start button
- Type System Configuration
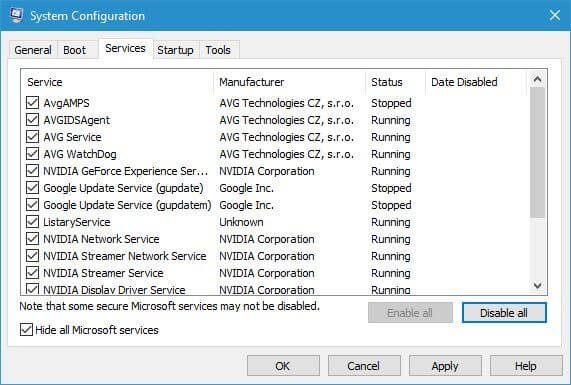
- Click on Services Tab and then tap on Hide All Microsoft Services box
- Select Disable All then go to the Startup tab
- Choose the Open Task Manager
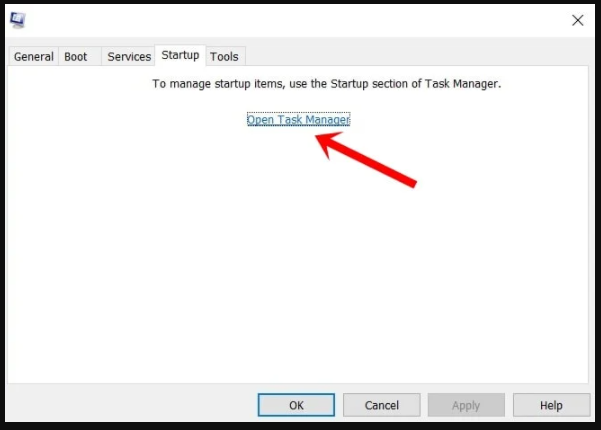
- Close Task Manager
- Restart your System
Exit Safe Mode
In the previous step, that would ensure clean boot and see the problem vanished for good, in this step, however, it is required to exit carefully from Safe Mode. Here are the steps,
- Click on Start Menu
- Type System Configuration
- Choose the Boot Tab on the left-hand bottom side of the page
- Unselect the Safe Boot Option and tap on OK
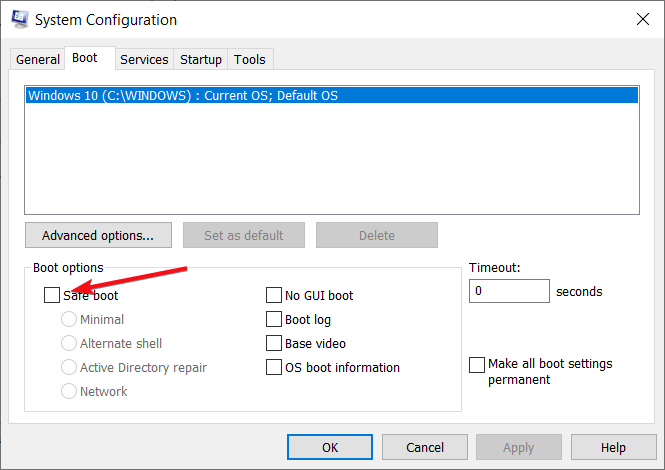
- Restart your System to see normal booting restored
Solution 2: Disable Antivirus Temporarily
Since your device is protected by Windows Defender to a certain degree, it is recommended to disable other Antivirus installed. Doing this would allow you to see if the problem persists.
Based on the problem, you may require reinstalling or even uninstalling the antivirus as a whole. In some cases, the incomplete or corrupted installation of the antivirus program causes various issues and after uninstallation, you might see the message gone.
Follow the steps to disable the antivirus program:
- Launch the antivirus application in the taskbar or in the Start menu.
- And click the settings tab then select disable antivirus option.
- Disable the antivirus for the time duration you want.
Now after disabling the antivirus tries downloading the online file or email attachment which is showing the error to see if the problem is resolved.
And if the error is fixed then uninstalling the antivirus program might work for you.
Get SpyHunter to Remove Virus/Malware Completely
Solution 3: Creating a New Profile in Windows
Windows Device allows you to create multiple User Profiles. In this case, using a separate profile would help you move the error permanently, and using the new profile, you can access all the regular functions.
The steps include,
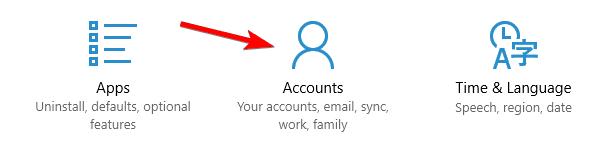
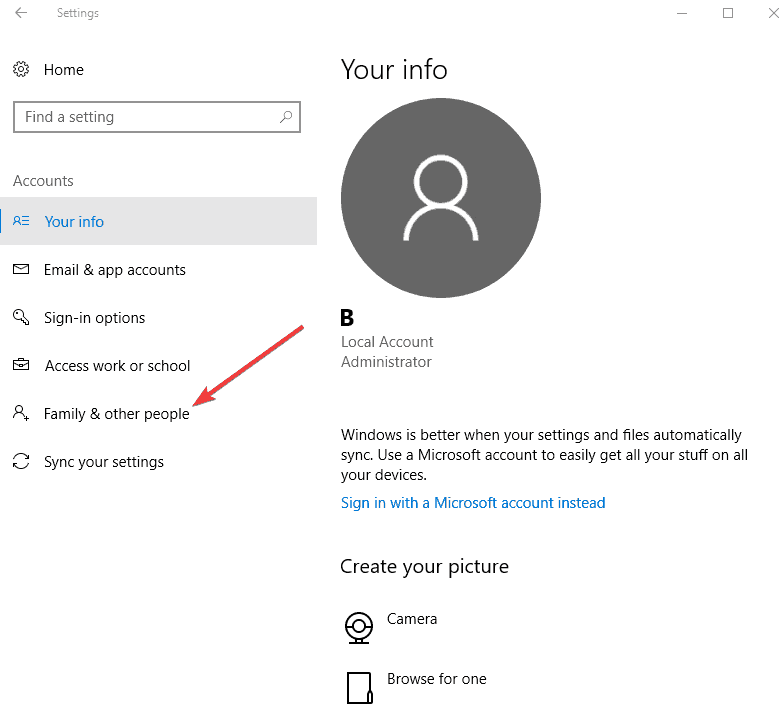
- Click Start Menu > choose Settings and click on Accounts
- Select Family and Other People option
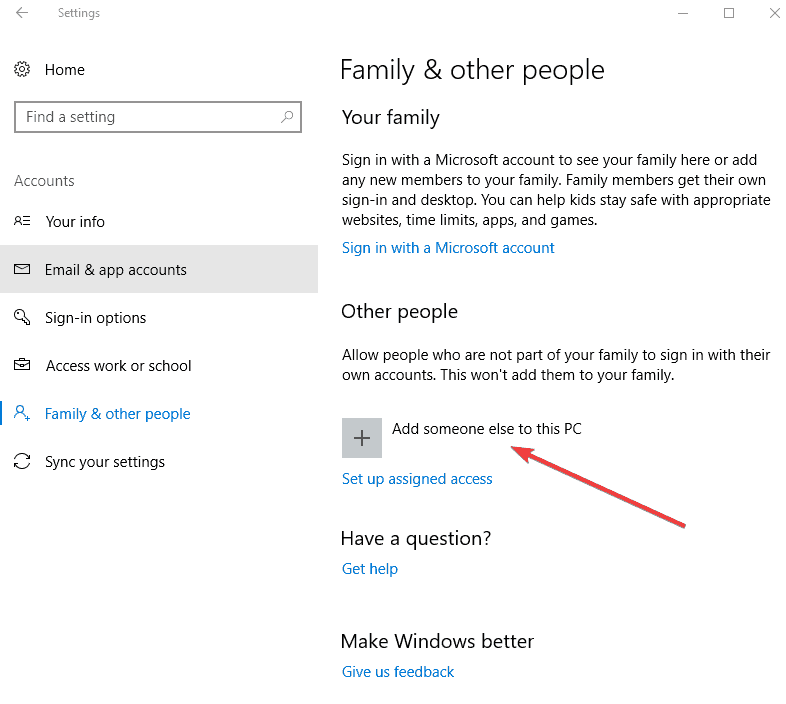
- On the Other People segment, click on Add Someone else to this PC
- Fill out the form using User Name and Password to create a new account
- Tap on Change the Account Type
- Using the drop-down arrow, select Administrator to give higher Admin privileges
- Restart the System
- Login using the New User ID and Password
- Check if the error of “Fix [Filename].exe contained a virus and was deleted” gone
- If the issue is solved, it means the original profile was corrupted by the Virus
Solution 4: Repair Corrupted Profiles
In continuation with the previous step, here are some simple steps to repair a corrupted user profile as follows,
- Using your New Account, switch to the Old account
- Tap on OK to move forward
- Restore Default Admin privilege to the Old Account
- Check for the filename that contains the virus and remove corrupted files
- Make sure to have the account hold Admin Mode
Solution 5: Download and Run the Microsoft Safety Scanner
The Microsoft Safety Scanner is a tool, that scans, detect and remove malware program from the Windows system.
But you need to download the latest version of the tool before running each and every scan.
Also, the tool won’t replace any other antimalware tool and remove malicious programs from the system completely.
- For downloading the tool visit the Microsoft official page
- Now launch it and choose the scan type you want to conduct.
- Initiate the scan and review the results that appear on the screen, you will see a list of the entire program identified on your system.
Now if you want to delete the tool, then simply remove the msert.exe file from your system and reboot it.
1 – How to Check If a File Has a Virus before Downloading?
Before downloading the file, make sure you have a third-party antivirus program installed on your system. As many antivirus programs have the ability to scan the file as soon as you download any file directly from the internet.
Despite this, you can also copy the direct link to the file and search the link on the free website VirusTotal.com. This free website searches for the malicious link after scanning and prevents the risk of installing the virus infection.
2 – Can you get a virus from downloading a file but not opening it?
Yes, sometimes downloading a malicious file is enough to infect your computer. In many cases, it is seen that downloading a file without opening it could lead to the effecting of the attacker-controlled code from within the file and this is capable to exploit the susceptibility in a program that is capable to handle the file.
Recommended Solution to Fix Windows PC Errors & Optimize its Performance
To fix various Windows PC problems like freezing, crashing or hanging it is suggested to scan your system with the PC Repair Tool.
This is an advanced, multifunctional tool that detects and fixes DLL-related errors just by scanning. It is a highly advanced and trusted tool, that repairs corrupted Windows system files, prevents your PC from file loss, removes virus or malware infection and much more.
So feel free to run this automatic utility and make your Windows PC error-free.
Get PC Repair Tool, to Make Windows PC Error-Free
Summing it Up
These were the useful fixes for combating the virus; responsible for showing “Filename contains a virus and was deleted”.
Use these fixes step by step to ensure your system is clean from these malicious programs and the error File contained a virus and was deleted gets fixed.
Apart from that if you like this article useful then don’t forget to hit the Like button, simple by heading to our Facebook page.
Good Luck..!
Hardeep has always been a Windows lover ever since she got her hands on her first Windows XP PC. She has always been enthusiastic about technological stuff, especially Artificial Intelligence (AI) computing. Before joining PC Error Fix, she worked as a freelancer and worked on numerous technical projects.