Did you see the bddci.sys Blue Screen Error on your Windows 11 or 10 OS? The bddci.sys BSOD error occurs unexpectedly with the system crash and as a result, you are unable to do anything. Whenever this error arises the system crash often which leads to restarting or rebooting the PC.
To fix bddci.sys error, we recommend Advanced System Repair:
This software is your one stop solution to fix Windows errors, protect you from malware, clean junks and optimize your PC for maximum performance in 3 easy steps:
- Download Advanaced System Repair rated Excellent on Trustpilot.
- Click Install & Scan Now to install & scan issues causing the PC problems.
- Next, click on Click Here to Fix All Issues Now to fix, clean, protect and optimize your PC effectively.
So, in this article find out the best possible solutions to fix bddci.sys error, so keep reading the article to get to know the complete solutions to fix blue screen errors without further ado.
What is Bddci.sys File?
The Bddci.sys file is the system file utilized by Windows and the Microsoft DOS OS which includes the variable and the system settings. And these files are generally used for storing the device drivers.
It is a component of the Bitdefender antivirus utility. And the Bddci.sys BSOD error especially ensues due to the clashes between the system files & the Bitdefender file.
This issue happens when we update and install our files and programs, software, Operating systems etc, the error message started appearing on our screen.
- The file bddci.sys is corrupt or else missing.
- sys could not be found.
- Windows failed to start – bddci.sys.
- bddci.sys failed to load.
You are more likely to see the error due to corrupted drivers, hardware issues, and other software issues. So, here follow the workable solutions to fix the error permanently.
How to Fix “Bddci.sys” Blue Screen Error on Windows 11 & 10?
Solution 1 – Uninstall the Bitdefender Antivirus
Few users have installed the Bitdefender on their system and laptops due to this installation they are facing bddci.sys error. In order to get rid of this error simply uninstall Bitdefender Antivirus utility entirely from your system.
Below we have mentioned the process through which you can uninstall the Bitdefender:
- Go to the Windows setting by pressing the Windows+ I
- Click on Apps and then go to App & features
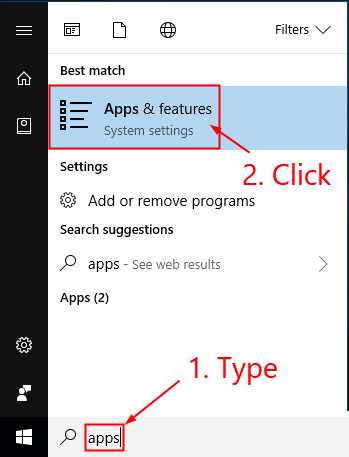
- Inside the right pane locate the BitDefender and hit it.
- Click on the Uninstall
- Restart your system or PC to check the Blue Screen bddci.sys error arises or not.
Moreover, you can also uninstall the Bitdefender Antivirus using the 3rd party uninstaller, this is an advanced tool, that uninstalls any program completely without leaving any traces or junk files behind.
Get Revo Uninstaller to uninstall Bitdefender antivirus completely
Hope by doing this you can fix the error if not then move on to the next solution.
Solution 2 – Rename the System file
There are a few users who haven’t installed the Bitdefender although they are getting the BSOD error on their PC and system. If you are one of them then it is highly suggested that rename bddci.sys file will surely work for you.
To do so follow the below-given steps:
- Press the Win key+E
- In the navigation, pane click on This PC which is located on the left corner side.
- Choose My Computer from the Quick access navigation pane which is available on the left-hand side.
- You need to double-tap on (C:)
- Open System 32 & insert or enter the driver’s folder.
- Next, locate the bddci.sys
- Click right on the file and click on Rename
- Name the file as bddci.bak / bddci.old
- Once it is done restart your system and monitor if the error is solved or not.
NOTE: You can find bddci.sys C:\Windows\System32\drivers\ and C:\Program Files\Bitdefender Antivirus Free\web\
Solution 3 – Uninstall the Windows update
Updating the Windows acts quite contrarily. Updating Windows helps the system to run smoothly without prompting any error but in this scenario, it causes unexpected errors. This simply means that after installing the updates or patches you might get the Blue Screen bddci.sys error. In order to uninstall the Windows update or patch follow the given steps:
- Go to the Start
- Click on Run by pressing Win+R
- A dialogue box will prompt on your screen.
- Type the appwiz.cpl command in the Search box.
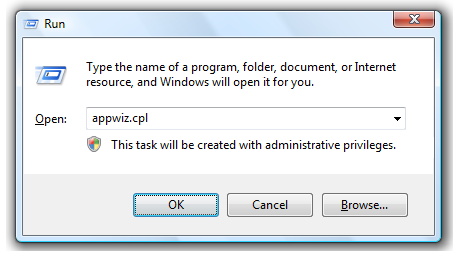
- Click on Enter.
- Programs and Features will appear on the screen. Next, click on View installed update.
- In Microsoft Windows, you will find Updates click and select the Uninstall
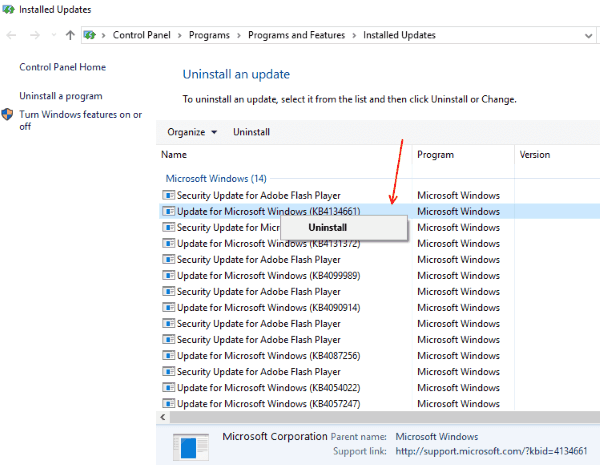
- Click on Yes to confirm the uninstallation process.
After doing so review if the error is persisting if still it is occurring then proceed to the next solution.
Solution 4 – Install the Pending Windows Updates
Installing Windows Updates is one of the major and effective solutions. Windows Updates can solve almost each and every error that occurs on your System. This method will help you to install the pending Windows Updates.
To complete the installation process obey the below instructions:
- Click on Start
- Search for Updates and hit the Enter
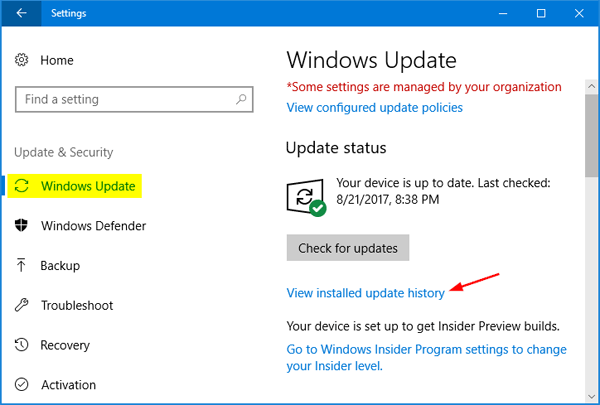
- Windows Update setting will appear on your screen.
- Click on Check for Updates.

- Windows will scan for new and latest updates if it is available.
- If there is any pending update then it gets automatically downloaded.
- Wait until the process gets completed. After updating a notification will appear on your screen.
- Finally, Restart your PC.
Solution 5 – Run the SFC Scan
The Blue Screen bddci.sys Error occurs when there is a conflict between the system files and bddci.sys. And running the SFC scan repairs corrupted Windows system files and makes your PC or system run smoothly and effectively without prompting any corrupted error. To run the SFC follow the below procedure:
- Open the Run dialogue box by clicking Win+R
- Enter the cmd command in the Search box
- At a time Press, the Ctrl key + Shift key + Enter to launch a command prompt as admin
- A user account control box will appear on your screen. Click on the Yes
- Type the SFC /Scannow syntax command.
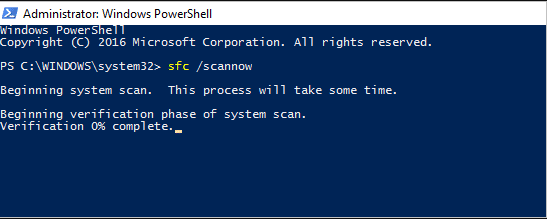
- Next, click on Enter.
- By doing so the system will scan the files and display the execution percentage.
- Once the execution percentage reaches 100. Then Restart your system or PC.
Solution 6 – Delete Bddci.sys File
Another alternative way to resolve this Blue Screen bddci.sys error is to delete the bddci.sys file. To carry out this process we are using the Command Prompt on Windows Recovery Environment. The Window Recovery Environment can assist to boot recovery and troubleshooting via external media.
To carry out the process follow the given instructions
- Select the Win icon which is located on the taskbar. Choose the Power option.
- Click on the Restart option by pressing the Shift key.
- Select the Troubleshoot and then click on the Advanced option.
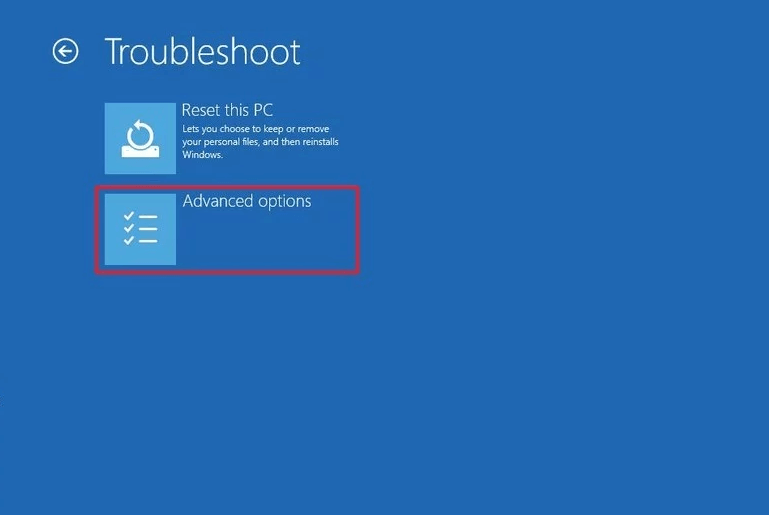
- Click on Command Prompt. To perform the Win partition enter the below mention command and Click on Enter to execute the process. bcdedit /enum
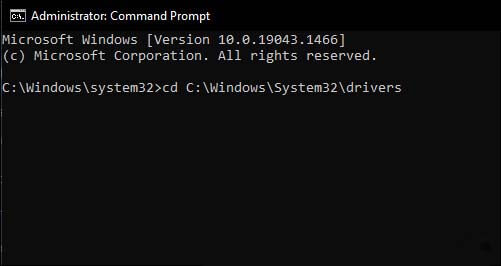
- Run the command to access System 32 C:\Windows\System32\drivers
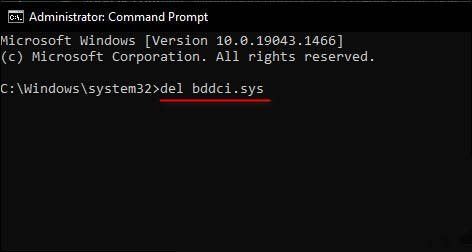
- Execute the command to delete or remove the “del bddci.sys” file
- You can see the file has been deleted by running the below command dir bd*.*
Solution 7 – Execute the System Restore
If none of the above fixes works for you to fix BSOD bddci.sys error then all you need to do is perform the System Restore. Performing the system restore will undo the recent changes and take back your system to the state where there is no error and your system is running fine.
To execute the System Restore follow the below steps:
- Go to the Search
- Next, type or enter the rstrui
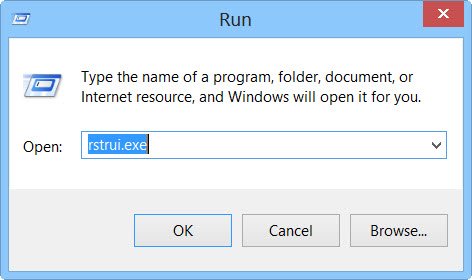
- Click on Enter.
- On your screen, you can see the System Restore wizard. Click on the Next
- Select the date & time one after the other from when the bug started occurring.
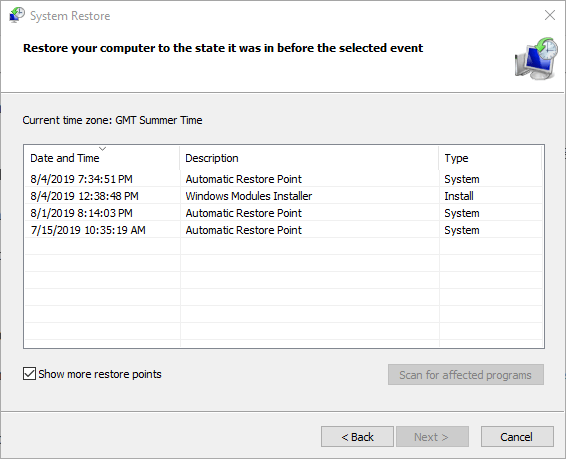
- Select the Finish
- Click on Yes to confirm the process.
Best & Easy Solution to Fix Bddci.sys Error
To fix various Windows PC problems like freezing, crashing or hanging it is suggested to scan your system with the PC Repair Tool.
This is an advanced, multifunctional tool that detects and fixes DLL-related errors just by scanning. It is a highly advanced and trusted tool, that repairs corrupted Windows system files, prevents your PC from file loss, removes virus or malware infection and much more.
So feel free to run this automatic utility and make your Windows PC error-free.
Get PC Repair Tool, to fix bddci.sys Blue Screen Error
Conclusion
Now it’s time to wind up..!
In this article, I tried my level best to provide you with all the solutions. Try all the solutions one by one and see which solution works for you.
It is estimated that one of our solutions managed to fix the error. Hope the article works for you.
If there is anything that I missed out on, or you have any queries or suggestions then you can write to us on our Facebook Page. Also, don’t forget to shoot the like button.
Good Luck..!
Hardeep has always been a Windows lover ever since she got her hands on her first Windows XP PC. She has always been enthusiastic about technological stuff, especially Artificial Intelligence (AI) computing. Before joining PC Error Fix, she worked as a freelancer and worked on numerous technical projects.