
In Windows 10 sometimes an error occurs in Remote Desktop Connection and because of this error, RDC fails to work.
Some of the users who are using the Remote Desktop feature faces the problem “remote desktop connection is not working anymore” Remote Desktop Connection or RDC is similar to the other features of Windows OS, it also depends upon its root services for execution.
You will notice that RDC stop working issue displays if any of the root services get unable to run.
Well, if you are the one who is facing the issue remote desktop connection not working windows 10, no need to worry about as we are here to help you out from this situation. This blog is for you only.
Thus, if you want to repair remote desktop windows 10, then without wasting time, just try out the below-given solutions one after another.
Why is My RDP Not Working?
There are several reasons for RDP not working in Windows 10. Here I am sharing some of the common ones. Many users are facing the error while trying to access another device remotely because Windows 10 restricted the access of another device or due to network connectivity errors.
Some users also reported that if there are any mismatch issues between the Windows Firewall than also the RDP connection issue appears.
Despite this, the antivirus program installed on the system can also cause the remote desktop connection not working issue in Windows 10.
So, here follow the given possible fixes to get rid of the Remote desktop has stopped working issue.
How To Fix Remote Desktop Connection Stopped Working Error
Method 1 – Allow Remote Desktop Via Windows Firewall
Sometimes remote desktop stopped working when Windows Firewall blocks it. To make sure that this service is blocked by a firewall or not you should check and allow it via Firewall by applying below given steps:
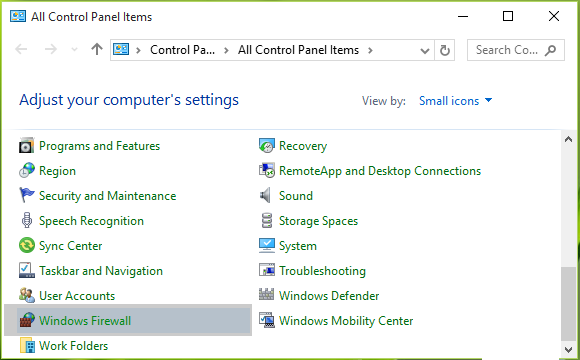
1: Go to the Control Panel and click Windows Firewall.
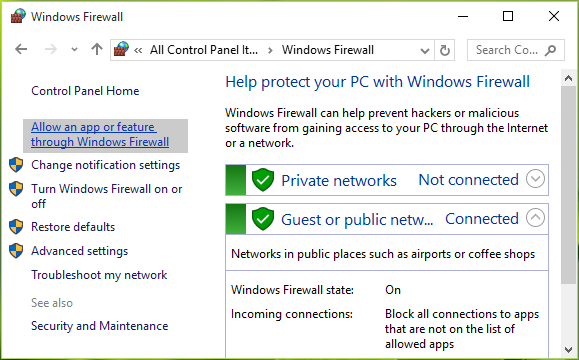
2: After it, click on the Allow an app or feature through Windows Firewall link present in the left pane.
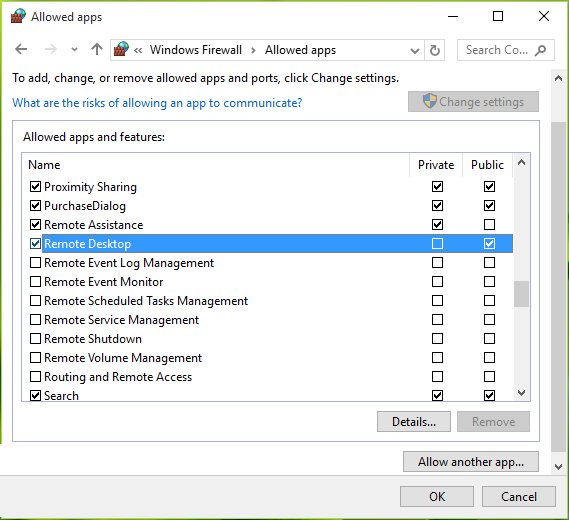
3: Navigate to the Allowed apps screen, click Change settings and then scroll down, check Remote Desktop entry in this list. Make sure that you’ve allowed this app for Public. Click OK.
After the completion of the above-given steps reboot your machine and it is hoped that the remote desktop stopped working issue must be fixed.
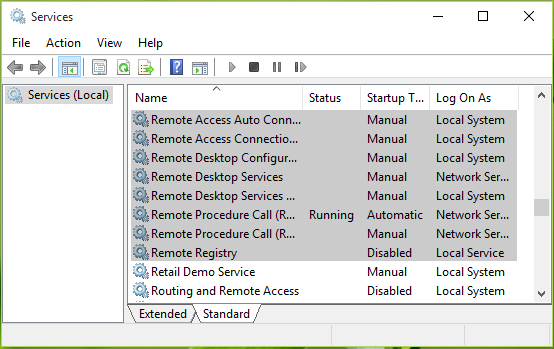
Method 2 – Check Dependency Services
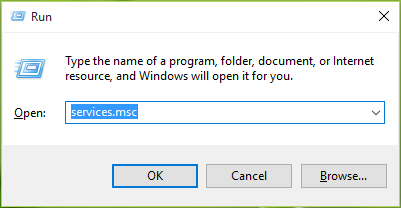
1: Open the run dialogue box by pressing Windows + R and type services.msc in the Run dialog box, press Enter key to open Services snap-in.
2: In the Services window, scroll down and check the status of all the service that contains “remote” term in their name. It is recommended that all of these services must be set either to Manual or Automatic plus none of them should have Disabled status. After the completion of this RDC will start working as expected.
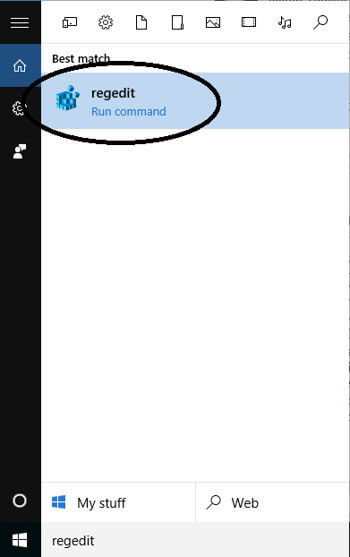
Methods 3: Disable AutoLogin by Using Registry Editor
You can also try the registry editor in order to disable the autologin and that will definitely resolve remote desktop connection has stopped working windows 10.
1: First of all, you need to go to the “Search” bar and then type “Regedit”. After you see it in the search result, just open it.
2: After this, you will see the Registry Editor window located in the left pane. Now, there you have to select HKEY_LOCAL_MACHINE.
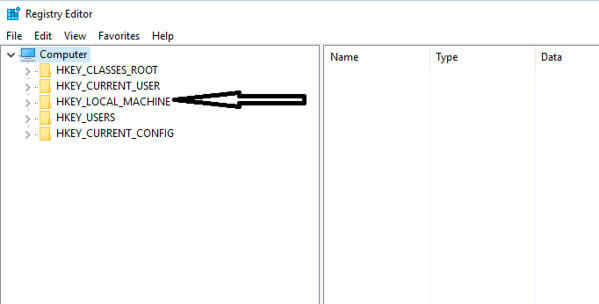
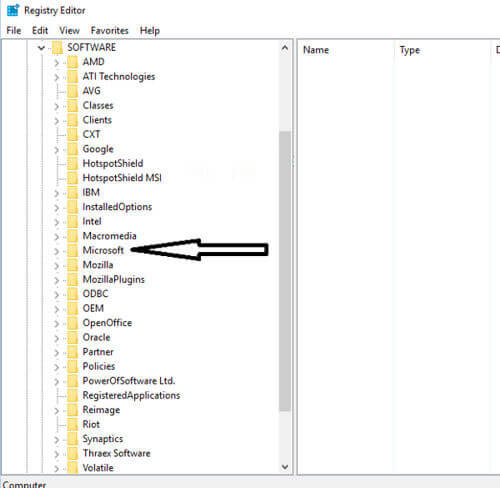
3: This will then reveal some of the folders before you do and then select “SOFTWARE” from the list to view their contents.
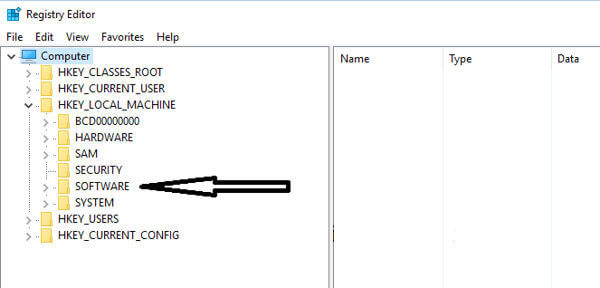
4: After this, try to look for “Microsoft” and then select it when you get.
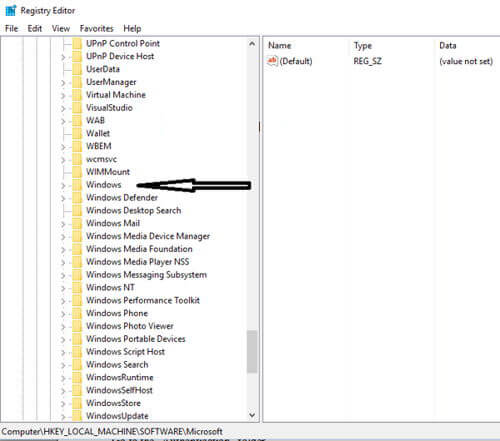
5: Now simply search for “Windows” in the sub-folders that lies at the very bottom of the parent’s folders when the list goes down in the alphabetic order.
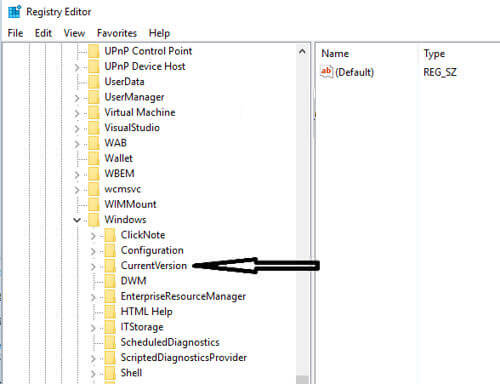
6: After this, you have to search for “CurrentVersion”.
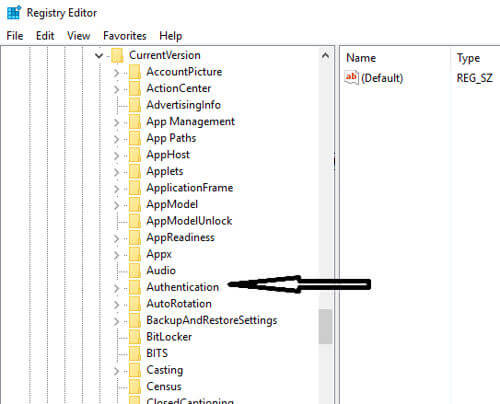
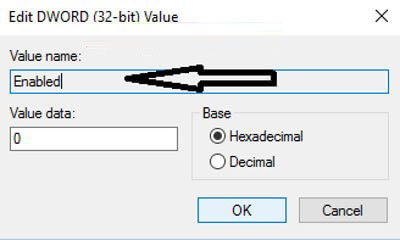
7: Now simply go to the folder named “Authentication”.
8: Now from there, select “LogonUI” just to view the content. When you see “user switch”, just click to edit this. There you will see “Enabled” written in the right pane which needs to be edited. Click this option and try to set it as “Disable” and set the value to zero.
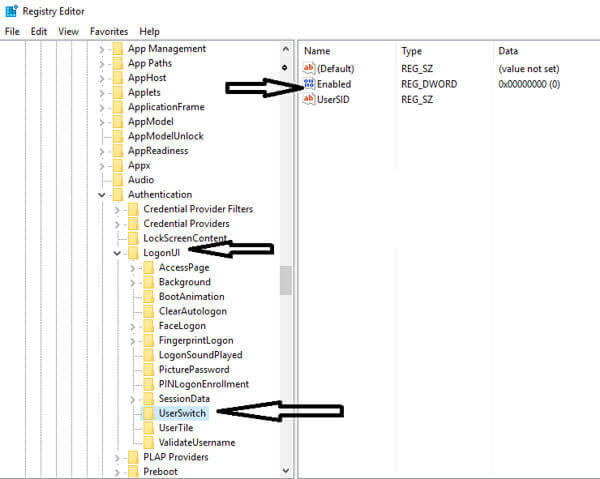
9: After this, just save the changes made by you by clicking “OK”.
With these steps, you will notice that this error does not exist anymore. So, you can then establish a smooth connection in Windows 10 with the remote desktop without any kind of interruptions.
Method 4: Uncheck Printers Option in Remote Desktop Connection
If you notice that your connection crashes with the remote computer again and again then you should just uncheck the Printers option.
For this, you have to first go to Remote Desktop Connection with the use of a search bar. There, you will see its window where there is a category called “Local Devices and Resources” at the bottom of the screen.
You will there see a “Printer” option there and you will also notice that this option is marked by default. So, make sure that you uncheck this option and click “OK” to apply the changes.
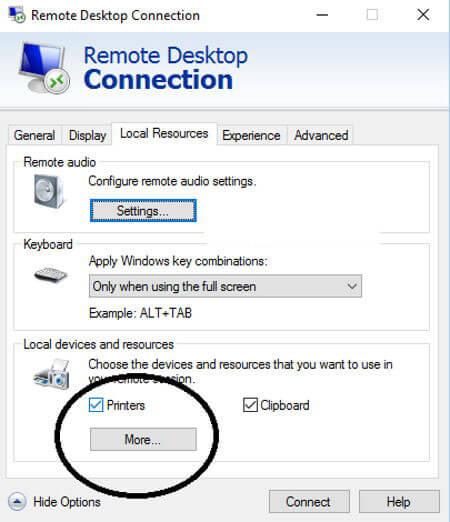
Just try this and start connecting to the remote system that will definitely respond.
Method 5: Audio Playback in Settings
When you open the settings of Remote Desktop Connection, you will notice that the audio playback settings are by default ACTIVE for the remote computer. So, make sure that you disable these settings so that it could not damage the connection in any situation.
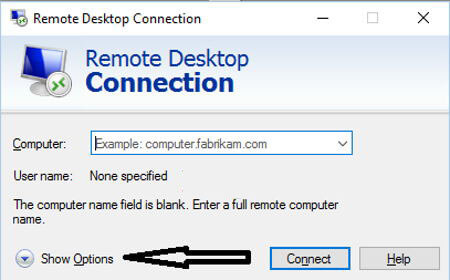
1: First of all, you have to go to the Search box and then type “Remote Desktop Connection” and then press the Enter key.
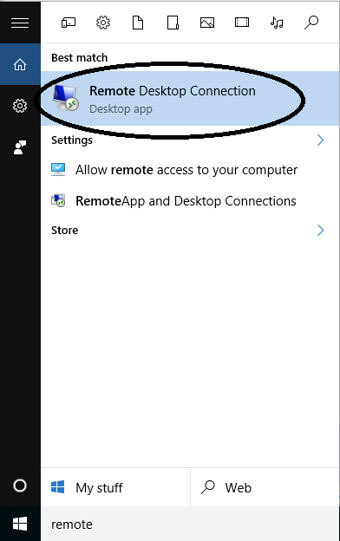
2: There you will see “Show Options” that are linked at the bottom. There, you just have to select this link to open the complete options.
3: After this, you have to click the “Local Resources” tab that actually lies at the top of the window. There you will see the first category appears “Remote Audio”, make sure that you click the “Settings” tab in order to open the options.
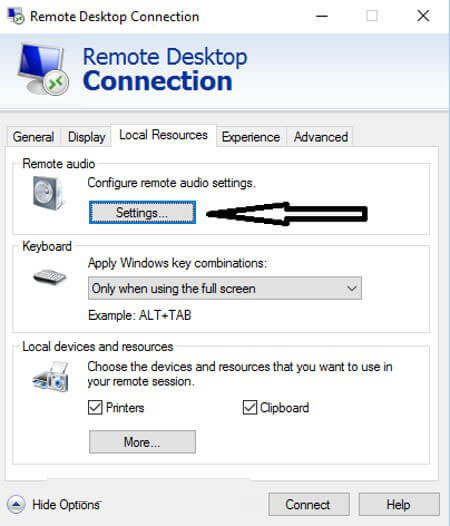
4: Now, you will see playback options where you have to select “Do not play” radio button and then click the option “OK”.
Method 6: Remove the Recently Installed Apps
It may happen that, due to the installation of any new app the feature of remote desktop gets corrupted. Thus, if you have installed some new app in your system, you should remove them to access the remote computer.
For example- FL studio is the best app that is used for music production, but there is more chance that it damages the connection between the Remote desktop and your computer. So, whenever you install FL studio it will install Vorbis.acm in your Windows system files.
You are required to check C:/Windows/System32 and look there for Vorbis.acm file. If this app exists there, you need to rename it as “Vorbis.acm.old” so that it cannot damage your system.
Well, manually uninstalling any program won’t remove the program completely some of its traces and registry entries are left behind. so it is best to use the third party uninstaller to remove the program completely.
Get Revo Uninstaller to remove the program completely
Method 7: Rename Bitmapped Images
If you want to resolve remote desktop connection stopped working windows 10 issue, firstly you are required to back up your previously used bitmap images.
When you will continue establishing a remote connection with your computer having the same setup the ‘Terminal Server Client‘ will saves the copy of images in your system.
How to do so:
- Press “Windows + R” to open the dialog box “Run“.
- Now type “%USERPROFILE%\AppData\Local\Microsoft\Terminal Server Client\Cache.”
- Here you will get some bitmaps files which should be renamed as “.bmc.old.”
- Now, try to connect them.
Try the above-given solutions to fix Remote Desktop Connection Stop working issue.
Best & Easy Solution to Fix Remote Desktop Connection Has Stopped Working
If the above manual solutions fail to work or if after Resolving the Remote Desktop Connection has stopped working issue your device runs slow then you can try the Window Repair Tool. This is a very advanced tool that detects the issue very easily by scanning once and thus fix the various errors of Windows 10.
With the help of this tool, you can fix any kind of error issue such as- application errors, registry corruption, DLL errors, damaged files or other common issues. The best thing is that it is very easy to use, moreover, it not only fixes the errors but also optimizes the Windows PC performance.
Get Windows Repair Tool to Fix Remote Desktop Connection Has Stopped Working
Conclusion
After trying the above all methods, you can easily resolve Remote Desktop Connection has stopped working error in Windows 10. All these methods are very easy to apply so that you can try it without any technical help.
However, if you are unable to follow the given manual solutions than feel free to run the Windows repair tool to fix the remote desktop connection not working Windows 10 error.
Hopefully, the above-given solutions will help you to get rid of RDC stop working issue.
Good Luck…!!
Hardeep has always been a Windows lover ever since she got her hands on her first Windows XP PC. She has always been enthusiastic about technological stuff, especially Artificial Intelligence (AI) computing. Before joining PC Error Fix, she worked as a freelancer and worked on numerous technical projects.