
We all know that steam is one of the most popular digital distribution platforms for PC games, this platform has millions of active users. But according to a report, after upgrading to Windows 10 Steam games fail to start.
This issue can be solved easily if you are unable to play any game on Steam and Windows 10 after upgrading to or installing it then don’t worry as this blog contains the complete solution to get rid of Windows 10 steam game issues. After applying the given tricks you will learn how to fix steam missing executable error.
Most of the discussion or forum sites have a common solution i.e. verifying the game cache. This can fix the steam not running error, but it also downloads the complete game again which is not what nearly everyone wants.
Verifying game cache is not suitable for the users that have 10 or more games on Steam as they have to download every game again. Don’t worry as there is a way to avoid this time-consuming task.
Go through the article to get the complete solution for the game to steam on Windows 10.
How do I Run Steam Games on Windows 10?
Solution 1: Move your Installed Games to a Different Location
- Run Steam and navigate to the game library, search for the smallest game that you have installed and right-click on it.
- Navigate to the Local tab and click on Browse local files.
- The game folder appears, now move all your installed games to one folder above it and that be supposed to fix this error.
- If the game folder doesn’t appear then you need to verify the integrity of the game cache. This step will re-download the game to a new location.
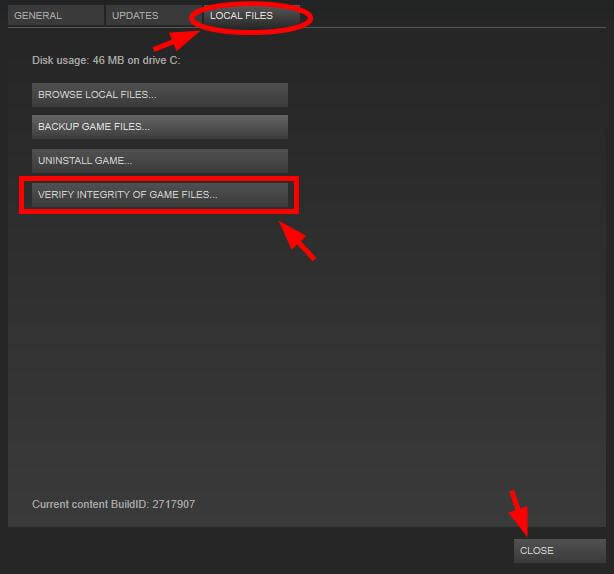
- After verifying game cache, do again steps 2 and 3 in order to find the game directory.
- At last, move all your Steam games to one folder above it.
This will solve steam games running slow on Windows 10 issues.
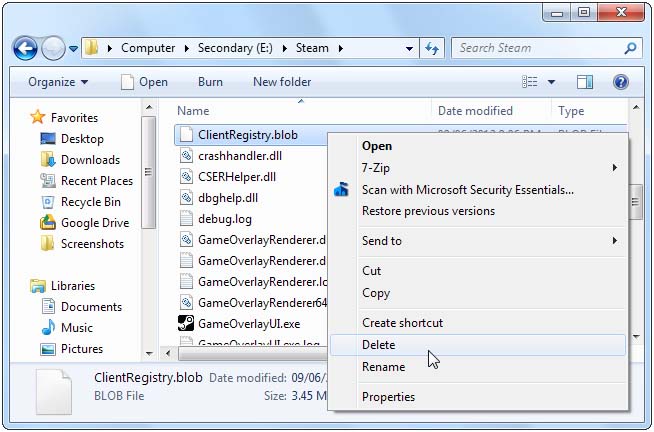
Solution 2: Remove ClientRegistry.blob
If you are unable to run Steam or it fails to run itself or you experiencing any kind of odd issues with games then you should try this trick. Remove the ClientRegistry.blob file, after deleting you’ll have to log back into Steam. This step will also be lost the other local settings,
- You’ll find this file in your Steam folder, go through– C:\Program Files (x86)\Steam by default. Before deleting this file it is recommended to close the steam completely.
Solution 3: Modify the Download Server
Steam is programmed to detect the nearest download server to you, sometimes these download servers can become overfull and affect the games downloading speed. So it is recommended to change your download server.
In order to change your download server follow the steps given below:
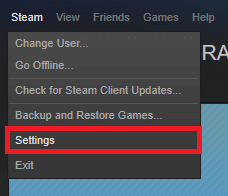
- Click on the Steam menu and choose Settings
- From the Settings window-,> click on the Downloads + Cloud tab
- Choose a different server from the Download region box.
- After changing download server you need to reboot Steam.
Solution 4: Set CPU Affinity
By doing this you can fix the issues appearing when user try to play some older games unable to play with multiple CPU cores on modern computers.
Fix this issue: Run a game-> alt-tabbing out-> open the task manager-> go to the process tab and right-click on the game’s process -> use the Set Affinity option.
Sometimes this option gets unable to solve the problem, if you are unable to solve this problem then don’t worry as another solution is available to fix the glitchy issue until you re-launch the game.
Setup the Steam.exe’s CPU affinity, after doing this you will launch the game through Steam, this will inherit Steam’s CPU affinity and run with the perfect CPU affinity.
Solution 5: Disable Steam Overlay
If you are playing an old Steam game then you may face graphical issues, this issue appears when Steam’s in-game overlay the screen that come into view when user press Shift+Tab while in a game.
In order to disable the overlay for an individual game: right-click on the game in Steam library and choose Properties, and uncheck the Enable Steam Community In-Game checkbox.
Solution 6: Turn off Compatibility Mode
Windows system automatically set the compatibility mode settings for certain programs, Windows also run Steam in compatibility mode when they start crashing. If Steam finds that it’s running in compatibility mode, then it will display a message: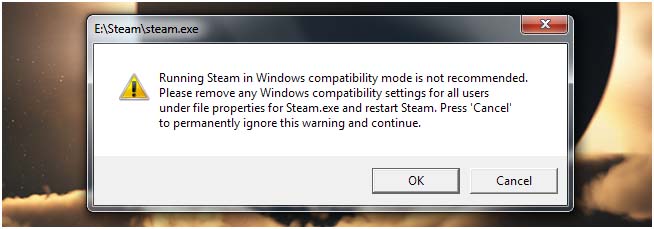
- You can also don’t see any compatibility settings when you right-click on the Steam shortcut and go to the Properties.
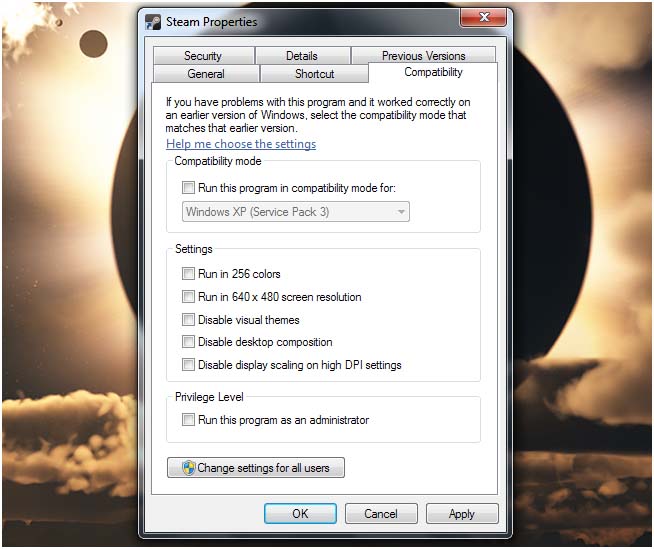
This setting is hidden by the Windows when the compatibility mode setting is applied. In order to remove this, you need to use the registry editor.
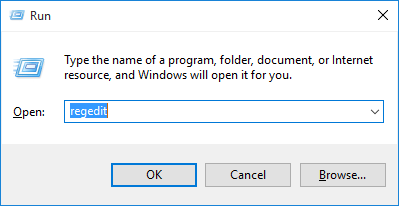
- Open the registry editor window: Click on the Start
- Type Regedit into the Start menu, and hit Enter key.
- After that, you need to browse the:
HKEY_CURRENT_USER\Software\Microsoft\Windows NT\CurrentVersion\AppCompatFlags\Layers key in the registry editor.
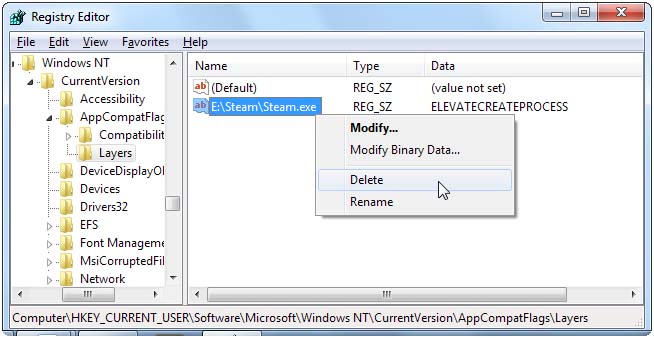
- After finding it, delete any values related with Steam.
After doing the above-given operation you can launch steam on windows 10 without any compatibility mode errors.
Conclusion
All the above-given tips and tricks are very effective, if you are suffering from any kind of steam games running slow on windows 10 issue then you can easily deal with them via the given solutions.
Apply the solutions one by one as it will help you to fix steam Windows 10 issues.
Hope you like this article and you got your problem’s solution.
Apart from this if you want to share any questions or have any queries regarding this article then write to us in the below comment section.
Hardeep has always been a Windows lover ever since she got her hands on her first Windows XP PC. She has always been enthusiastic about technological stuff, especially Artificial Intelligence (AI) computing. Before joining PC Error Fix, she worked as a freelancer and worked on numerous technical projects.