In order to make your Windows 8 and 8.1 System’s Hard Drive free from any types of errors, you need to apply some error checking tricks on your system.
By making your system’s HDD error-free you can easily protect your files, photos, videos, and other data stored in it.
It is one of the essential parts of turning a slow Computer or Laptop into an efficient and error-free Windows 8 system. When it comes to boosting the system performance and repair storage errors, then checking HDD becomes one of the necessary things to do.
So, if you are suffering from any type of issues like unable to open an application or file then it may be time to verify your system’s hard drive for errors with the help of Windows built-in disk checking utility, CHKDSK (check disk).
Windows 8.1 and 8 allow their users to scan their PC’s hard drives (both internal and external) for potential issues and fix them with ease.
Even if the hard drive of your computer has never encountered any crash. The hard drives may encounter physical and logical errors that lead to malfunctioning and in format or in the data stored in the drive. If the PC encounters a power failure and file corruption then the hard drive gets the victim of logical file corruption.
The Hard Drive errors are immediately noticeable as the most logical errors do not let the PC crash and they may not affect the files that you are using which are often unnoticeable.
Windows 8 automatically scans each hard drive on the system from time to time. You can even manually scan the drives at any time after power failure etc. Microsoft makes it easy for you in Windows 8 by providing you with an error checking feature that you can reach from the hard drive’s properties panel.
Checking the hard drive for errors is a very simple process in the Windows system. Windows has an integrated a series of tool that helps the users to determine whether their hard drives contain any type of error or not.
In many cases, Windows are efficient enough for repairing those errors instantly. Hard drives errors may be scary if one experiences it for the first time. Apart from this users are always recommended to use power backups to secure and protect their documents. You need to have a backup on the separate physical drive so that you can use them whenever your hard drives crash upon.
How to check Windows 8 Hard Drive for Errors by build-in utility:
In order to start the HDD scanning process, you have to right-click on the Drive which you want to check for the error then choose Properties.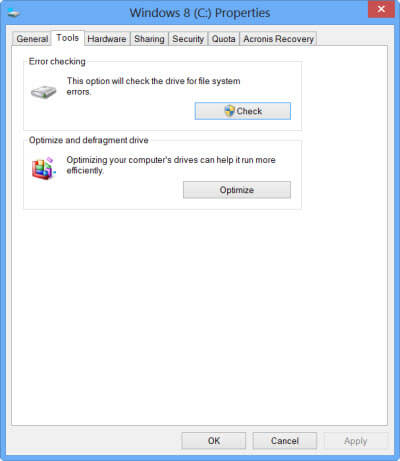
After it, go to the Tools tab, and under the Error-checking option, click on the Check button. With the help of this feature, you can check the drive for file system errors.
If the Error Checking tool detects any errors inside the disk then it will ask to check the disk completely. But, in case it doesn’t detect any error then display a message – “You don’t need to scan this drive.”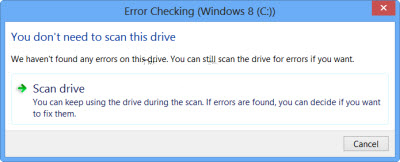
But if you want to check the HDD then choose to check the drive and then click on the Scan drive to start the scanning process.
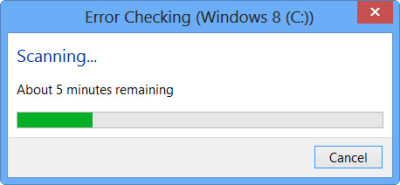
Once you start the scanning process, it will take less than 5 minutes to verify your entire drive for any types of problem and errors.
After the completion of the Disk Scanning Process, if no error is detected then Windows will display a message.
“Windows successfully scanned the drive. No errors were found”
 But, if it detects any errors then you will see the following message:
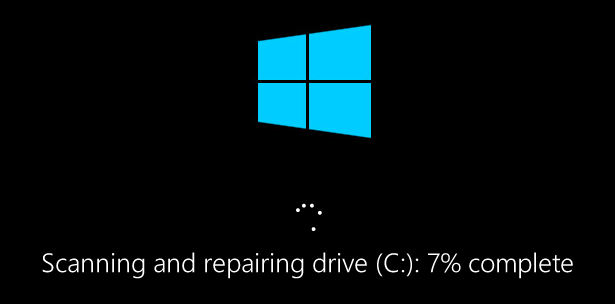
“Restart your computer to repair the file system.”
You should restart your system right away to fix all the detected errors.
 You can also see the complete details via the Event Viewer; it will display the relevant log.
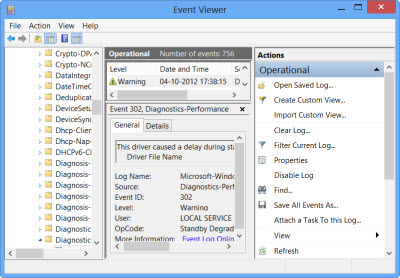
Check the Drive via chkdsk using Command Prompt
If you want to check for the disk error using the command prompt then you have to open the Command Prompt with the admin privilege. To do this, follow the below-given steps one by one:
Click on the Start button and, type in cmd then right-click on it and select Run as administrator.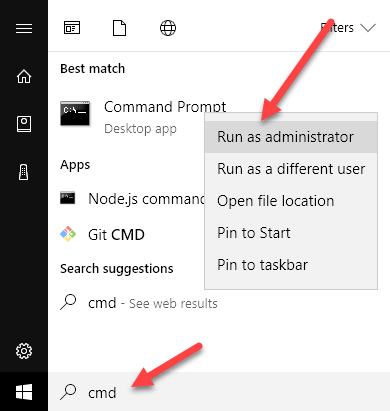
Now, you have to run the chkdsk command on the command prompt, go to the command window and type in the following command:
chkdsk c: /f /r /x
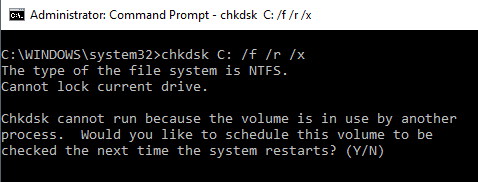 That’s all, this command will scan and fix all the errors present on your system’s hard disk drive.
Conclusion
After fixing the Windows system disk error, it is suggested to scan your entire Computer or Laptop with the help of a professional PC Repair Tool. This is the tool that specially programmed to scan and fix all the errors present on any Windows system.
It is very simple to scan your PC via this tool, and you don’t need to do anything manually. Simply download, install and run this software on your PC.
This will automatically scan your entire computer and show the scanned result after it clicks on the Fix All to get rid of all the errors present on your PC/Laptop.
Hardeep has always been a Windows lover ever since she got her hands on her first Windows XP PC. She has always been enthusiastic about technological stuff, especially Artificial Intelligence (AI) computing. Before joining PC Error Fix, she worked as a freelancer and worked on numerous technical projects.