Finding your Windows computer dealing with the high CPU usage problem due to the “system interrupts” processes in the task manager.
Wondering what is System interrupts and how to fix system interrupts 100 CPU problem then in this article you will get to know the complete information related to troubleshooting the problem.
To fix Windows system files corruption, we recommend Advanced System Repair:
This software is your one stop solution to fix Windows errors, protect you from malware, clean junks and optimize your PC for maximum performance in 3 easy steps:
- Download Advanaced System Repair rated Excellent on Trustpilot.
- Click Install & Scan Now to install & scan issues causing the PC problems.
- Next, click on Click Here to Fix All Issues Now to fix, clean, protect and optimize your PC effectively.
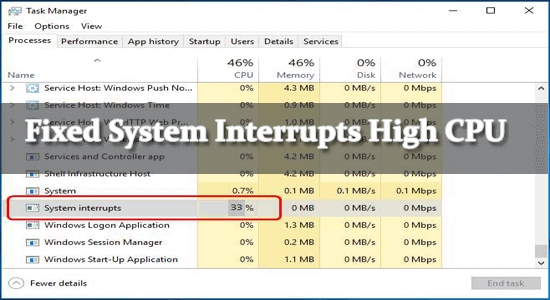
What is System Interrupts?
System interrupts is a certified part of the Windows operating system and accomplish the communication between computer hardware and systems. This can be displayed as a process in Task Manager and shows the CPU usage for entire hardware interrupts.
Well, the System interrupts process pretends as a CPU alarm system and if any condition requires the CPU attention then the system interrupts will prompt the processor of the high-priority condition.
And after that, the CPU recesses its work, saves it, and practices the important work and as the work is done, it will then return to its original state.
But if there are plenty of interrupts, then some errors might appear at the hardware level and this is the reason why they start compiling plenty of resources and cause system interrupts 100 CPU.
Luckily there are fixes that work for you to troubleshoot the System interrupts process hogging CPU problem.
Quick Solution: Reboot your PC
Restarting your system is a quick and easy way to solve various internal glitches causing the system to malfunction and stop running properly.
So, a complete reboot will give a fresh system restart by cleaning up the RAM as well as the processor cache. Therefore very first reboot your system and check if the system interrupt issue gets fixed.
Now if you are still encountering high CPU usage problems then start following the step-by-step instructions to troubleshoot the problem in no time.
How to Fix System Interrupts High CPU?
Solution 1 – Unplug External Hardware & Check Hardware Failure
Here it is advised to remove the external hardware such as the keyboard, mouse, external hard drive, webcam, printer, etc. as this conflicts with the system resources and may cause a system interrupt 100 CPU problem.
Remove the device one by one and after unplugging the external hardware check if the problem is resolved. But if the problems still persist then check for the hardware failure issue.
Follow the steps given:
- Check the hard disk health by running the WMIC (Windows Management Instrumentation Command-line) command in the command prompt.
- To do so open the command prompt type wmic and hit Enter
- And type diskdrive get status and hit Enter
- This will help you in fixing the hard disk issues.
- Run the inbuilt Memory Diagnostic tool to verify the RAM issues
Hope this works for you to identify the hardware failure causing the problem.
Solution 2 – Update Hardware Driver
If the system hardware driver gets corrupted or outdated then this might be a reason responsible for the system interrupts high CPU problem in Windows.
So, here it is suggested to update your device drivers, follow the steps to do so:
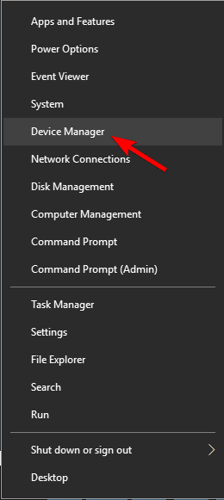
- Press the Windows + X key > to start a quick access menu. And click Device Manager
- Now expand the dialogue box and right-click on the device then select Update driver.
- Then select Update driver and click Search automatically for updated driver software.
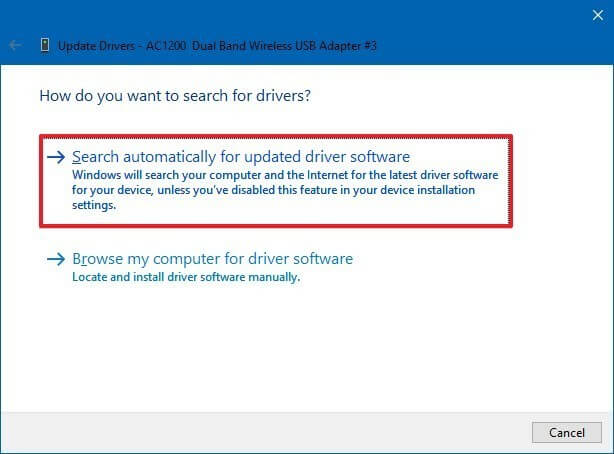
- You can see Windows start searching for the device driver update
After updating one device driver, repeat the steps to update all the drivers.
Well, updating the device drivers manually is very tiresome and time-taking, so here it is suggested to update the drivers by running the automatic Driver Updater. This is just by scanning once detects and updates the drivers automatically.
Get Driver Updater to update drivers automatically
Solution 3 – Disable Internal Devices
Now if after updating the hardware drivers you are still dealing with the problem, then here it is recommended to disable particular device drivers to locate the culprit one.
Here has a look at the internal devices you need to disable.
- Internal sound devices
- Network adapters
- Internal modems
- Add-on cards, like TV tuner cards, modems, DSL or ISDN adapters.
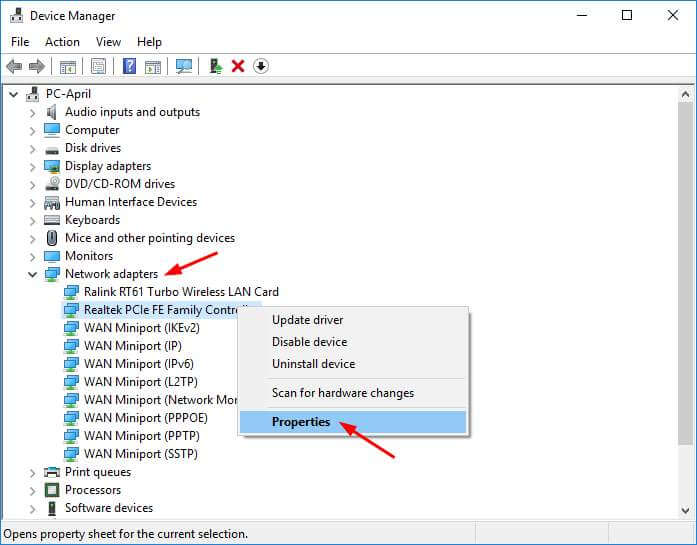
All these devices will be disabled easily via the Device Manager. Here follow the steps to disable the Network adapters.
The network adapter can wake the computer while transmitting data and plenty of interruption during the process. Therefore to end the system interrupts high CPU disable the feature.
Follow the steps to do so:
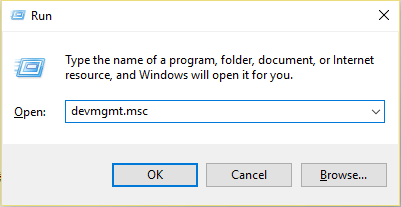
- Press Windows + R key and in the Run dialog box type devmgmt.msc press Enter to open Device Manager.
- Then expand the Network adapters dialog box
- Right-click on the network adapter and select Properties.
- Then switch to the Advanced tab under Property, scroll down to locate the Wake on Magic Packet, and Wake on Pattern match.
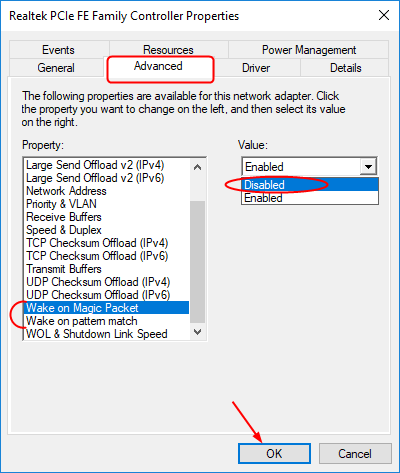
- And from the drop-down menu, set their value to Disabled
- Lastly, save your settings and click OK.
Solution 4 – Disable USB Root Hubs
Disabling the USB root hubs will simply stop the external hardware from interrupting the CPU which might be resulting in showing a system interrupts 100 CPU problem
Follow the steps to do so:
- Right-click on the start menu and from the menu choose Device Manager
- Locate and click to expand the Universal Serial Bus controller’s dialogue
- Now right-click on the USB Root Hub and select Properties
- Next, switch to the Power tab and verify if the mouse and keyboard are using the root hub. But if not then disable it.
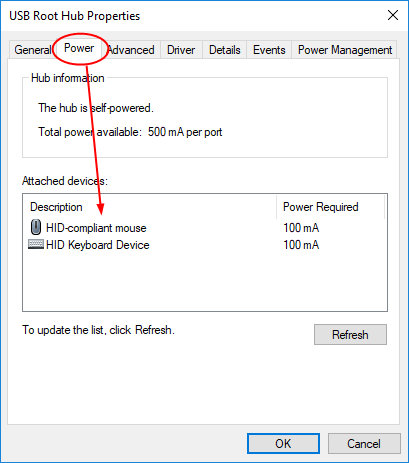
- Make sure to disable all root hub exceptions for your keyboard and mouse.
Next after disabling the USB Root hubs > go to the task manager and verify whether the problem is resolved.
Solution 5 – Disable Windows Fast Startup
If you have enabled the Windows fast startup feature then disabling it may work for you to solve the problem.
Follow the steps to do so:
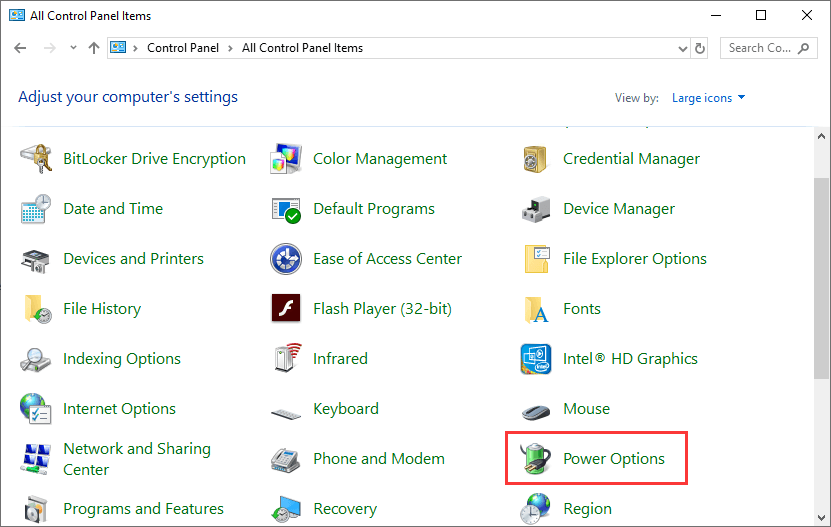
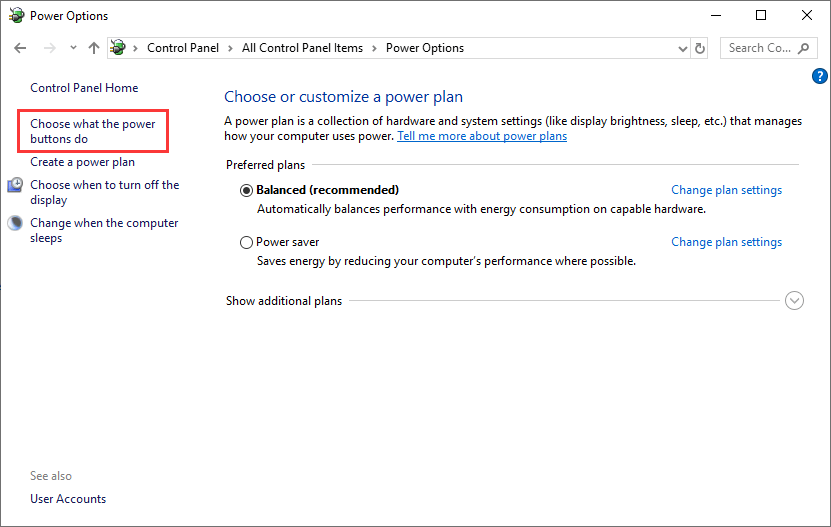
- In the Windows search box type cmd and open the Control panel to open it.
- Then In the Control Panel click Power Options
- Now click Choose what the power buttons do on the left side.
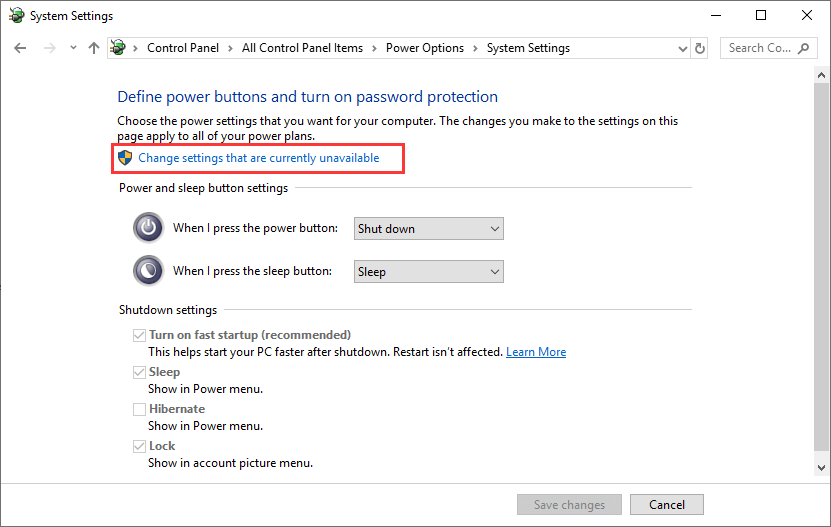
- And select the option Change Settings that are currently unavailable, this needs administrative privileges.
- Then uncheck the box next to Turn on fast startup > at the bottom of the screen.
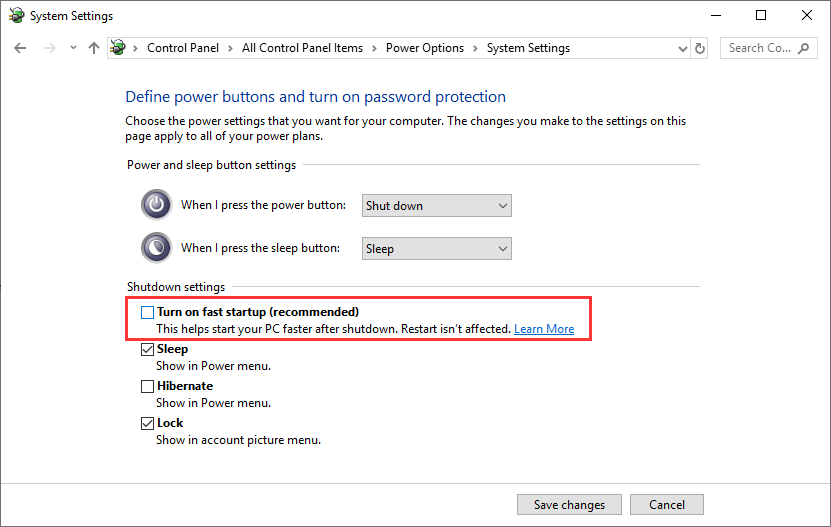
- Next, save changes > exit
Now restart your computer and verify if the problem is resolved or not.
Solution 6 – Turn OFF Audio Enhancements
The sound driver uses enhancement for improving the sound quality but in some cases, these properties are incompatible with the system and this may cause the system interrupts problem.
So, here try disabling the Audio Enhancement feature as this may work in your case to fix the problem.
Follow the steps given to do so:
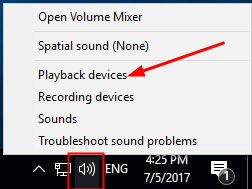
- In the system, tray right-click on the speaker icon
- And double-click the Default Device (speaker) > and open Properties
- Move to the Enhancements tab > checkmark the box that shows Disable all sound effects.
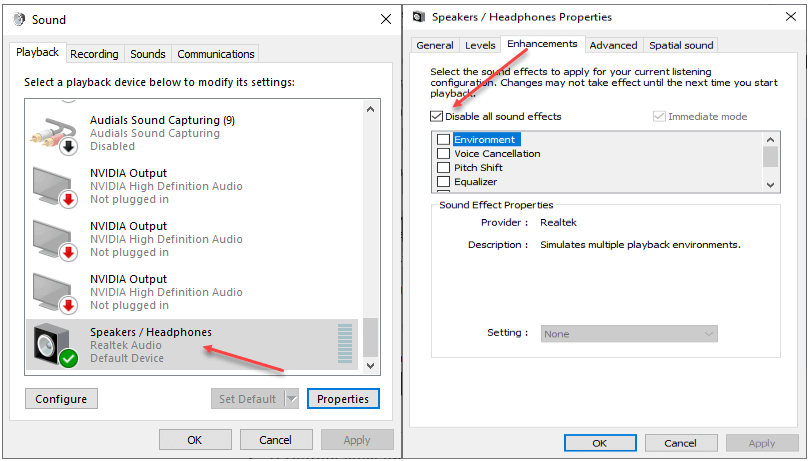
- Now click OK to save the changes > exit the setting
Check if the Windows system interrupts high CPU is fixed or not. But if not then enable the audio enhancement feature.
Solution 7 – Update Your BIOS/UEFI
If the above solutions won’t work for you then the outdated BIOS could be the culprit causing system interrupts issues.
So here try to update the BIOS to solve the problem. And to do so, first, verify the BIOS version you are running.
- In the search box type CMD > and open Command Prompt to open it
- Next, type the given commands one by one and hit Enter after each
- systeminfo | findstr /I /c:bios
- wmic bios get manufacturer, smbiosbiosversion
Now after identifying the BIOS version go to the manufacturer’s website to update the BIOS and follow the instructions given.
Well, updating the BIOS is a bit complicated a small mistake can damage your system and may cause your system unbootable so be careful while following the steps.
And, before updating the BIOS, make sure to back up the system disk.
Recommended Solution – Increase Windows System Performance
Here it is advised to run the PC Repair Tool, this is an advanced and multifunctional tool that just by scanning once detects and fixes computer issues and errors.
This is an alternative solution to get rid of the computer-hogging resources and optimize Windows PC performance.
With this, you can also fix many computer fatal errors like BSOD errors, DLL errors, Runtime errors, repair registry entries, and much more.
This is completely safe to use, so feel free to scan your system and make it blazing fast.
Get PC Repair Tool, to Fix Errors and Optimize PC Performance
Conclusion:
So, this is all about the system interrupts high CPU problems. Here I tried to list down all the possible solutions to troubleshoot the issues and start using your Windows system with ease.
Make sure to follow the list of solutions one by one carefully. Hope the article turns out to be useful and fixes the given works for you.
If there is anything that I missed out, or you have any queries then you can write to us on our Facebook Page. Also, don’t forget to shoot the like button.
Good Luck..!
Hardeep has always been a Windows lover ever since she got her hands on her first Windows XP PC. She has always been enthusiastic about technological stuff, especially Artificial Intelligence (AI) computing. Before joining PC Error Fix, she worked as a freelancer and worked on numerous technical projects.