Killer Network Service is running in the background and causing high CPU usage on Windows 11. Wondering what is (KNS) Killer Network Service and why it is running in the background?
In this tutorial know everything about the Killer Network Service application and how to stop Killer Network Service on Windows 11 and fix the high CPU usage problems.
So without further ado, let’s get started..!
What is Killer Network Service?
A Killer network service is a service which runs in the background. This service monitors and optimises all the processes and the network connections in your computer to provide a good gaming experience.
This one is not a Windows service but it has a very bad reputation due to some reasons. This can cause serious performance issues for your computer and there is malware available on the web with the same name.
Is Killer Network Service Harmful For My PC?
Killer Network Service is not harmful to your computer. It is a service that optimises everything to make your gaming experience better and more enjoyable.
But some viruses and malware disguise themselves with its name. So if you want to check if the one present in your computer is a legit service or a malware then follow the steps mentioned below:
- Click on my computer.
- Then click on the Path Bar and paste the path
- C:\Program Files\killernetworking\killercontrolcenter
- Now right-click on every file available as the name of Killer Network Service and click on the Properties option
- Check if the path mentioned there is the same or not. If not, delete the file as it can be malware.
How to Stop Killer Network Service High CPU Usage?
There can be multiple reasons for high CPU usage and in case the Killer Network Service High CPU Usage is the reason for the high CPU usage of your computer, then here are ways to fix this.
#1 – Disable the Killer Network Service
Here it is suggested to disable the Killer Network Service, as disabling it stops the KNS service from using CPU and causing the high CPU usage issues.
Follow the steps to do so:
- Press Windows + R key to open the Run box and here type services.msc in the search bar.
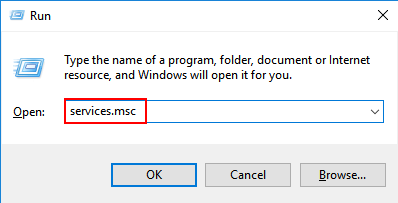
- Then click on the Services option.
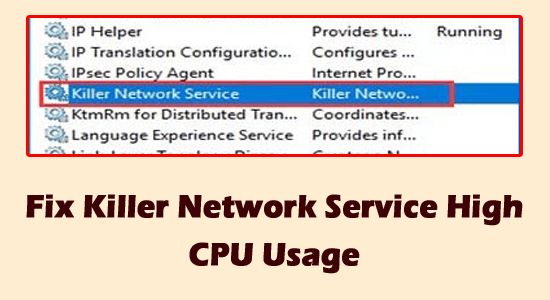
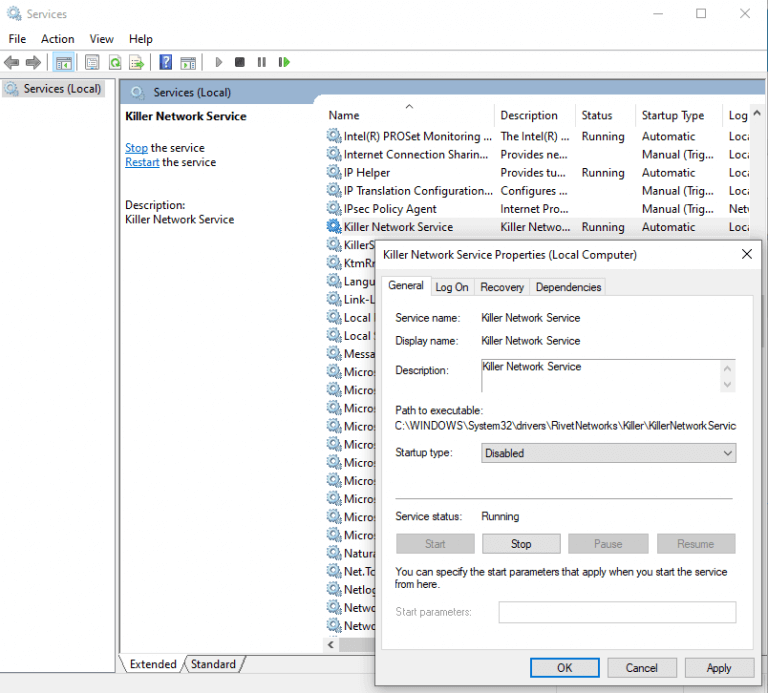
- Now scroll down and find Killer Network Services.
- And click on it and click on the Stop button available in the general section.
#2 – Change the Power Settings Of the Computer
Changing the power settings of your computer can also help you to boost the performance of your computer. To change the power settings of your computer follow the steps mentioned below:
- Click on the Start Menu and search for settings in the Search
- And click on the System
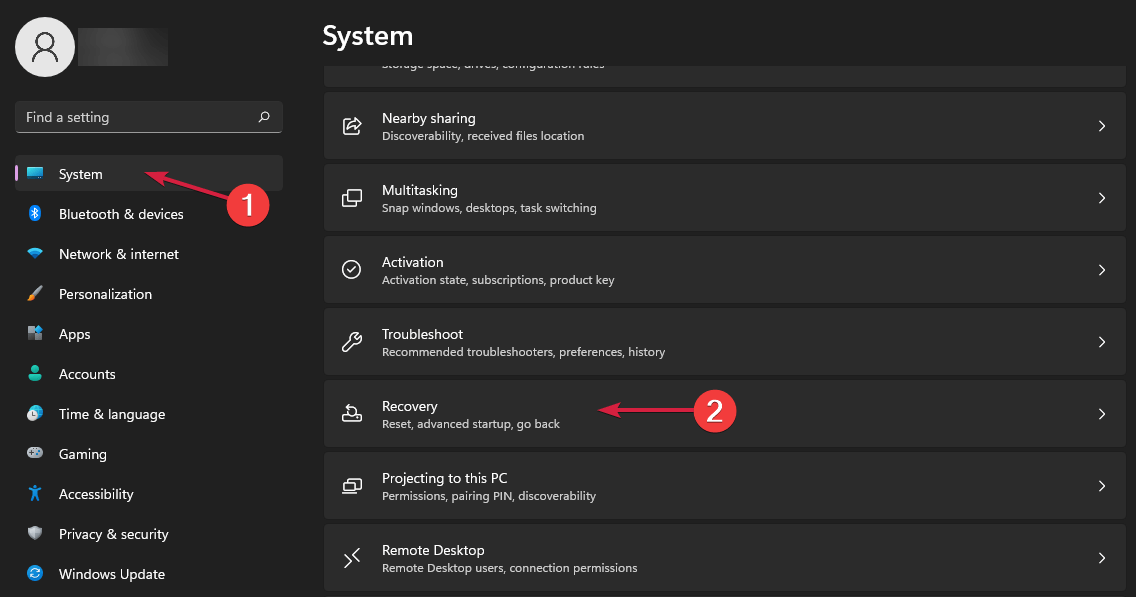
- Click on the Power and Sleep option available on the left side.
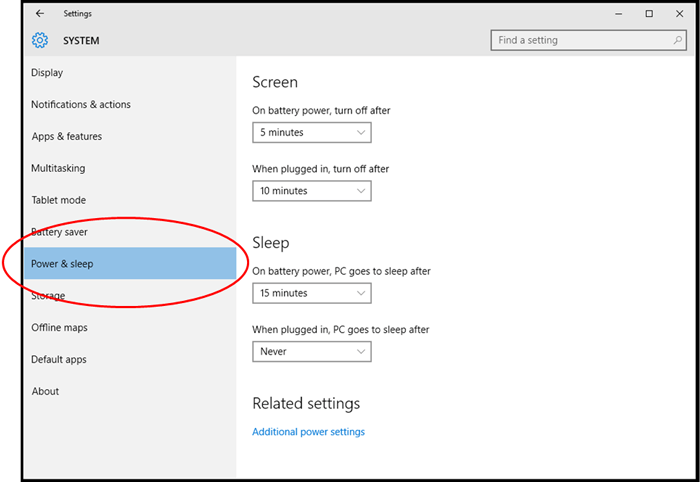
- Then click on the Additional power settings
- Now click on the High-performance option.
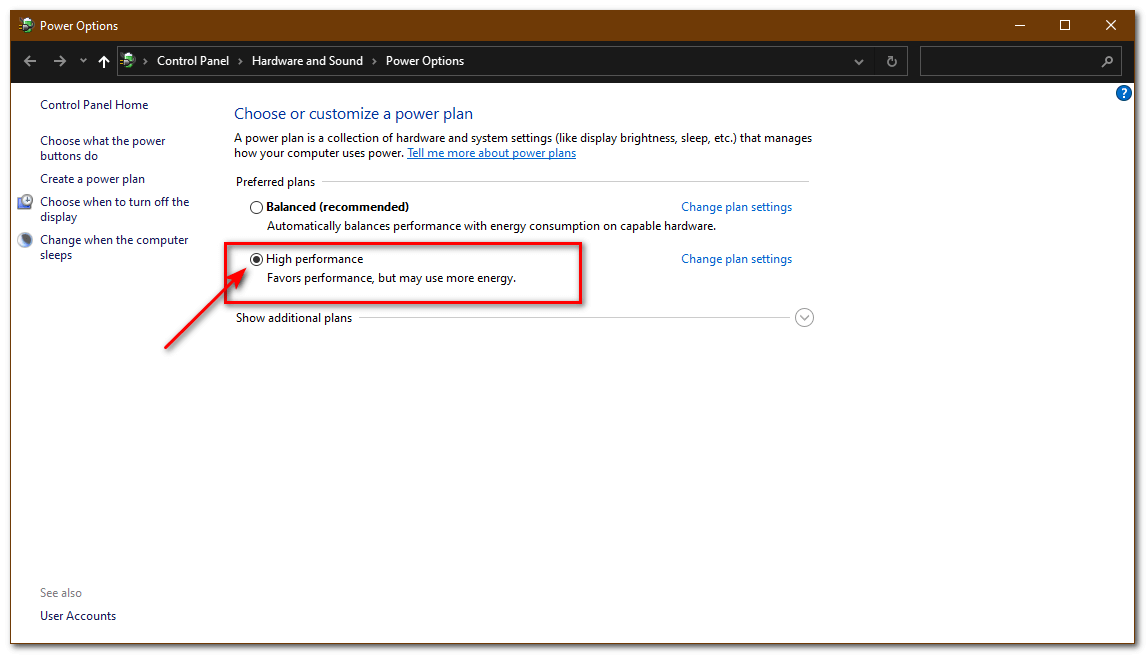
By enabling this mode, your computer will be able to fetch the highest performance from the CPU.
#3 – Using Command Prompt
Performing the Restore health command on your Windows system worked for several users to solve the high CPU usage caused by the KNS application on Windows 11.
- Click on the Start icon and search for CMD in the search bar.
- Now click on the command prompt and launch it.
- Then in the command prompt type dism.exe/online/clean-image/Restorehealth and hit Enter.
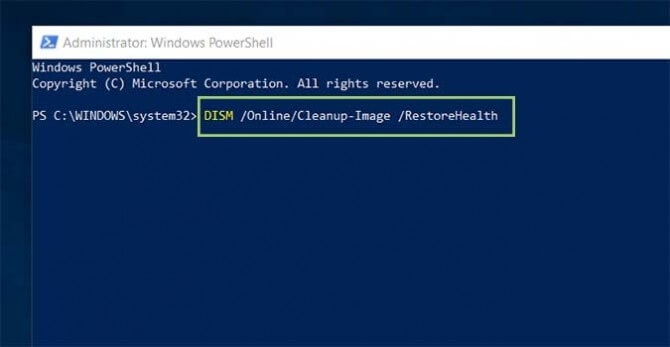
- Wait for the scanning to get finished (takes approx. 30 min.)
- This will automatically repair your system and enhance its performance.
Now check if the high CPU problem is resolved then well and good, but if still facing the problem then uninstall the application on your Windows system as this may work for you.
How to Uninstall (KNS) Killer Network Service?
You can try uninstalling the KillerService.exe Windows process if you don’t want it on your computer or if it is causing you any trouble. As it is not a Windows file, uninstalling it will impact other processes less. So to uninstall the Killer Network Service follow the steps mentioned below:
- Click on the Start button and search for the Control Panel in the search bar.
- In Control Panel, search for Programs and Features.
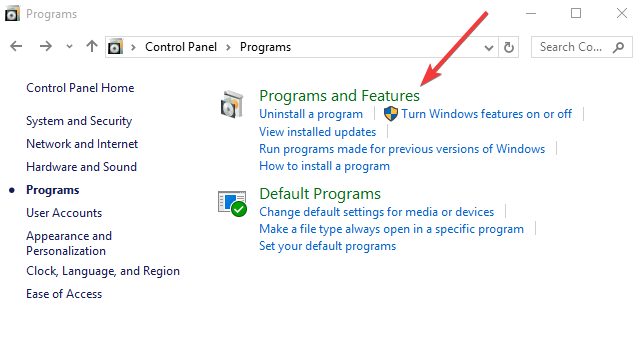
- Then find Killer Network Service in the list and right-click on it and click on the Uninstall
- Now restart your device and check if the high CPU usage issue is resolved or not.
Recommended Solution to Fix High CPU Usage Problem
If your PC is running slow due to various unwanted services running in the background and showing high CPU usage then it is recommended to scan your system with the PC Repair Tool.
This is a multifunction tool that just by scanning once detects and fixes various Windows issues and repairs corrupted system files, protects your system from file loss and much more.
It is also capable to fix other PC issues like BSOD errors, DLL errors, repair registry entries, runtime errors, application errors, and many others. So, feel free to download and install the tool.
Get PC Repair Tool, to Fix Windows 10 Issues & Errors
Conclusion:
So, this is all about Killer Network Service in Windows 11.
Here I tried my best to list down every detail related to the application and how to disable as well as uninstall the application.
Also, follow the steps to fix Killer Network Service high CPU usage problem on Windows 11.
Hope our guide works for you to solve the problem in your case. Also, we love to hear from our readers, do let us know which solution works for you. Also, do like and share the article on our Facebook page.
Good Luck..!
Hardeep has always been a Windows lover ever since she got her hands on her first Windows XP PC. She has always been enthusiastic about technological stuff, especially Artificial Intelligence (AI) computing. Before joining PC Error Fix, she worked as a freelancer and worked on numerous technical projects.